> For the complete documentation index, see [llms.txt](https://docs.avonnicomponents.com/llms.txt). Markdown versions of documentation pages are available by appending `.md` to page URLs; this page is available as [Markdown](https://docs.avonnicomponents.com/flow/tutorials/components/timeline/assigning-multiple-source-collection-to-the-timeline.md).
# Assigning multiple source collection to the Timeline
## Overview
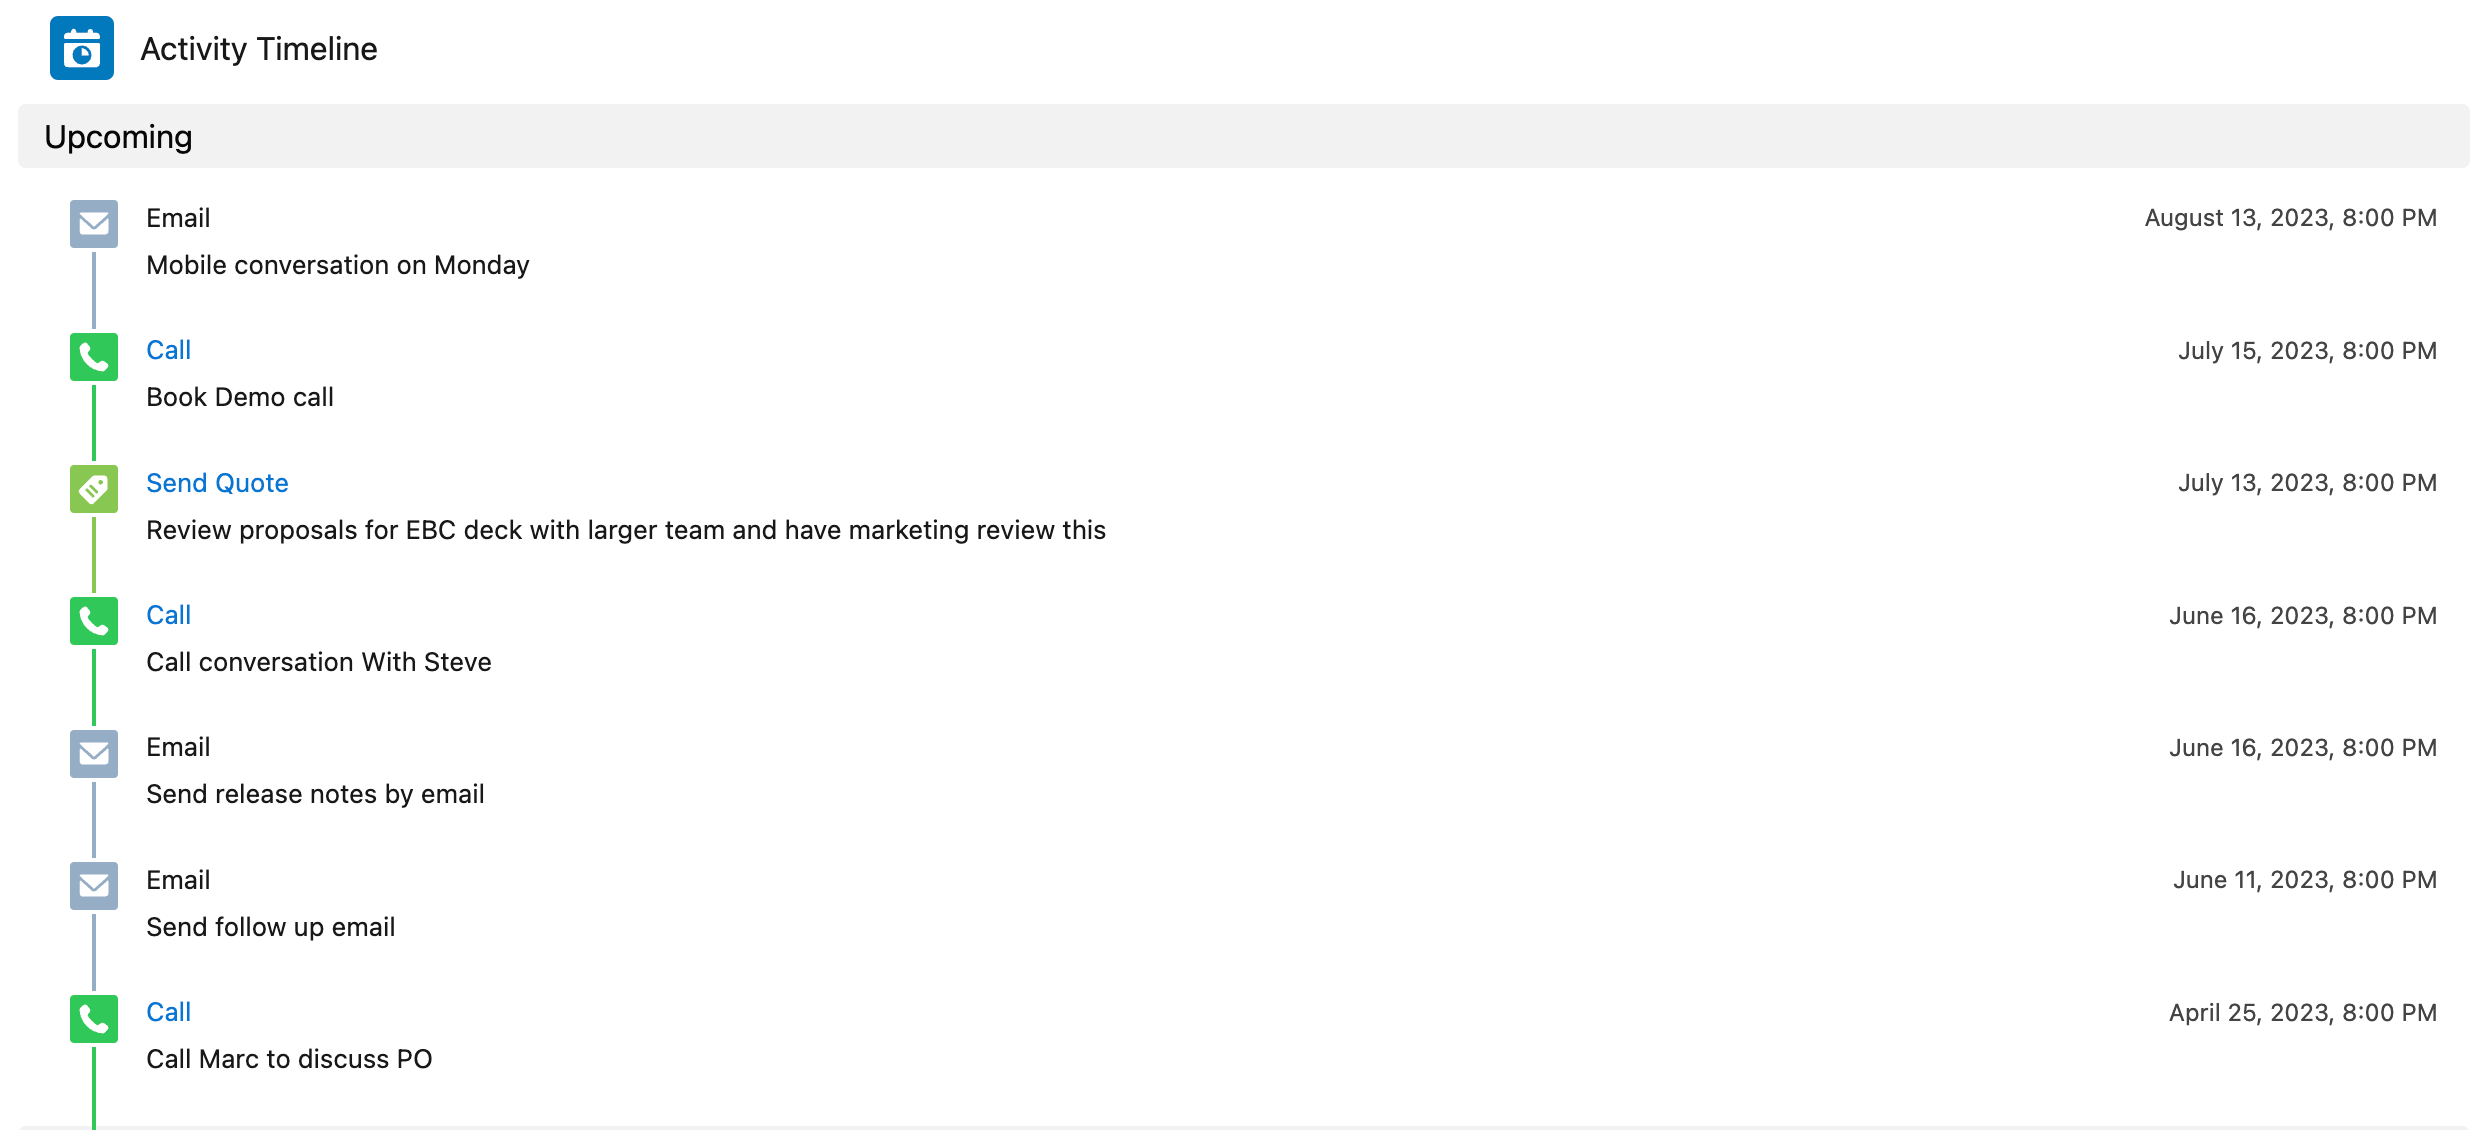
The[ Timeline component](/flow/flow-components/timeline.md) is designed to help display information visually and in a well-structured format. In this particular use case, the Timeline component showcases activities from multiple sources, organized according to a timeline view.
## Step 1: Creating your source collection
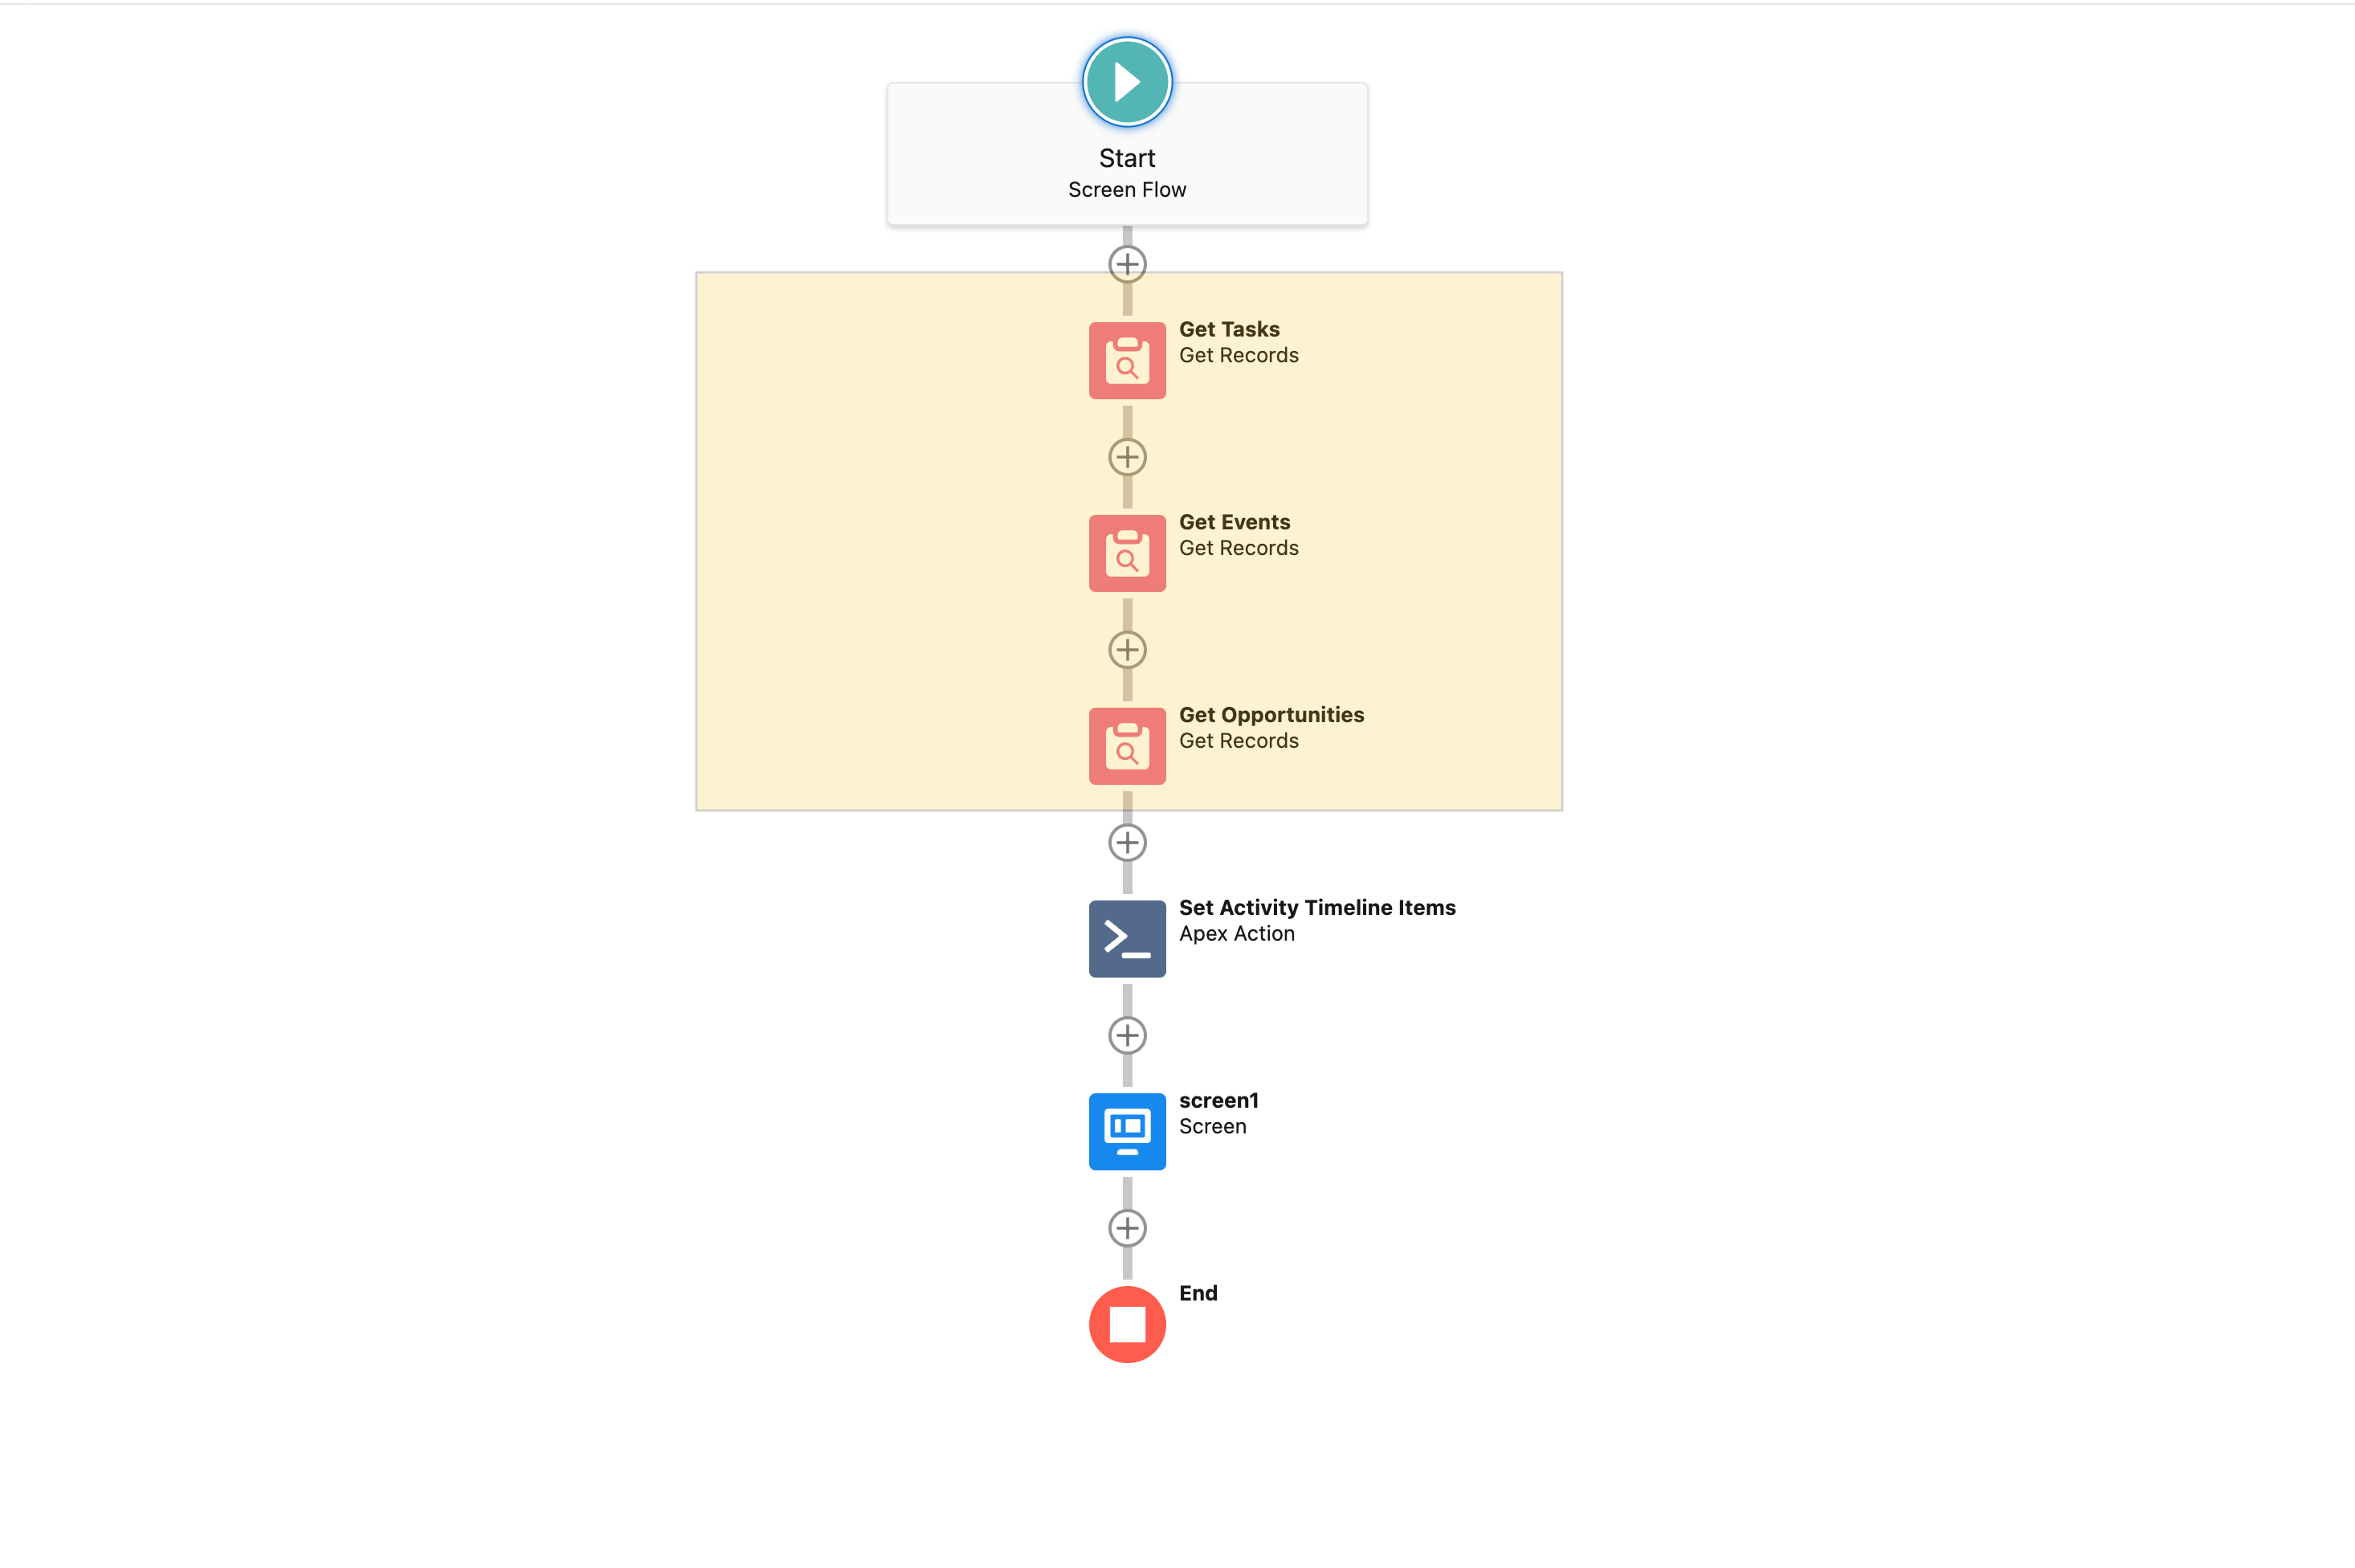
Initiate the creation of your source collections: Before assigning several source collections to the Activity Timeline component, develop the collections you wish to utilize. Within the Flow Builder, employ the 'Get Records' action to generate your collection variables (e.g., Collection1, Collection2, Collection3) to fetch data from multiple sources."
## Step 2: Adding the Avonni Timeline Items action
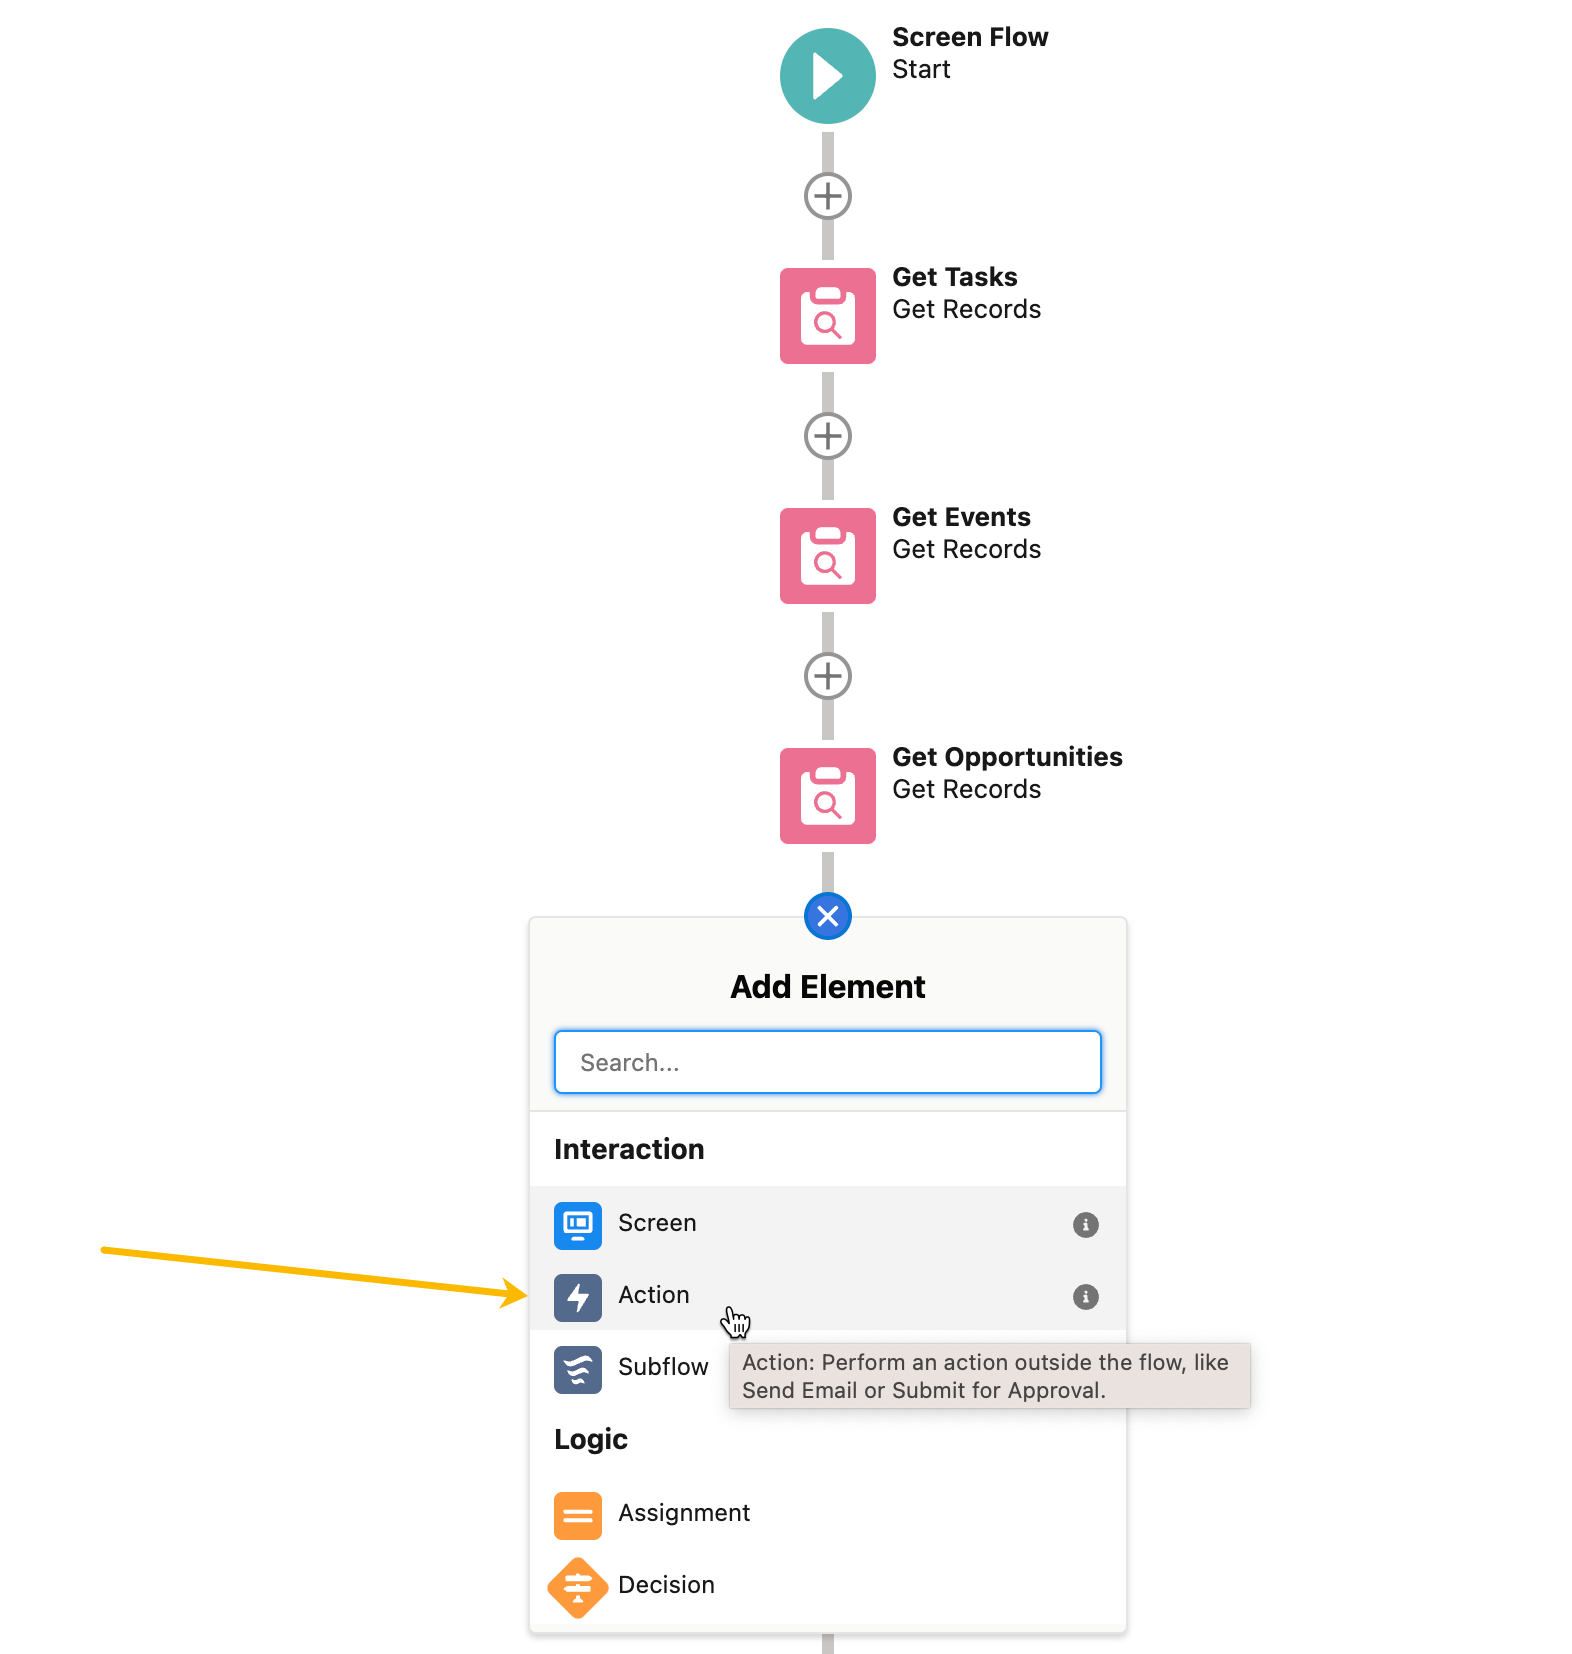
In this step, you will add the *`SObject Collection to Activity Timeline Items`* Avonni Action to your flow. This action allows you to convert your source collections into a format compatible with the Activity Timeline component.
1. **Add an Action element**: In the Flow Builder, click the + sign and select "Action"
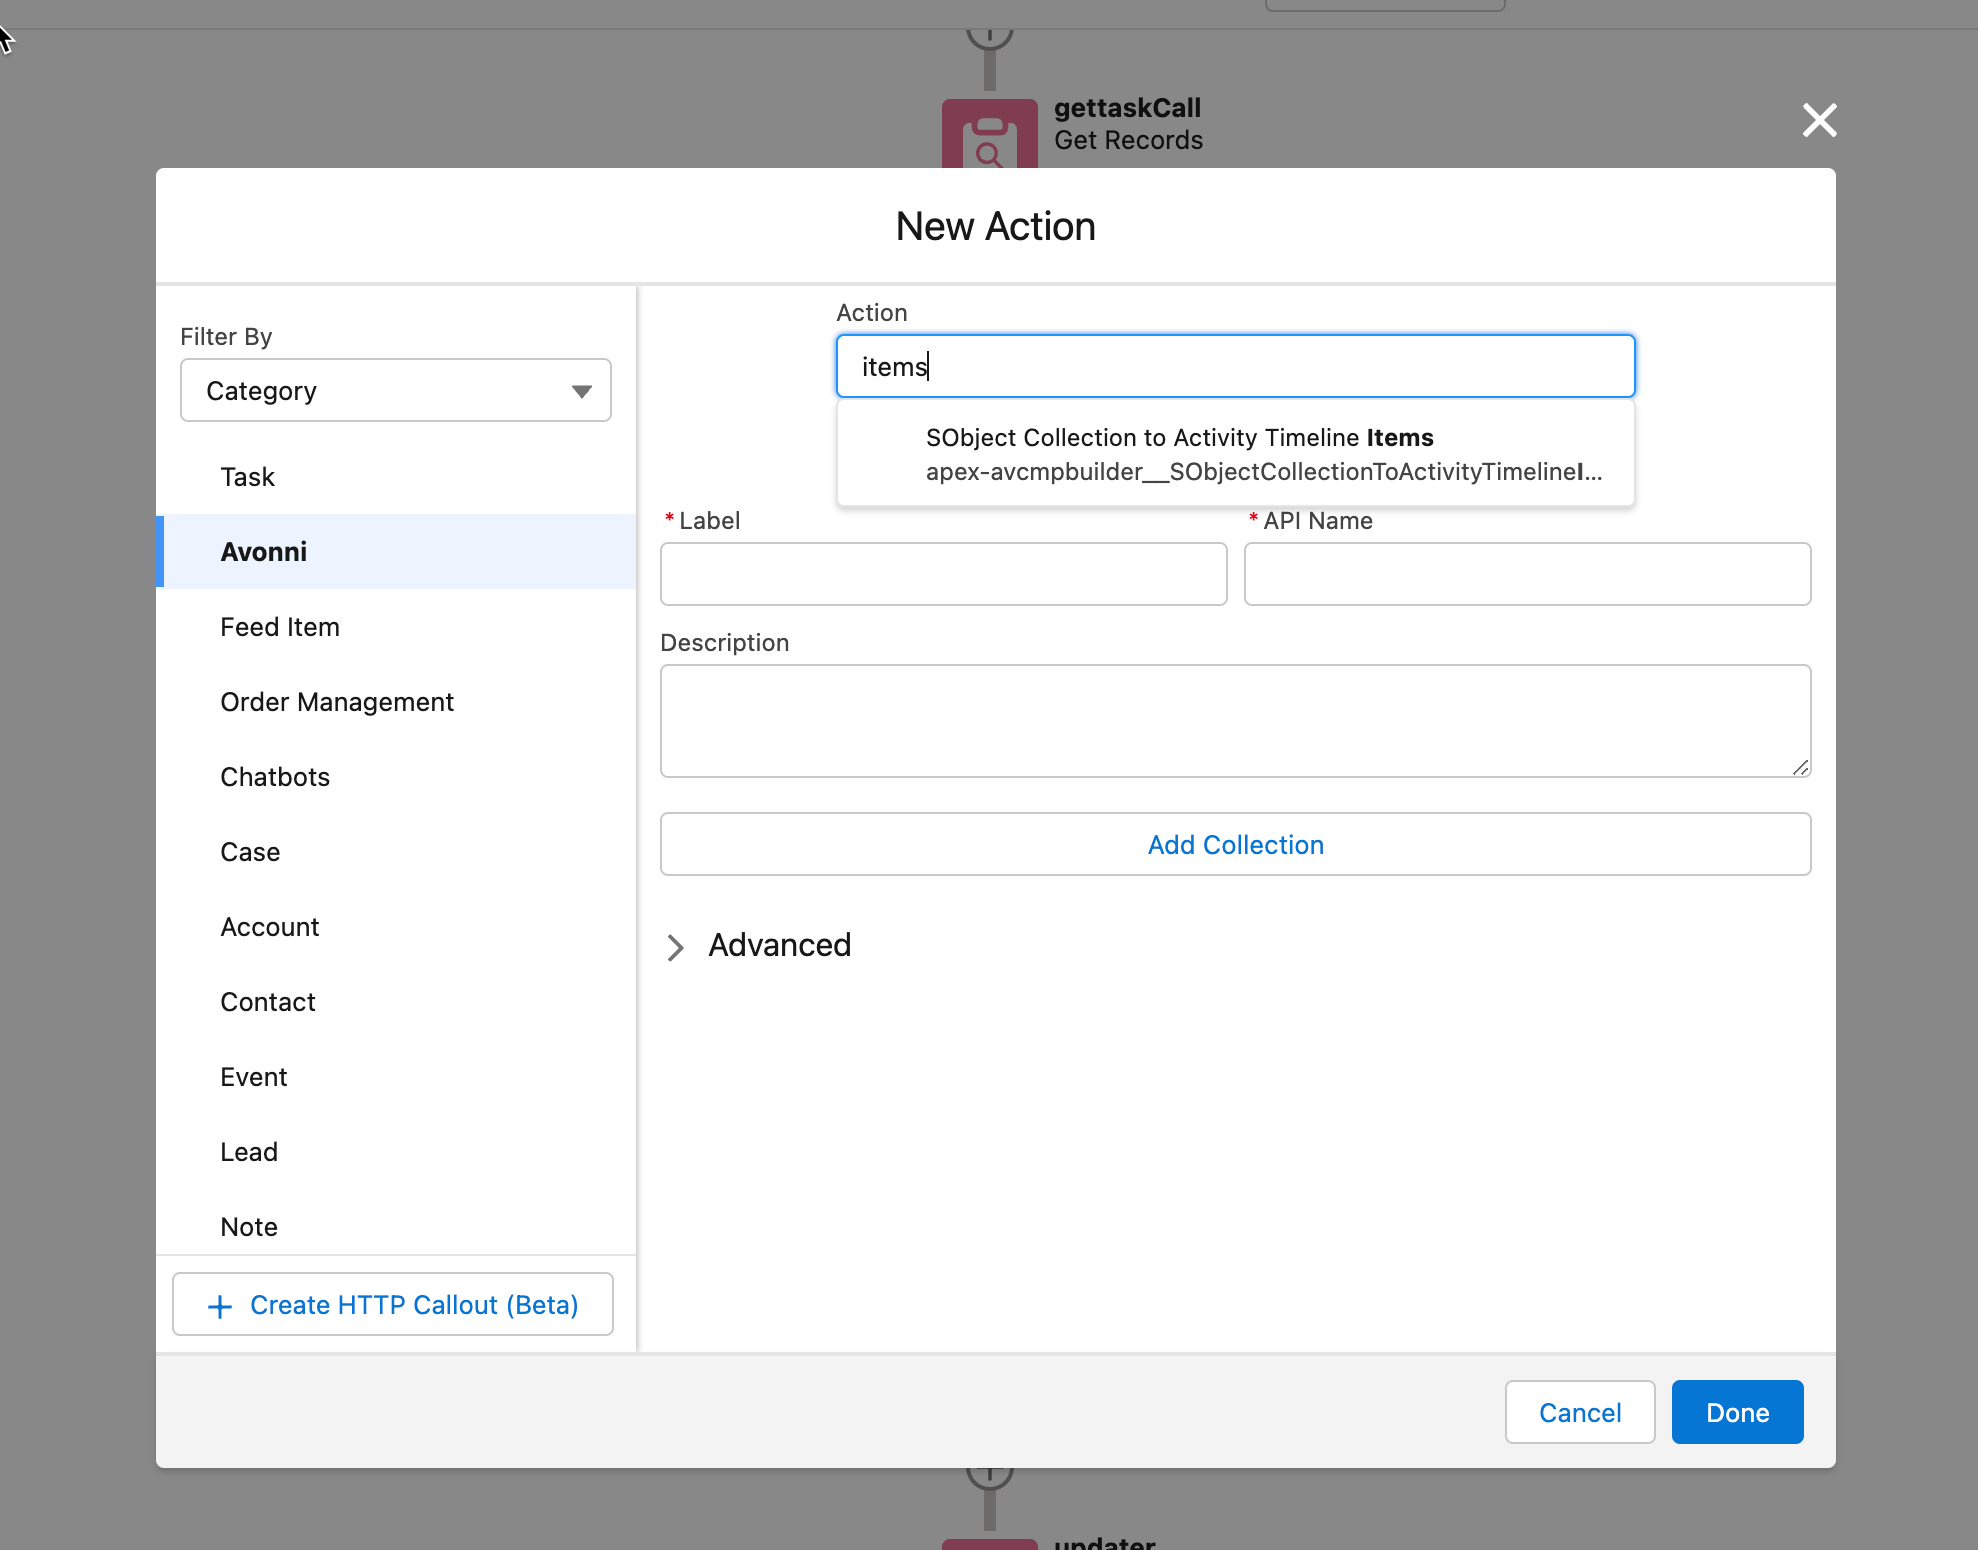
2. **Select the Avonni category**: In the filter panel for the Action element, select Avonni.
3. **Choose the `SObject Collection to Activity Timeline Items Action`**: In the Avonni category, select the '**`SObject Collection to Activity Timeline Items`**' action. This action will enable you to transform your source collections into a format compatible with the Activity Timeline component.
## Step 3: Configuring the action
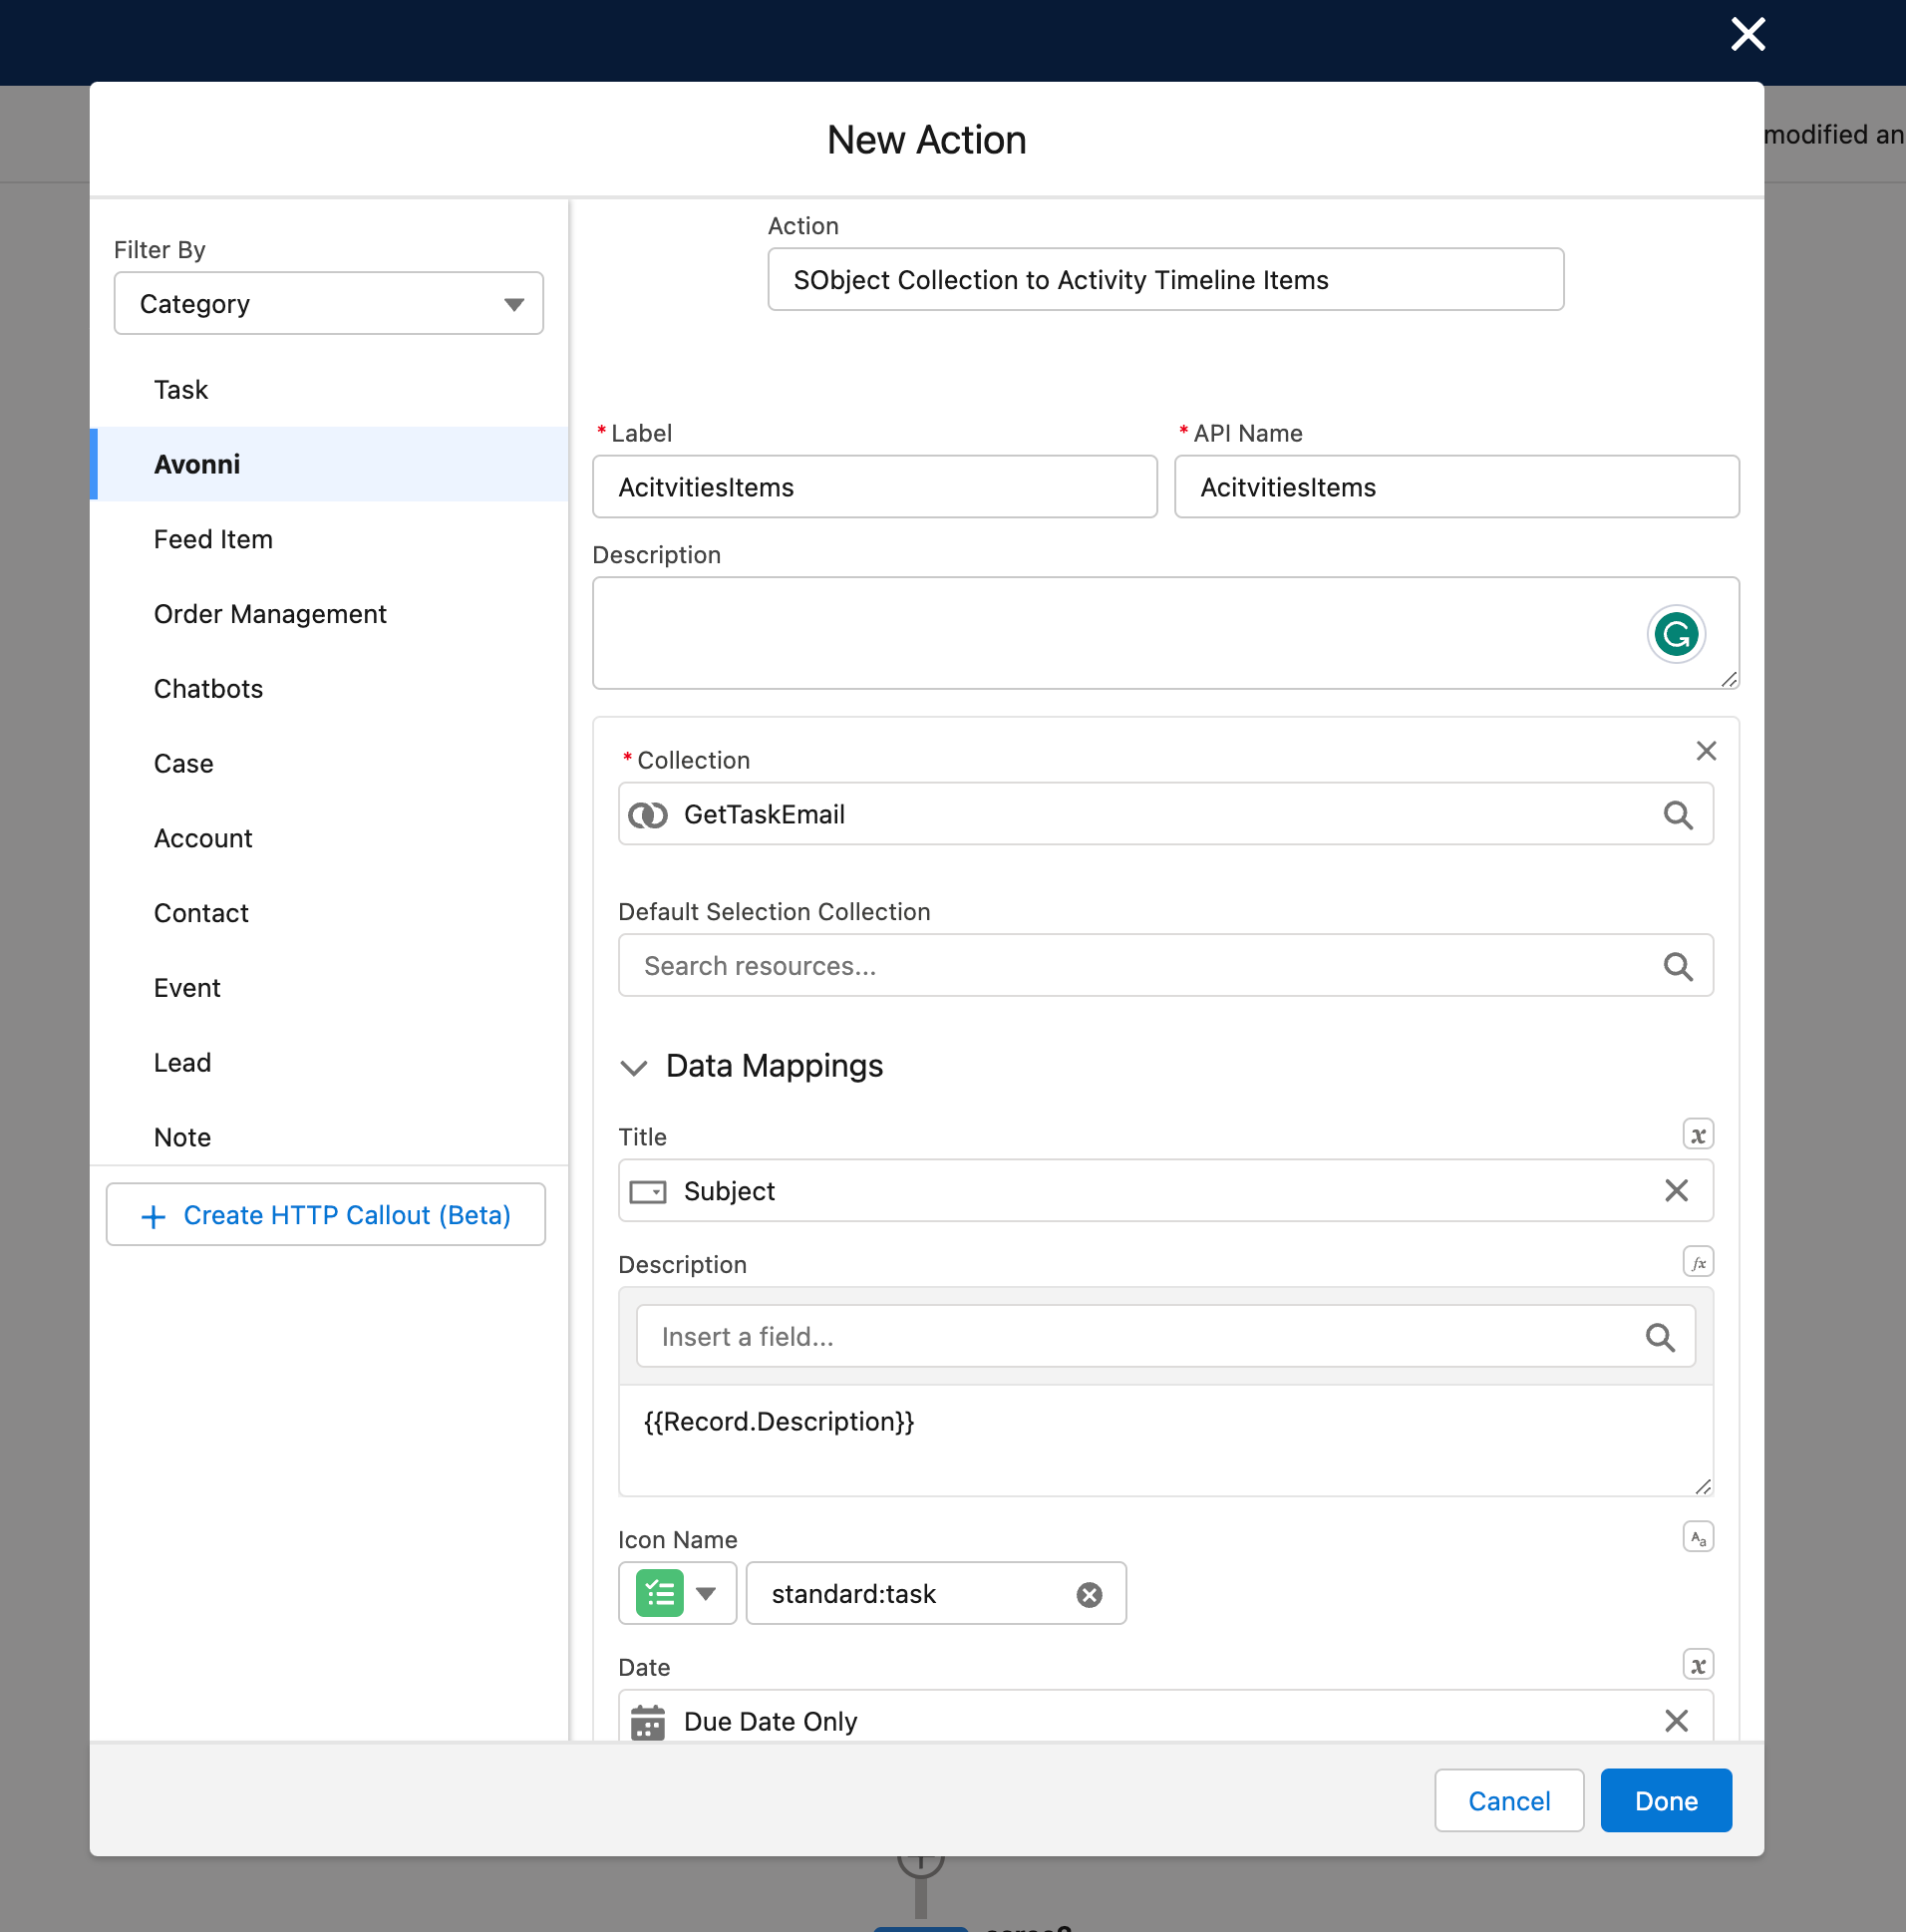
In this step, you will create your collections using the '**`SObject Collection to Activity Timeline Items`**' action added in [Step 2](#step-2). For each collection, you will select the corresponding Get records collection created in [Step 1](#step-1) and map the data accordingly.
1. **Configure collections**: Create your collection within the properties panel of the '**`SObject Collection to Activity Timeline Items`**' action. You can create up to 10 collections.
2. **Select Get records collection**: For each collection, click the 'Add Collection' input field and select the appropriate Get records collection created in [Step 1](#step-1). This step ensures that each collection is associated with its corresponding source collection.
3. **Map the data**: After selecting the Get records collection for each input field, specify the fields displayed in the Activity Timeline component. This includes fields like 'Date', 'Title', 'Subtitle', 'Icon', and others, depending on your specific use case. Be sure to map these fields from the source collection to the corresponding input fields in the action. This process ensures the data is correctly formatted for display within the Activity Timeline component.
{% hint style="info" %}
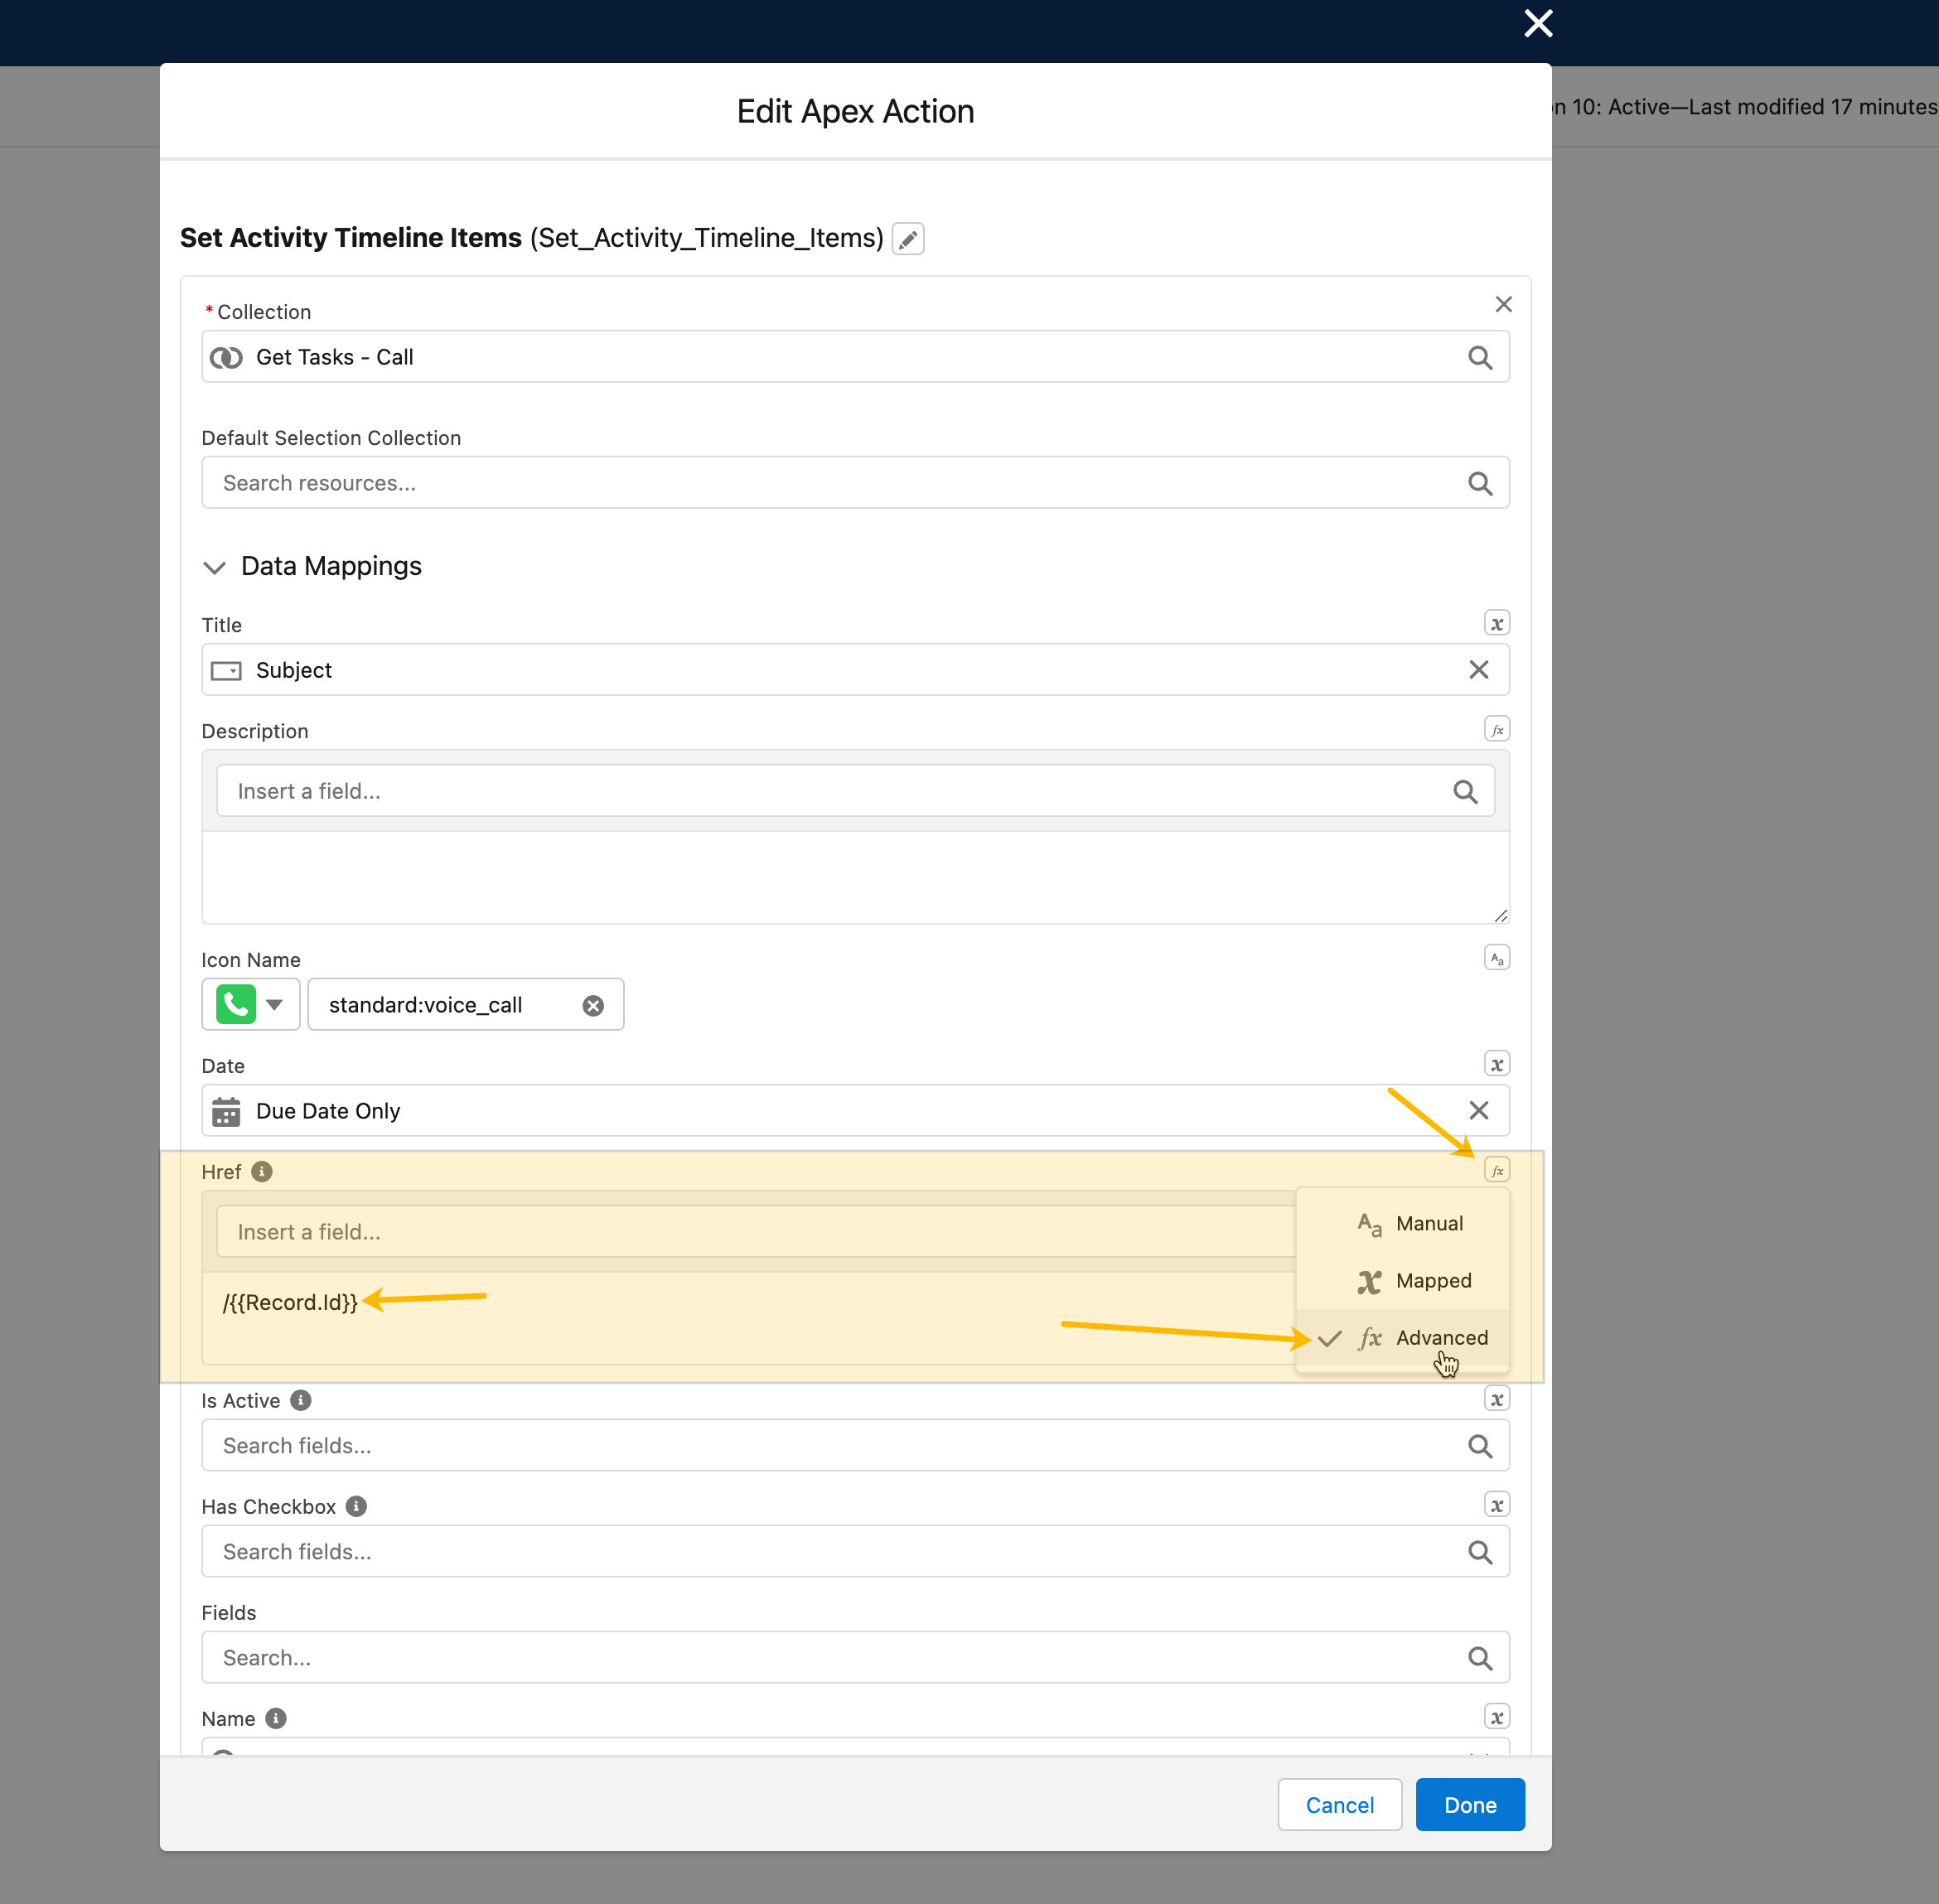
To enable a link that will navigate directly to the record page. To accomplish this, follow the steps below:
1. Locate the **`href`** section of the component you want to add the link to.
2. Click on the variable button located within the **`href`** section.
3. Select "**Advanced**" from the available options.
4. Now, in the text description, add the following snippet: **`/{{Record.Id}}`**
By adding **`/{{Record.Id}}`** to the text description, you are setting up a redirection to take users to the appropriate record page when they click the activity title.
{% endhint %}
## Step 4: Configuring action advanced settings
In this step, you'll set up advanced settings for the '**`SObject Collection to Activity Timeline Items`**' action to manually assign variables and create a new variable resource.
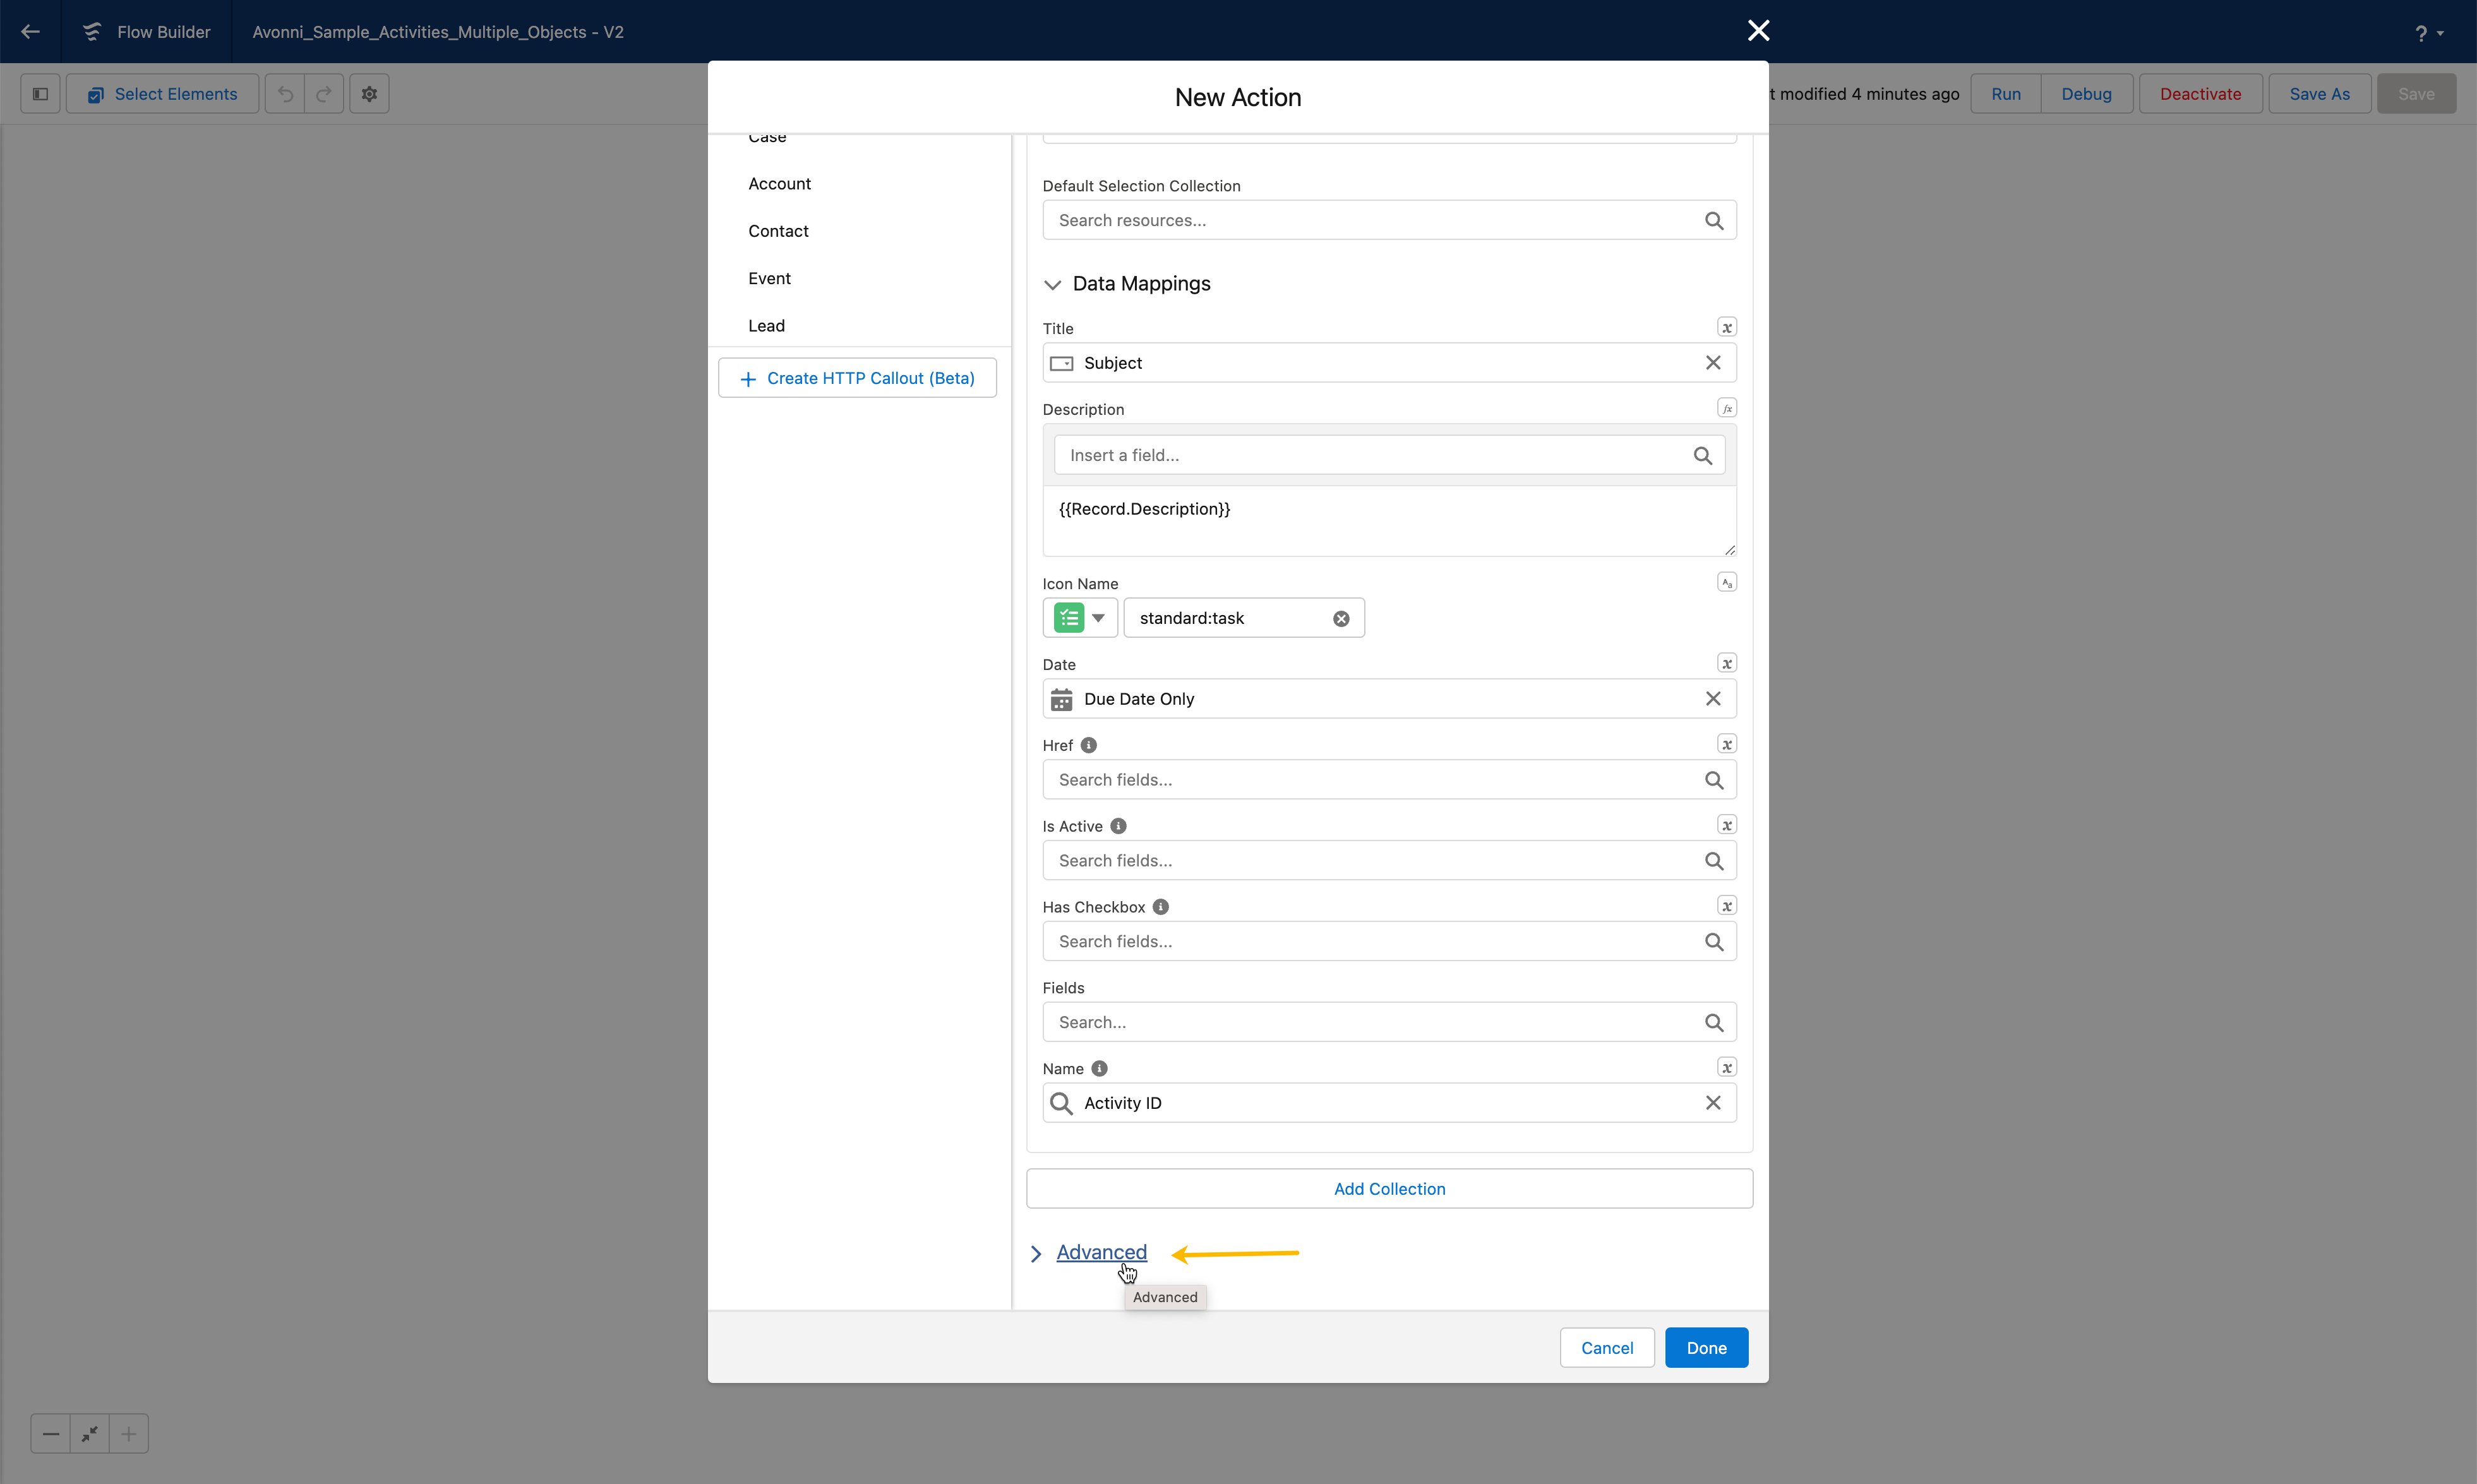
* **Access Advanced settings**: To access the advanced settings, click on the 'Advanced' link within the properties panel of the 'SObject Collection to Activity Timeline Items' action.
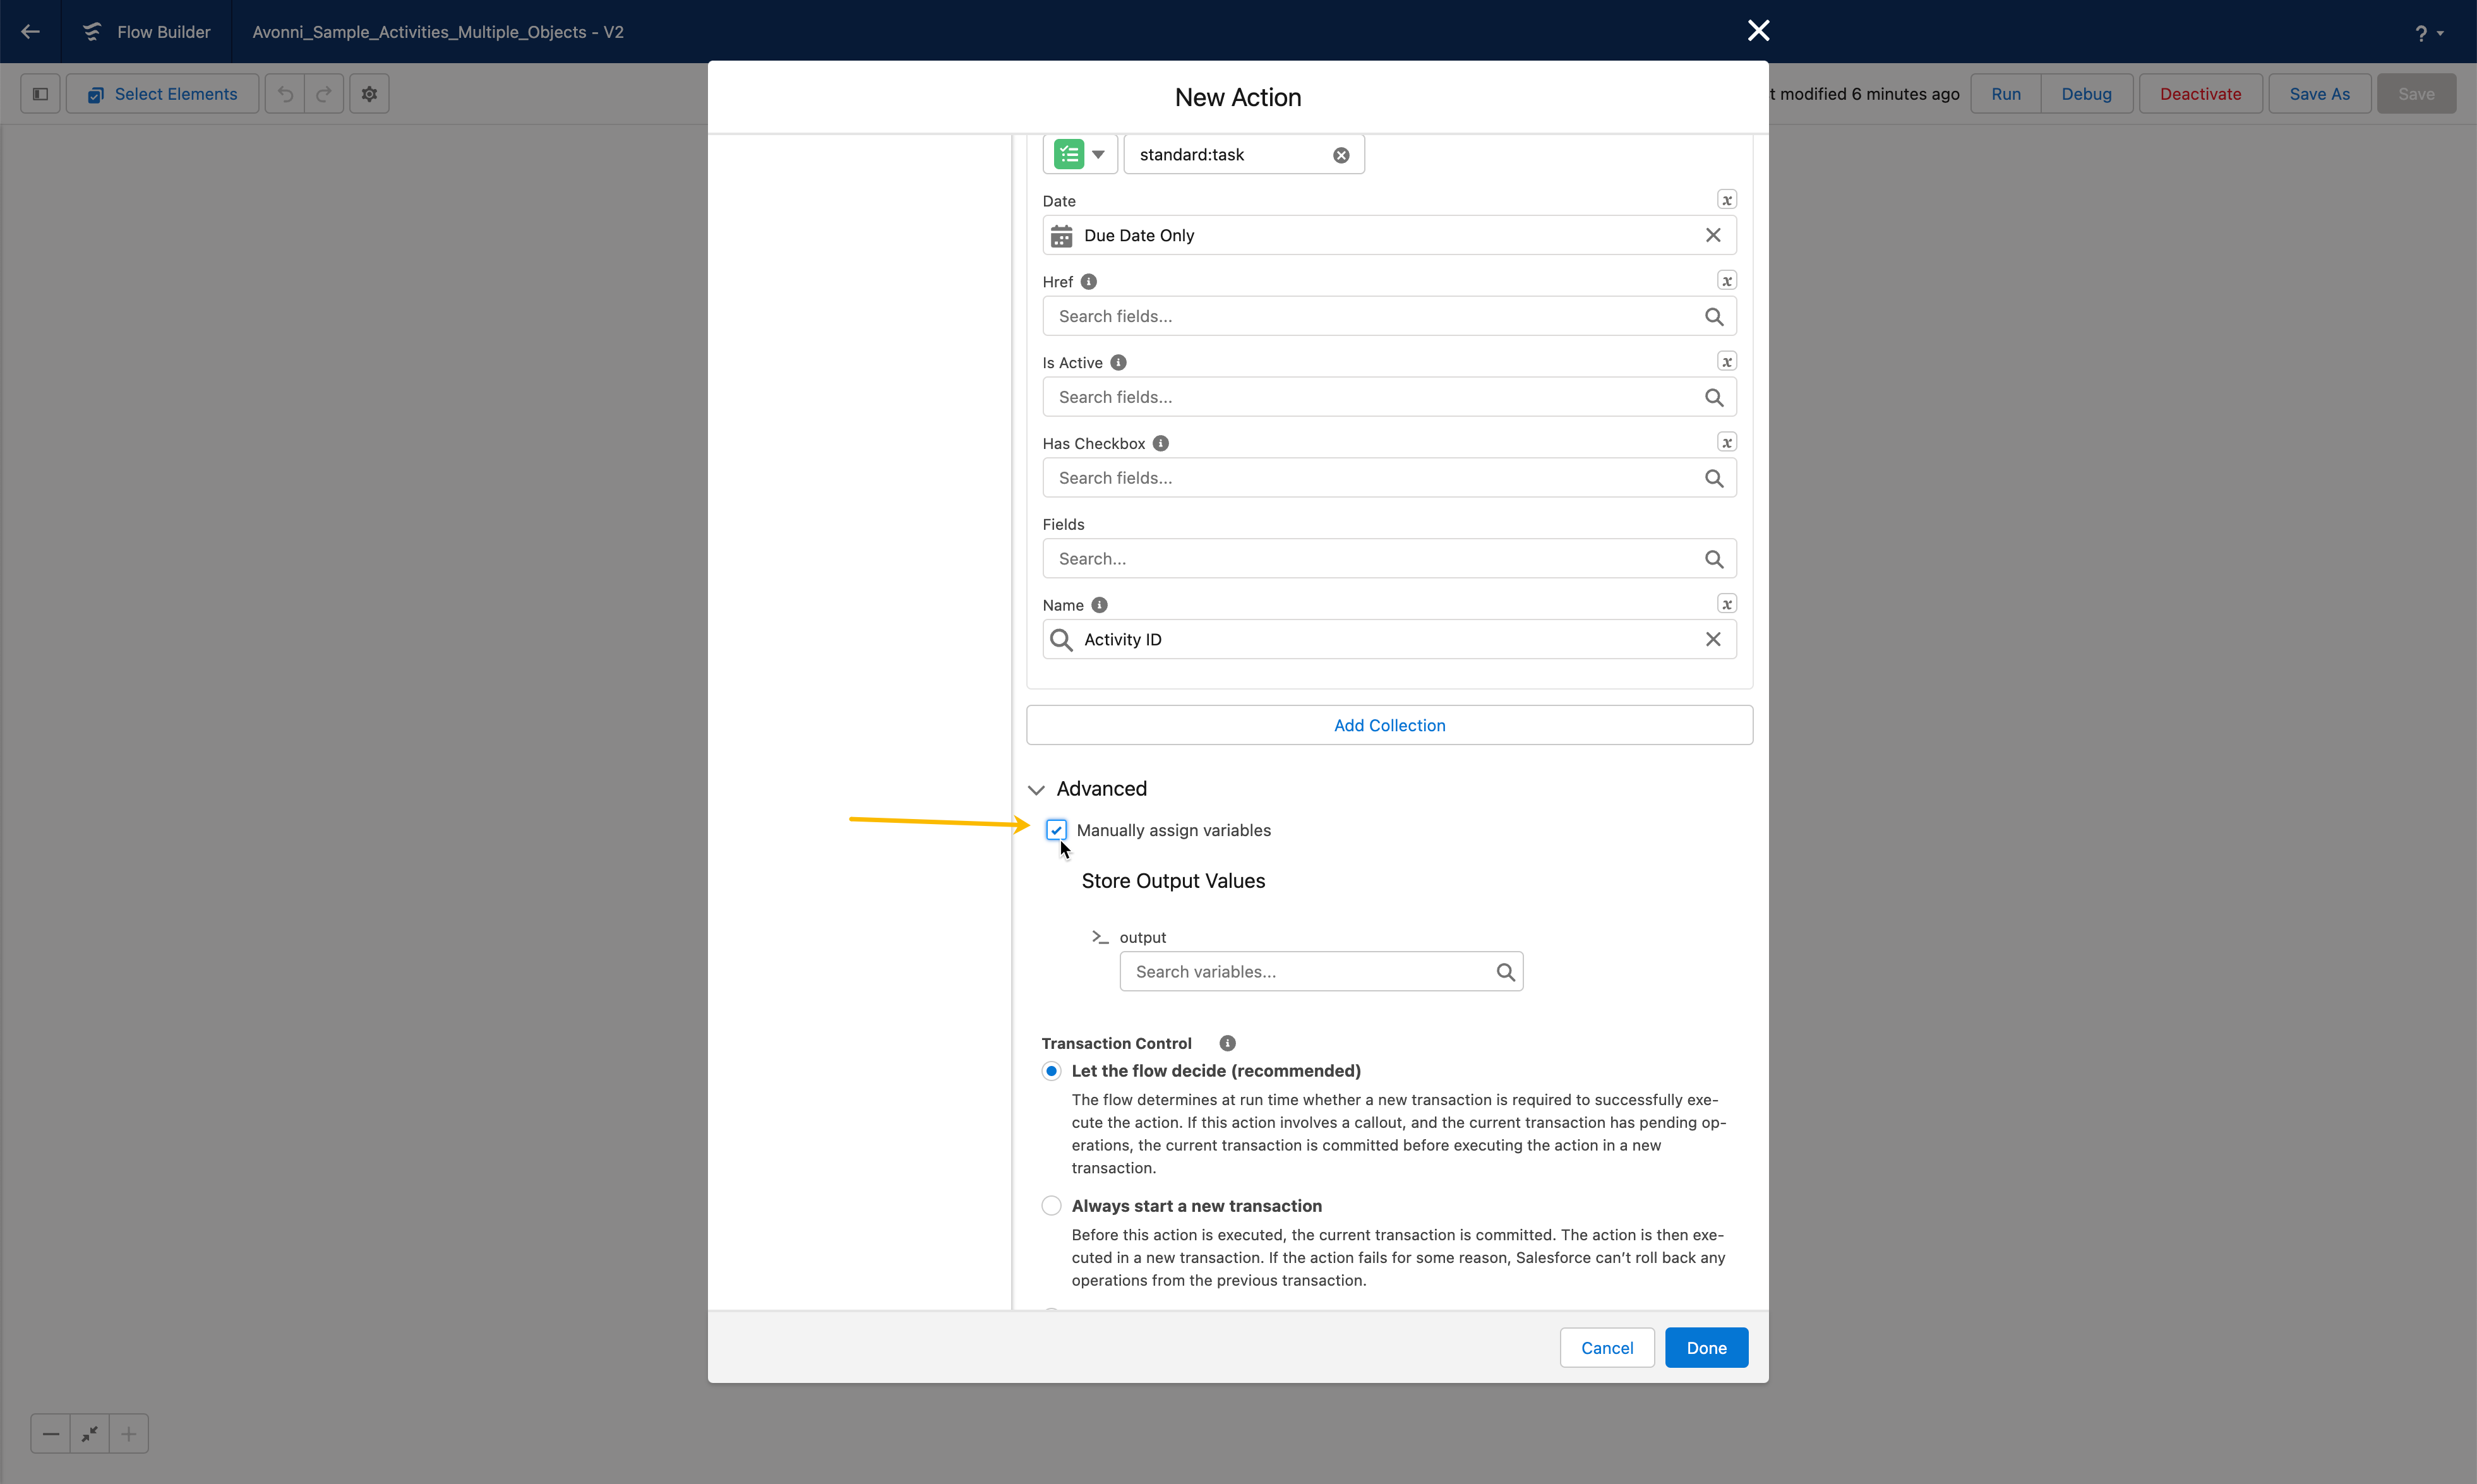
* **Enable manual variable assignment**: Check the box next to "Manually assign variables." This option allows you to create a new variable resource and manually define its properties.
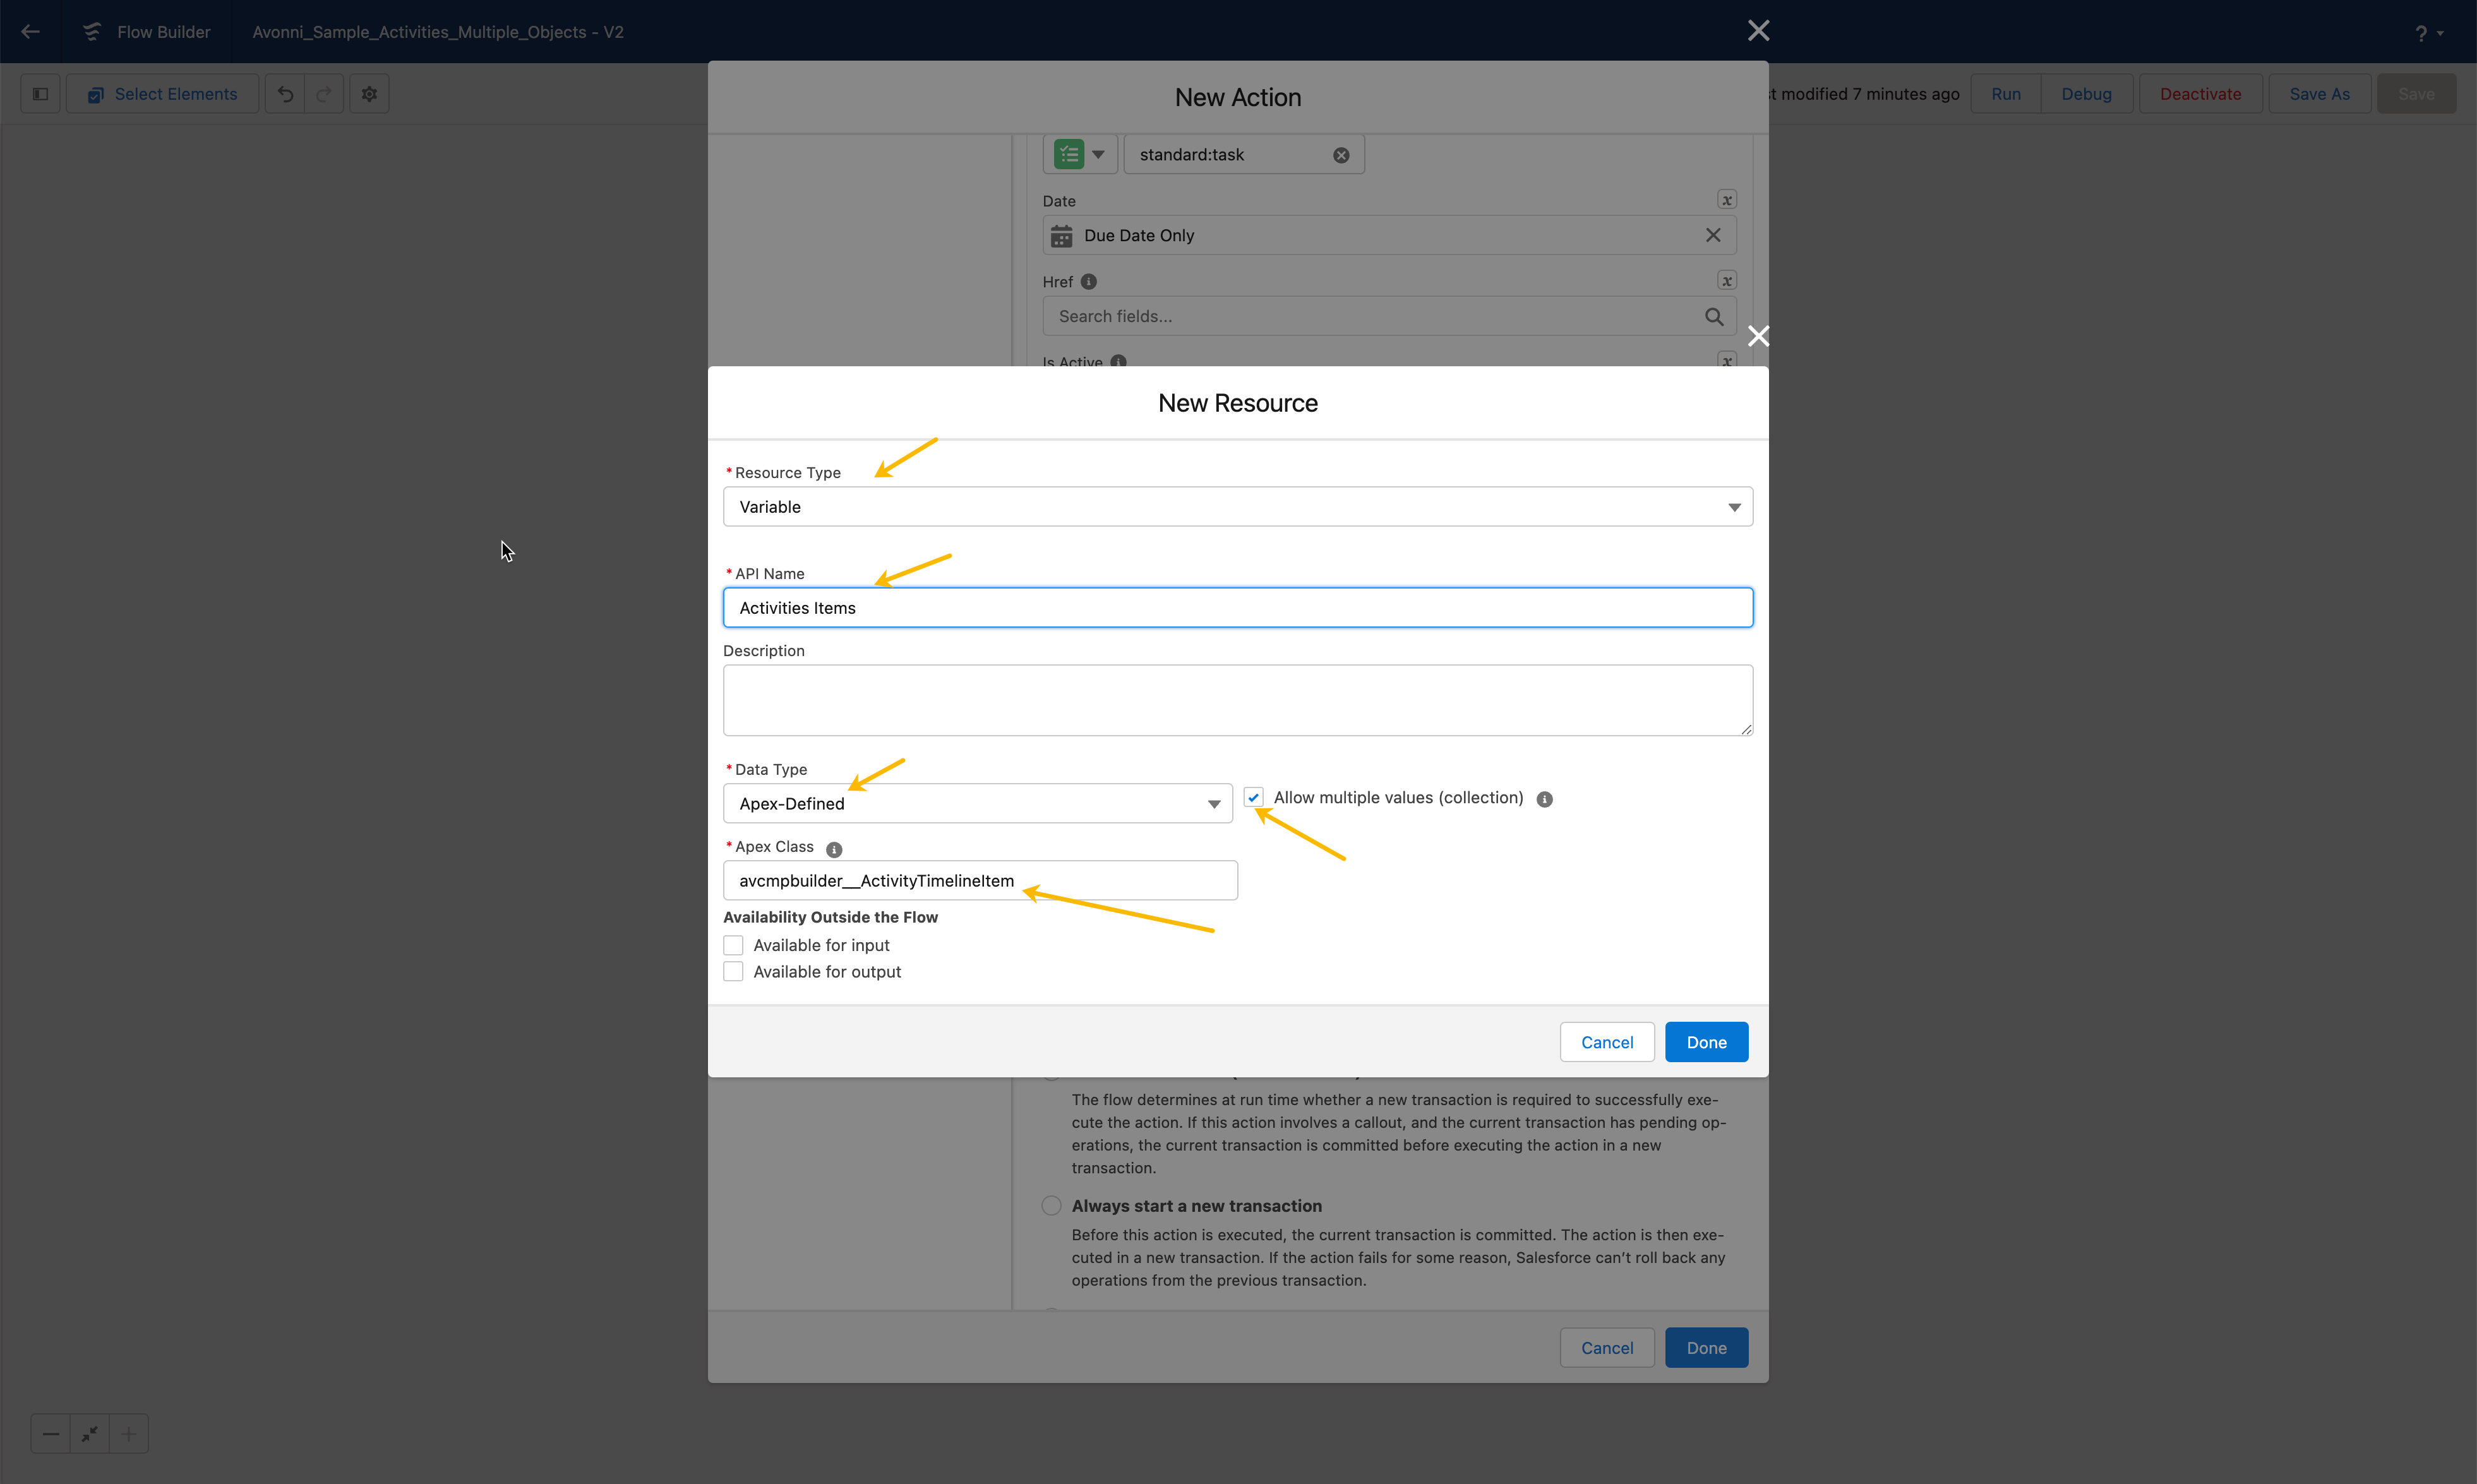
* **Create a new variable resource**: Click on the '**New Resource**' button and enter an API name for your variable. This name will be used to reference the variable throughout your Flow.
* **Set Data Type and Apex Class**: In the 'Data Type' field, select '**`Apex-Defined`**.' Check the box next to "**`Allow multiple values`**" to support multiple records for this variable. Then, in the 'Apex Class' field, select "**`avcmpbuilder__ActivityTimelineItem`**" from the dropdown list.
* **Save your changes**: Once you've completed the configuration, click the 'Done' button to save your settings.
{% @arcade/embed url="" flowId="FJohOPkl91rC5qx66qGX" %}
## Step 5: Adding and configuring the Activity Timeline component
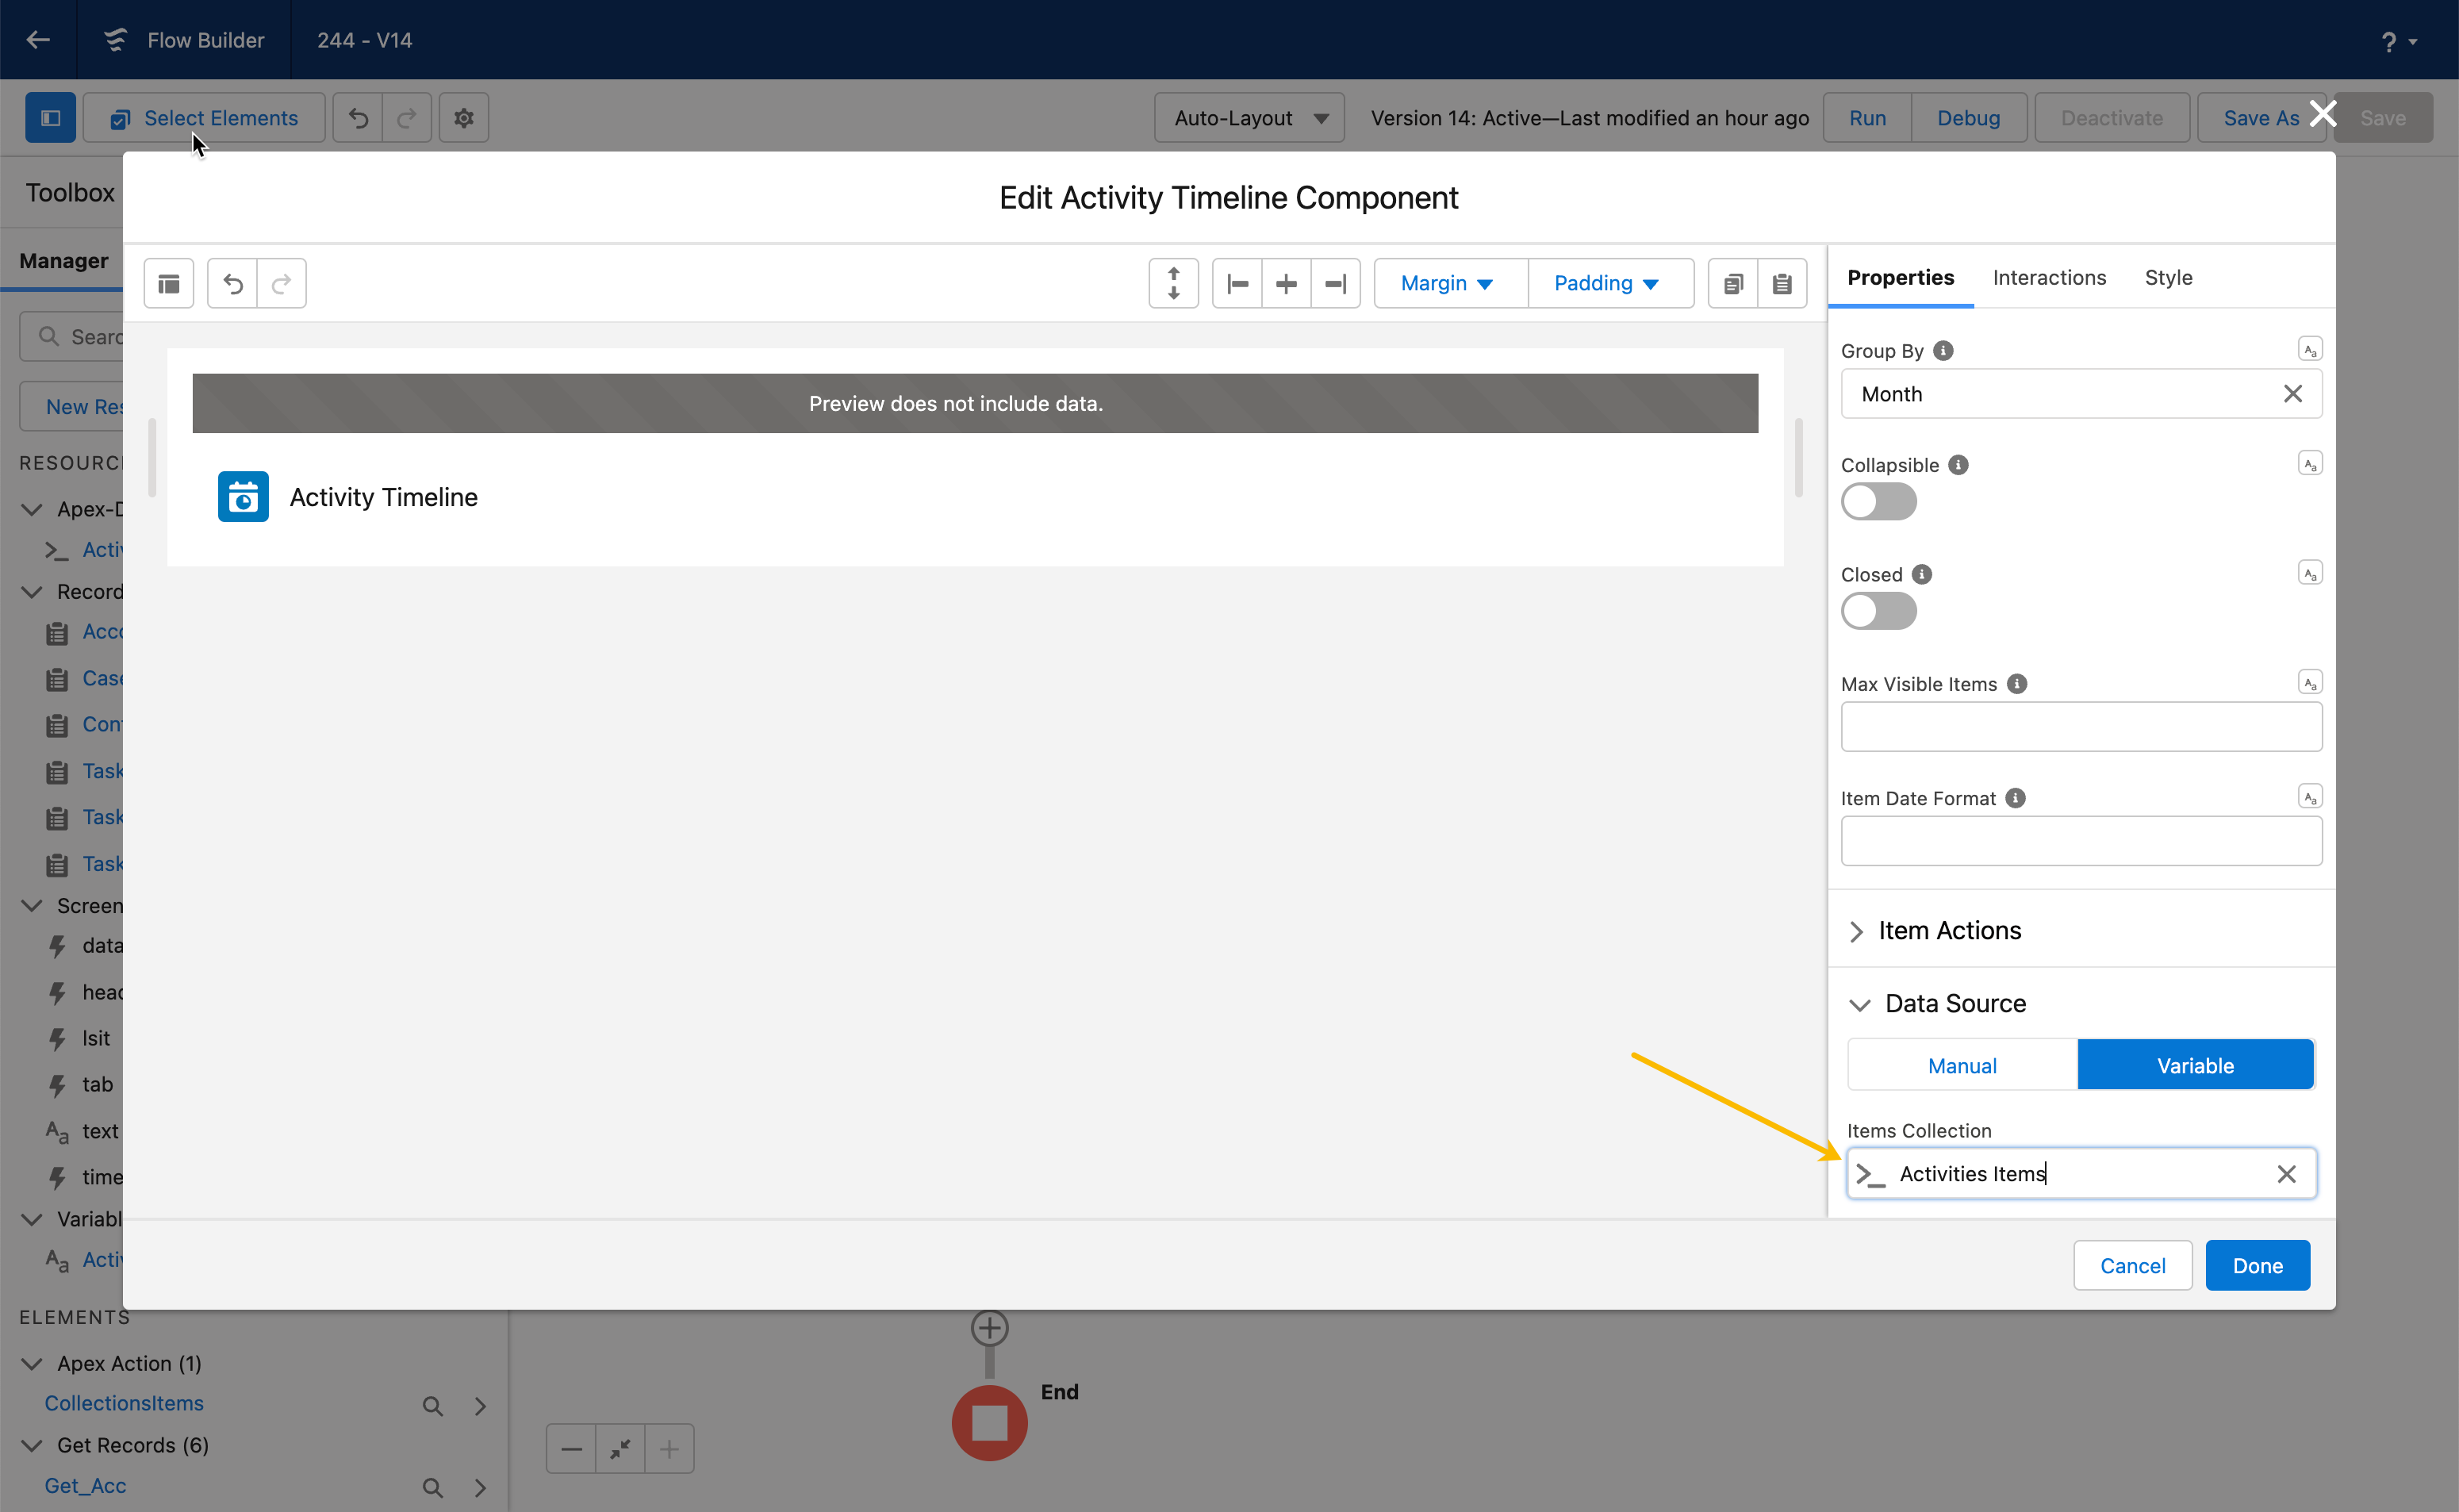
In this final step, you'll connect the Activity Timeline component to the Apex-Defined variable created in [step 4](#step-4-configuring-action-advanced-settings), enabling it to display data from multiple source collections.
1. **Add a screen element** with no header and footer
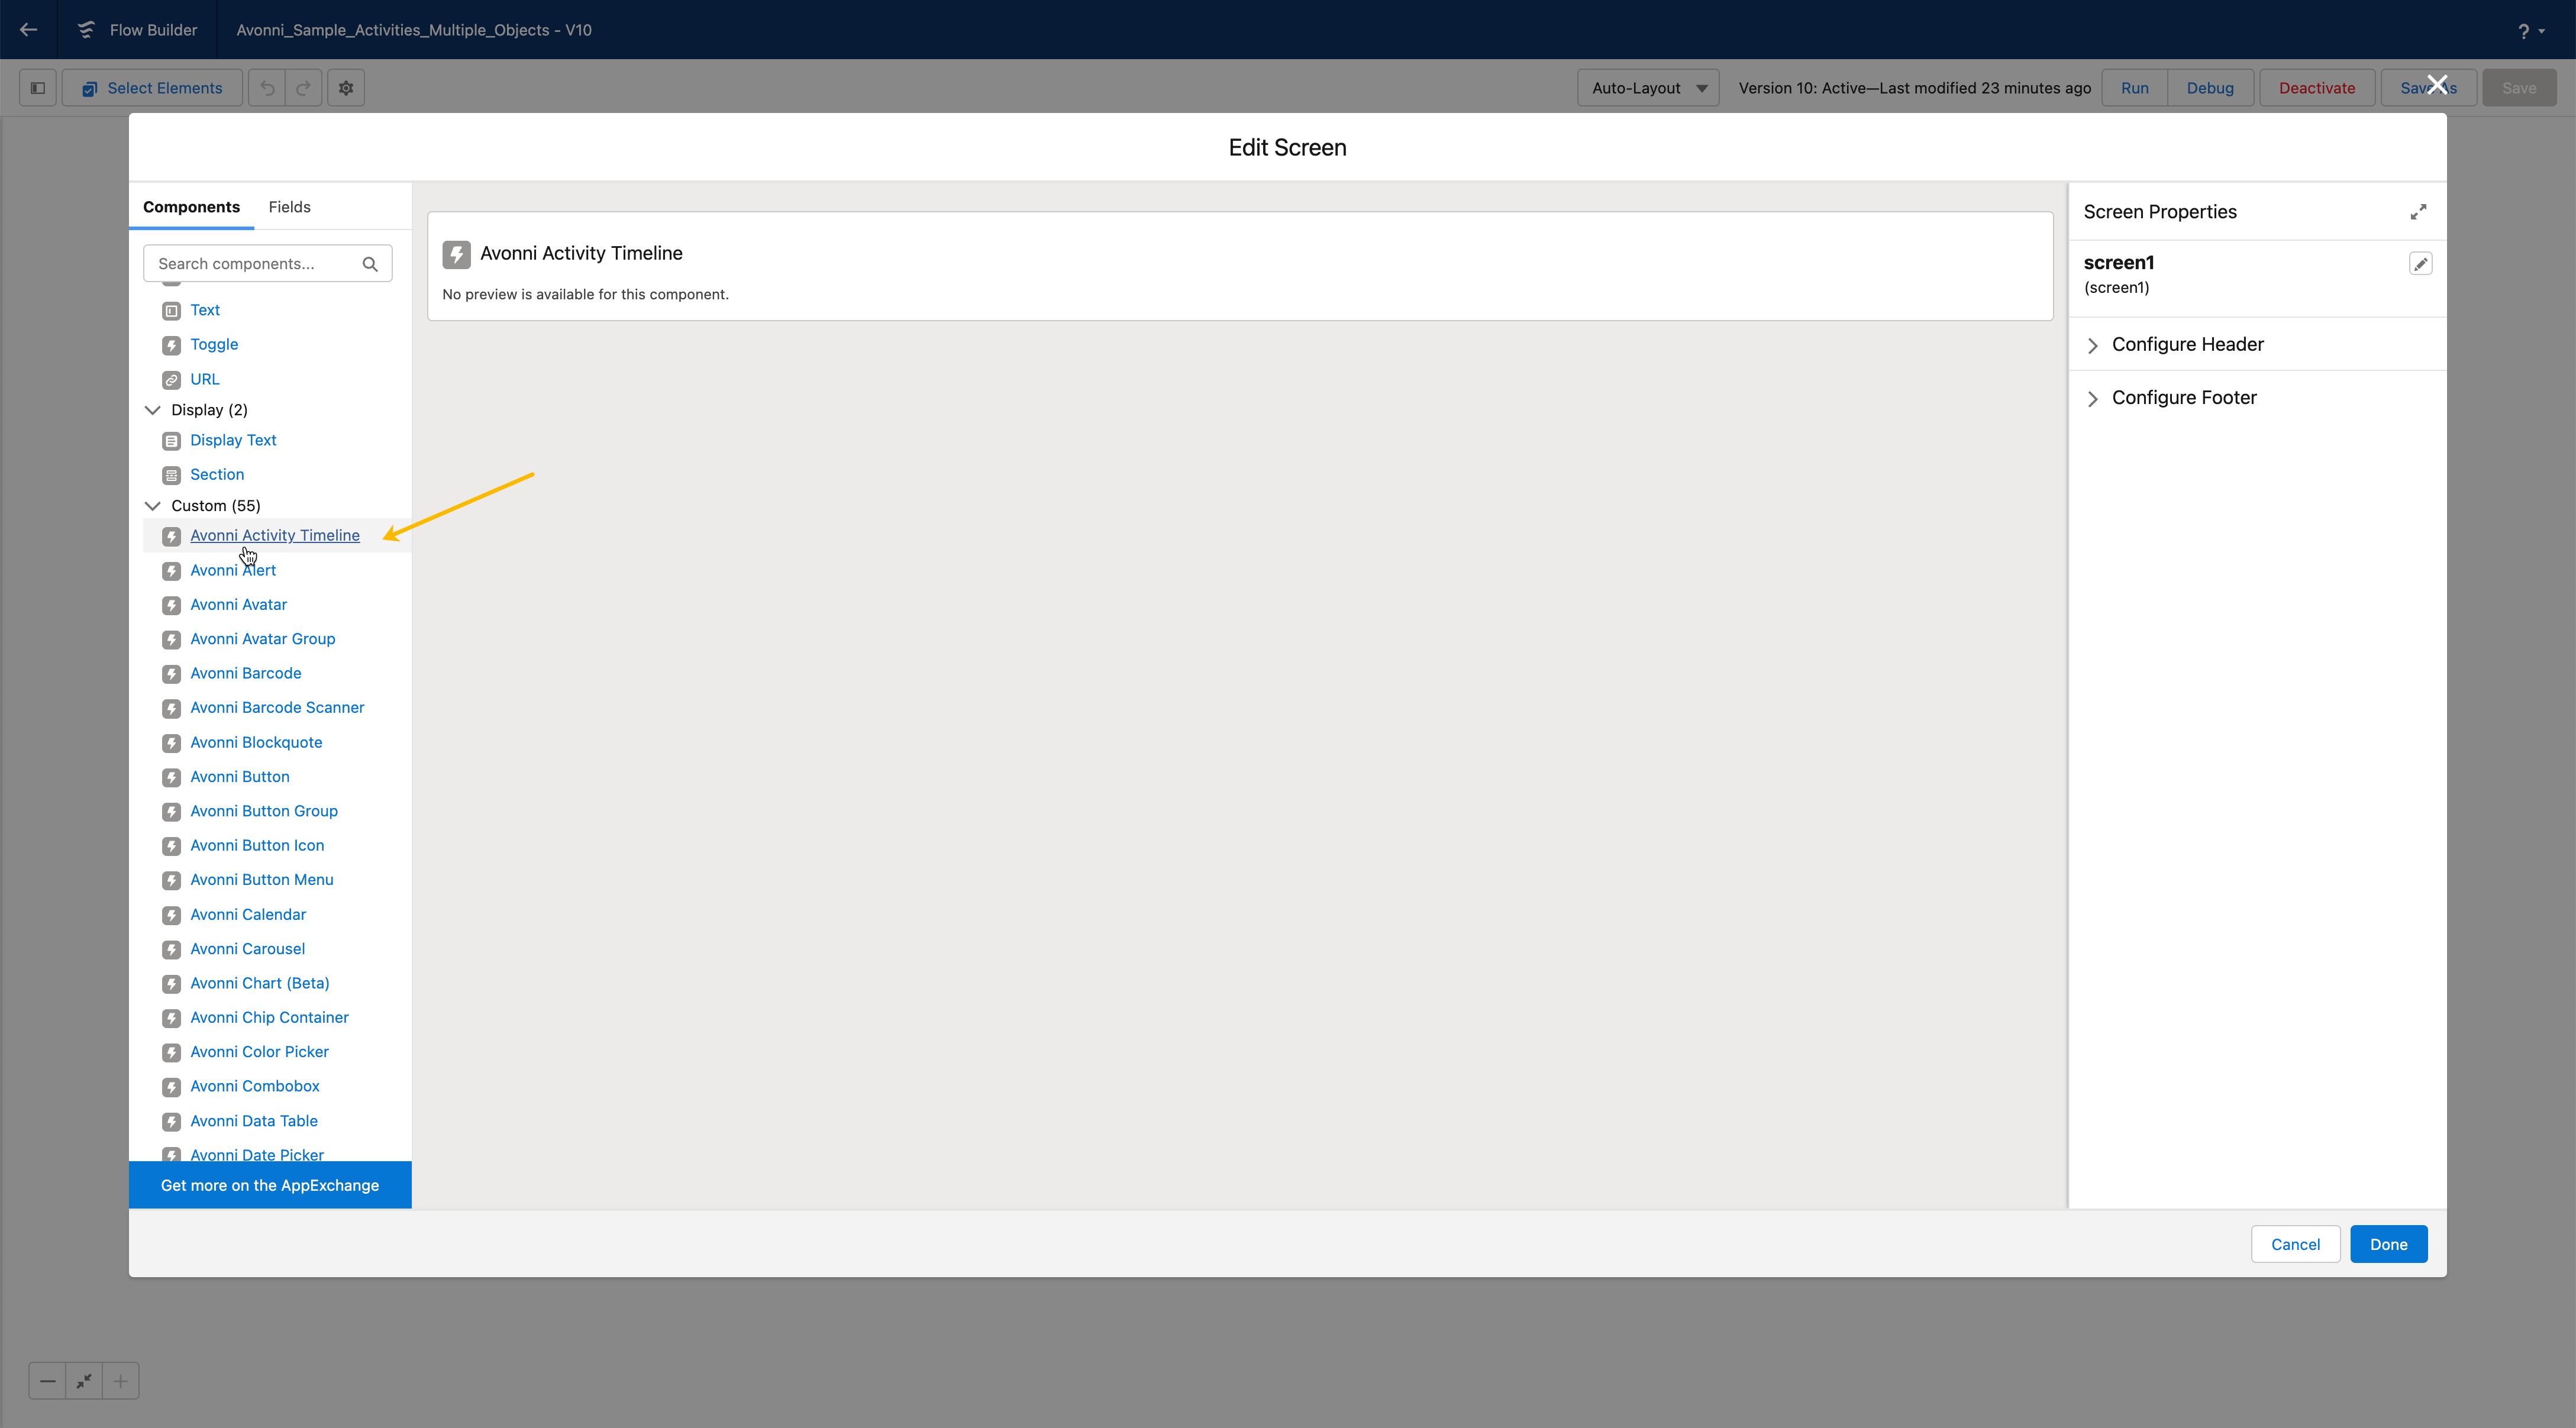
2. **Drag the Avonni Timeline Component** into our screen
3. **Open the Activity Timeline component**: Locate it within your Screen Flow and click on it to access its configuration settings.
4. **Access the Data Source section**: Navigate to the 'Data Source' section within the properties panel of the Activity Timeline component.
5. **Select Variable**: From the 'Data Source' options, choose 'Variable' to specify that the component should use the **Apex-Defined variable** you created earlier.
6. **Choose the Apex-Defined variable**: In the dropdown list, select the Apex-Defined variable you created in [step 4](#step-4). This will connect the Activity Timeline component to the variable containing the combined data from multiple source collections.
7. **Save your changes**: Click the '**Done**' button to save your settings and finalize the configuration.
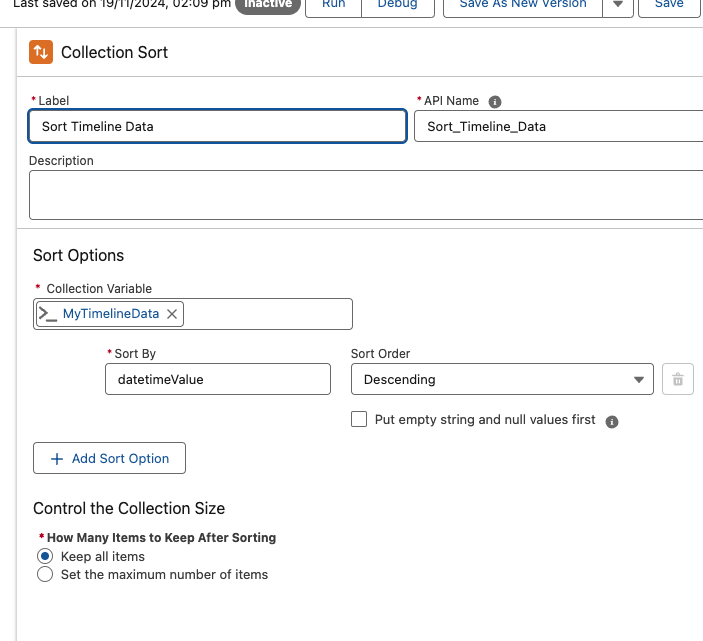
## **Advanced Sorting**
To further customize the sort order, you can use a "Collection Sort" element in your flow. This allows you to sort the items in the APEX collection variable based on your selected field. See the screenshot below for an example.
## **Congratulations**!
You have successfully added multiple source collections to the Activity Timeline component. These steps enabled the component to display data from various source collections, providing a comprehensive view of your Salesforce records in a visually appealing and user-friendly format.
---
# Agent Instructions
This documentation is published with GitBook. GitBook is the documentation platform designed so that both humans and AI agents can read, navigate, and reason over technical content effectively. Learn more at gitbook.com.
## Querying This Documentation
If you need additional information that is not directly available in this page, you can query the documentation dynamically by asking a question.
Perform an HTTP GET request on the current page URL with the `ask` query parameter, and the optional `goal` query parameter:
```
GET https://docs.avonnicomponents.com/flow/tutorials/components/timeline/assigning-multiple-source-collection-to-the-timeline.md?ask=&goal=
```
`ask` is the immediate question: it should be specific, self-contained, and written in natural language.
`goal` is optional and describes the broader end goal you are ultimately trying to accomplish on behalf of the user. GitBook uses it to tailor the answer towards what is most useful for that goal.
The response will contain a direct answer to the question and relevant excerpts and sources from the documentation.
Use this mechanism when the answer is not explicitly present in the current page, you need clarification or additional context, or you want to retrieve related documentation sections.
 {% endhint %}
## Step 4: Configuring action advanced settings
In this step, you'll set up advanced settings for the '**`SObject Collection to Activity Timeline Items`**' action to manually assign variables and create a new variable resource.
* **Access Advanced settings**: To access the advanced settings, click on the 'Advanced' link within the properties panel of the 'SObject Collection to Activity Timeline Items' action.
{% endhint %}
## Step 4: Configuring action advanced settings
In this step, you'll set up advanced settings for the '**`SObject Collection to Activity Timeline Items`**' action to manually assign variables and create a new variable resource.
* **Access Advanced settings**: To access the advanced settings, click on the 'Advanced' link within the properties panel of the 'SObject Collection to Activity Timeline Items' action.