> For the complete documentation index, see [llms.txt](https://docs.avonnicomponents.com/llms.txt). Markdown versions of documentation pages are available by appending `.md` to page URLs; this page is available as [Markdown](https://docs.avonnicomponents.com/flow/tutorials/components/timeline/perform-actions-on-selected-tasks.md).
# Perform actions on selected tasks
## Overview
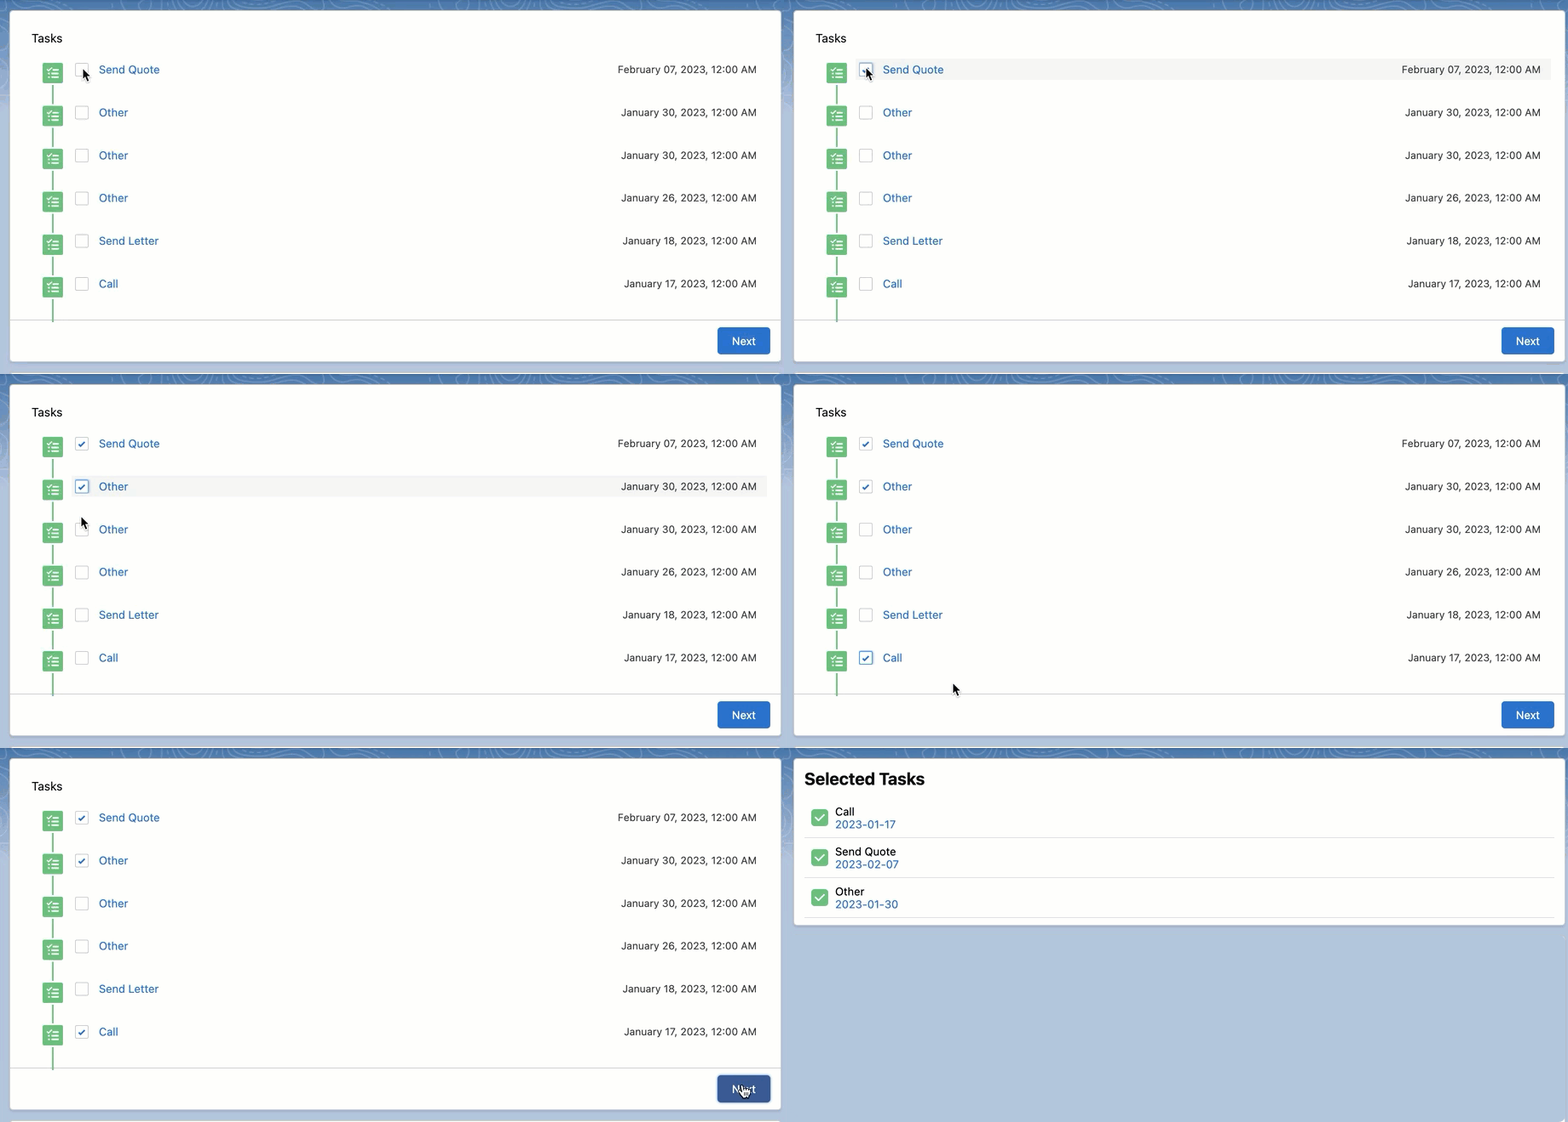
This page walks you through building an activity timeline component that lists selectable tasks based on a *GetRecords collection*. Then, we will display only selected tasks on another screen using the [Avonni List component](/flow/flow-components/list.md).
## Result
The final result looks like this:
## Steps
The steps to pass the RecordID are as follows:
### 1. Create the Get Records collection
The very first step starts with creating our Get Records collection to ask Flow Builder to fetch all the Task records by following the below steps:
* **Add a Get Records** element to fetch all tasks data
* Enter a collection Label > **GetTasks**
* Add the **Task Object**
* Select "**`None - Get all Task Records`**" in the condition requirements field
* Select "**`All Records`**" regarding the number of records to display
* Click "**Done**"
{% @arcade/embed url="" flowId="pkdgxr21m9Pchchh1EGH" %}
### 2. Add the Activity Timeline component
* **Add a screen** element
* Enter a screen label
* Drag the **Activity Timeline component** from the components list to our screen flow (located under the custom section)
* Enter an **API Name**. For example, *ActivityTimeline*.
{% @arcade/embed url="" flowId="HEGlfWkeA1l5cOwW2nZA" %}
### 3. Configure the Activity Timeline component
* Click on the **Open Component Builder** button to access all the settings for the Activity Timeline component
* **Enter a Title** for the component (e.g: Tasks)
* Under the Data Source section, **select Variable** to assign our previously created Get Records collection
* Under Source Collection, **click on the GetTask collection** we created in [step 1](#1.-create-the-get-records-collection)
* Under the **Data Mapping section**, let's do our fields mapping
* **Title** => Task.Subject
* **Description** => Task.Description
* **Name** => [Task.Id](http://task.id/) (Activity ID)
* **Icon Name** => standard:task (switch to Manual to select an icon manually)
* **Date** => Task.DueDate
* **Has Checkbox** => Yes (switch to Manual to select the toggle)
{% @arcade/embed url="" flowId="L6nSzHAeQgj8zVoUhA0H" %}
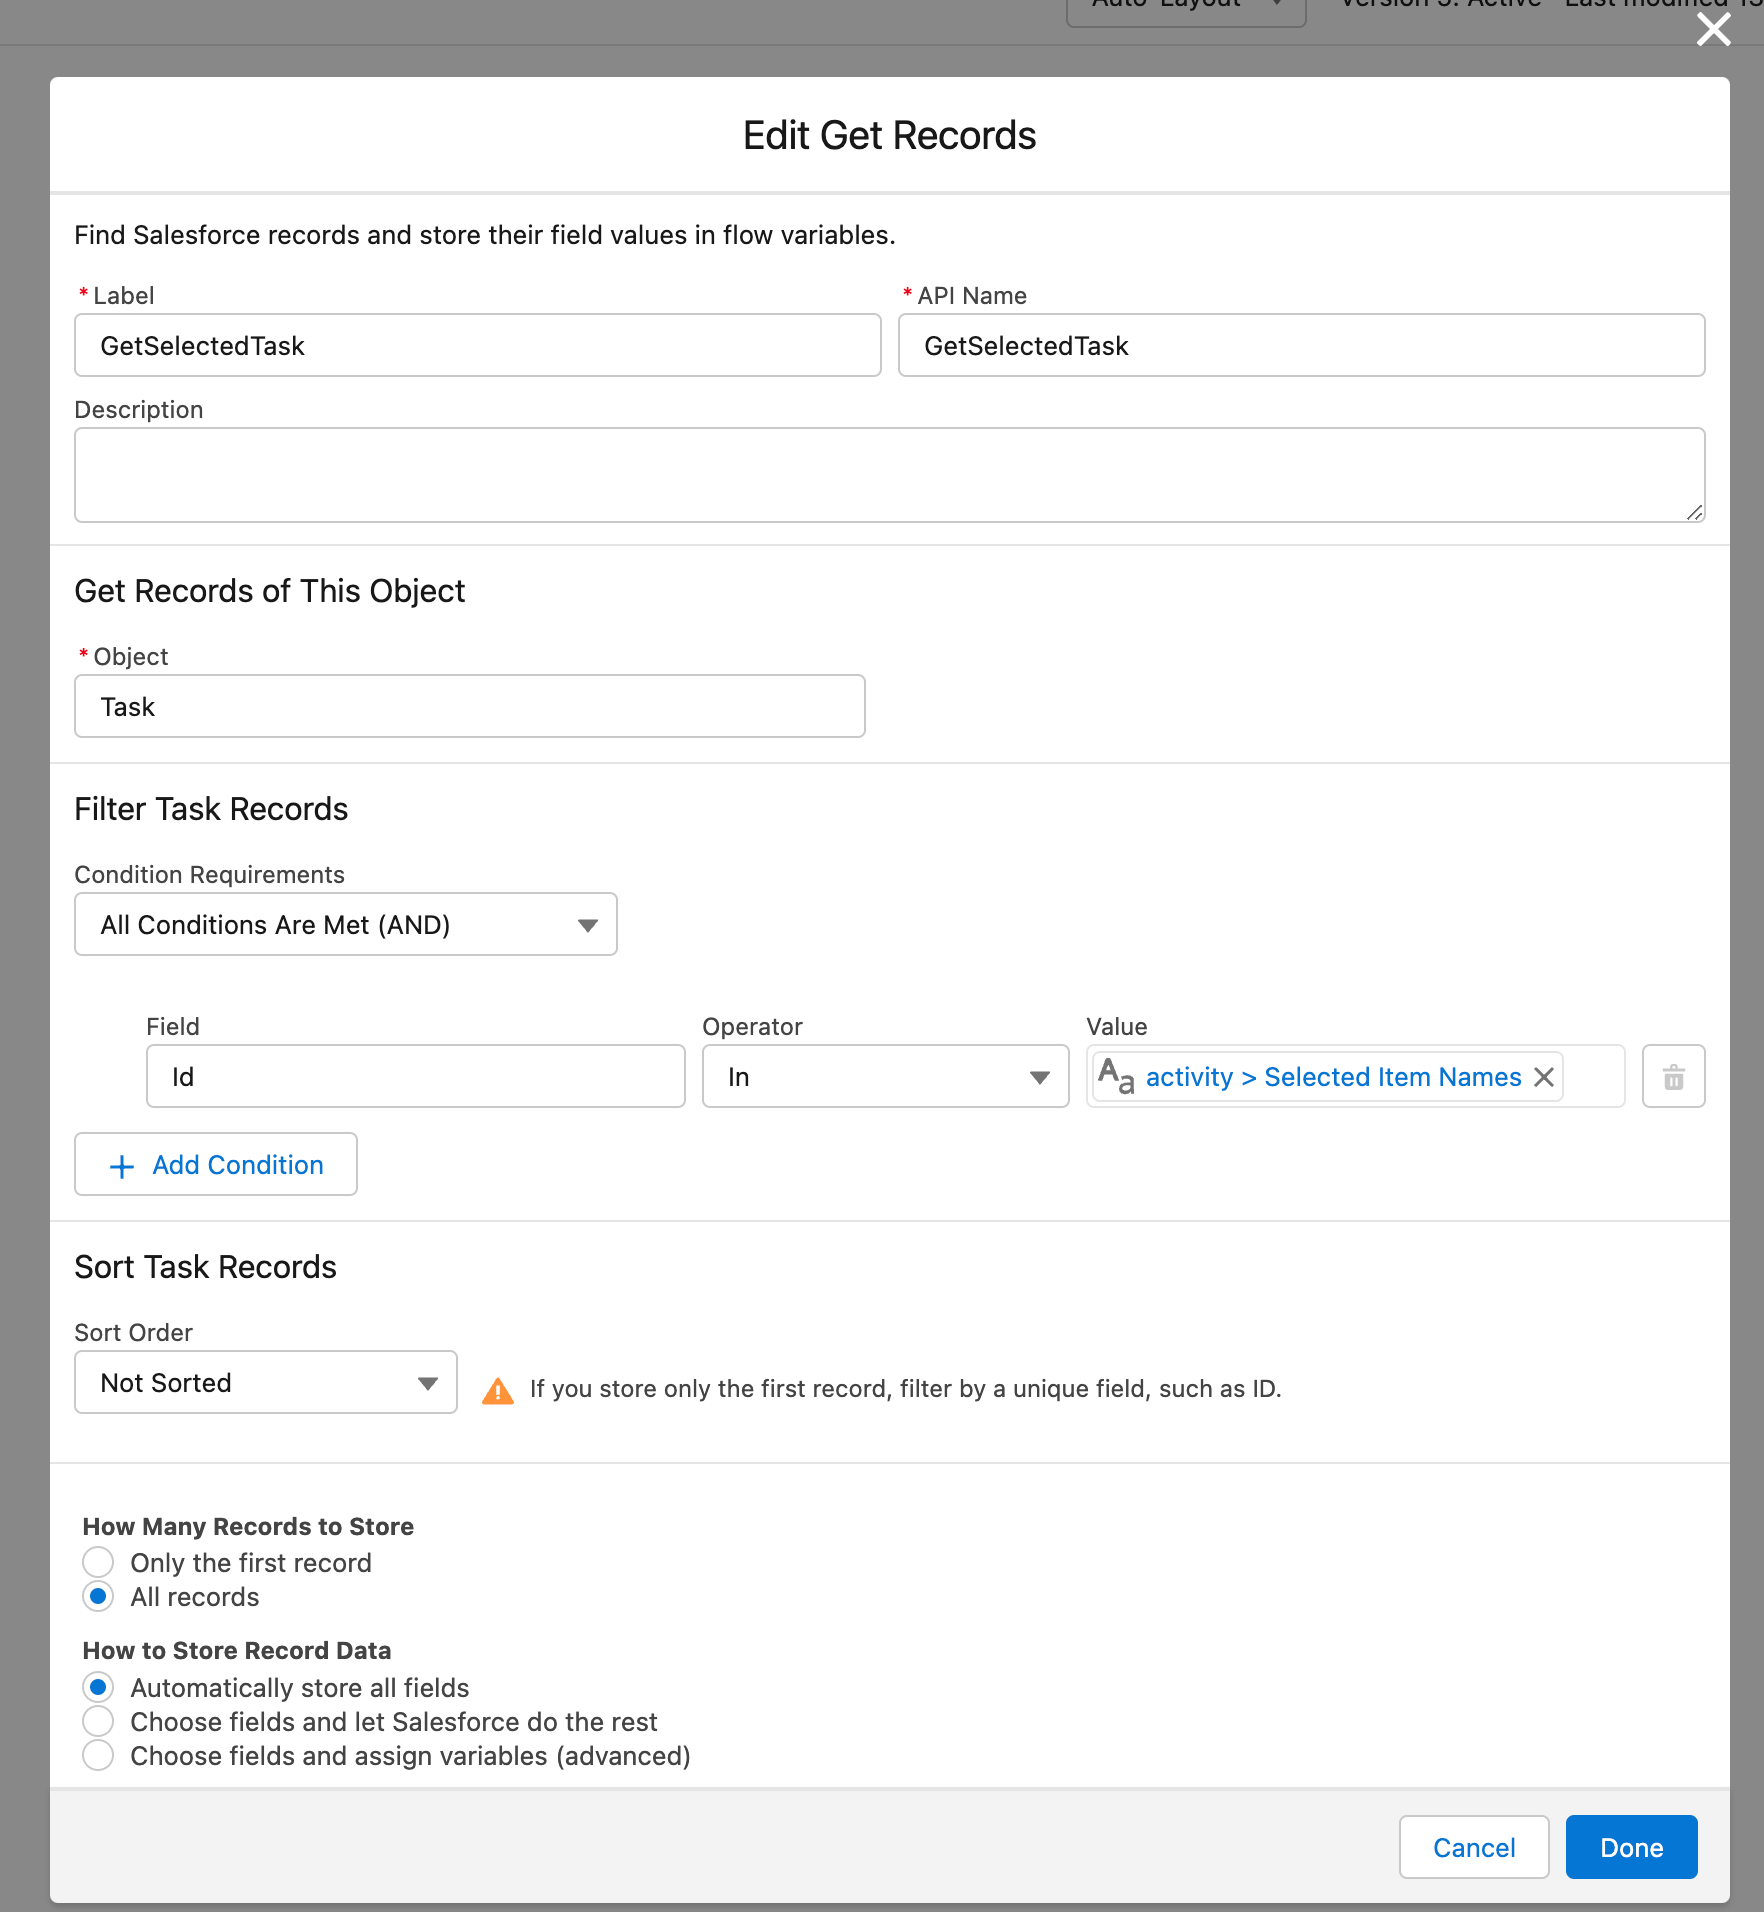
### 4. Create a new Get Records collection to fetch selected tasks
* Add a Get record collection:
* **Label**: GetSelectedTasks
* **Object**: Task
* **Filter**: Use the **IN** operator with value “activityTimeline.selectedItemNames“
### 6. Create a new flow screen
Now, we will add a new screen flow to display only selected tasks from our first screen.
* **Add a screen** element
* Enter a screen label
* Enter an **API Name**. For example, selectedTasks
* Drag the **Avonni List Component** to our screen flow
### 7. Configure the Avonni List Component
* Open the **Component Builder** to access all Settings
* Add a bottom divider
* Select a **variable** Data Source.
* Select the **source collection** "GetSelectedTask" created in [step 4](#4.-create-a-new-get-records-collection-to-fetch-selected-tasks)
* Configure the data mapping:
* **Label**: Subject
* **Name**: Activitiy ID
* **Description**: Description
* **Avatar > Icon Name** > Manual: Standard:task2
* **Avatar > Icon Size** > Medium
* Add an **info** label (optional)
{% @arcade/embed url="" flowId="ffVumlYHo7nArYrAwNcW" %}
Screen:
* List component
* Display selected tasks in the list
---
# Agent Instructions
This documentation is published with GitBook. GitBook is the documentation platform designed so that both humans and AI agents can read, navigate, and reason over technical content effectively. Learn more at gitbook.com.
## Querying This Documentation
If you need additional information that is not directly available in this page, you can query the documentation dynamically by asking a question.
Perform an HTTP GET request on the current page URL with the `ask` query parameter, and the optional `goal` query parameter:
```
GET https://docs.avonnicomponents.com/flow/tutorials/components/timeline/perform-actions-on-selected-tasks.md?ask=&goal=
```
`ask` is the immediate question: it should be specific, self-contained, and written in natural language.
`goal` is optional and describes the broader end goal you are ultimately trying to accomplish on behalf of the user. GitBook uses it to tailor the answer towards what is most useful for that goal.
The response will contain a direct answer to the question and relevant excerpts and sources from the documentation.
Use this mechanism when the answer is not explicitly present in the current page, you need clarification or additional context, or you want to retrieve related documentation sections.