> For the complete documentation index, see [llms.txt](https://docs.avonnicomponents.com/llms.txt). Markdown versions of documentation pages are available by appending `.md` to page URLs; this page is available as [Markdown](https://docs.avonnicomponents.com/flow/tutorials/components/input-pen/how-to-store-input-pen-drawings-as-attachments-in-salesforce.md).
# How to Store Input Pen Drawings as Attachments in Salesforce
## Overview
This tutorial will guide you through saving the signature as a file using an action component, ensuring that the signature is stored for future reference on the related record.
So, let's get started!
{% hint style="info" %}
**Content quick access**
* [Configure the Avonni Input Pen as a signature pad](#3.-add-and-configure-the-avonni-input-pen-component)
* [Save the Signature as a file on Salesforce](#4.-create-an-action-component-to-save-the-signature-as-a-file)
* [Add the flow to Salesforce](#5.-add-your-flow-to-your-salesforce)
{% endhint %}
## Final Outcome
## Steps
### 1. Create an input variable
Input variables serve as a way to store information passed between different screens in the flow. Here, we create an input variable to store the related record information.
* Create a new Screen Flow
* Click on the "**New Resource**" button
* Resource type => **Variable**
* API name => **RecordID** (or your API Name)
* Data Type => **Text**
* Check "**Available for input**"
### 2. Add a screen component and the Input Pen
* Add a Screen element
* Enter an API name
* Hide Header and Footer (if needed)
* Drag the Avonni Input Pen component
* Click on the "**Open Component Builder**" button to access all the Input Pen component's settings.
{% @arcade/embed url="" flowId="fnVrzU8jZuDClnyc05kg" %}
### 3. Add and configure the Avonni Input Pen component
You have accessed the component builder at this stage, which is crucial in setting up the Avonni Input Pen component. Here's how you can proceed:
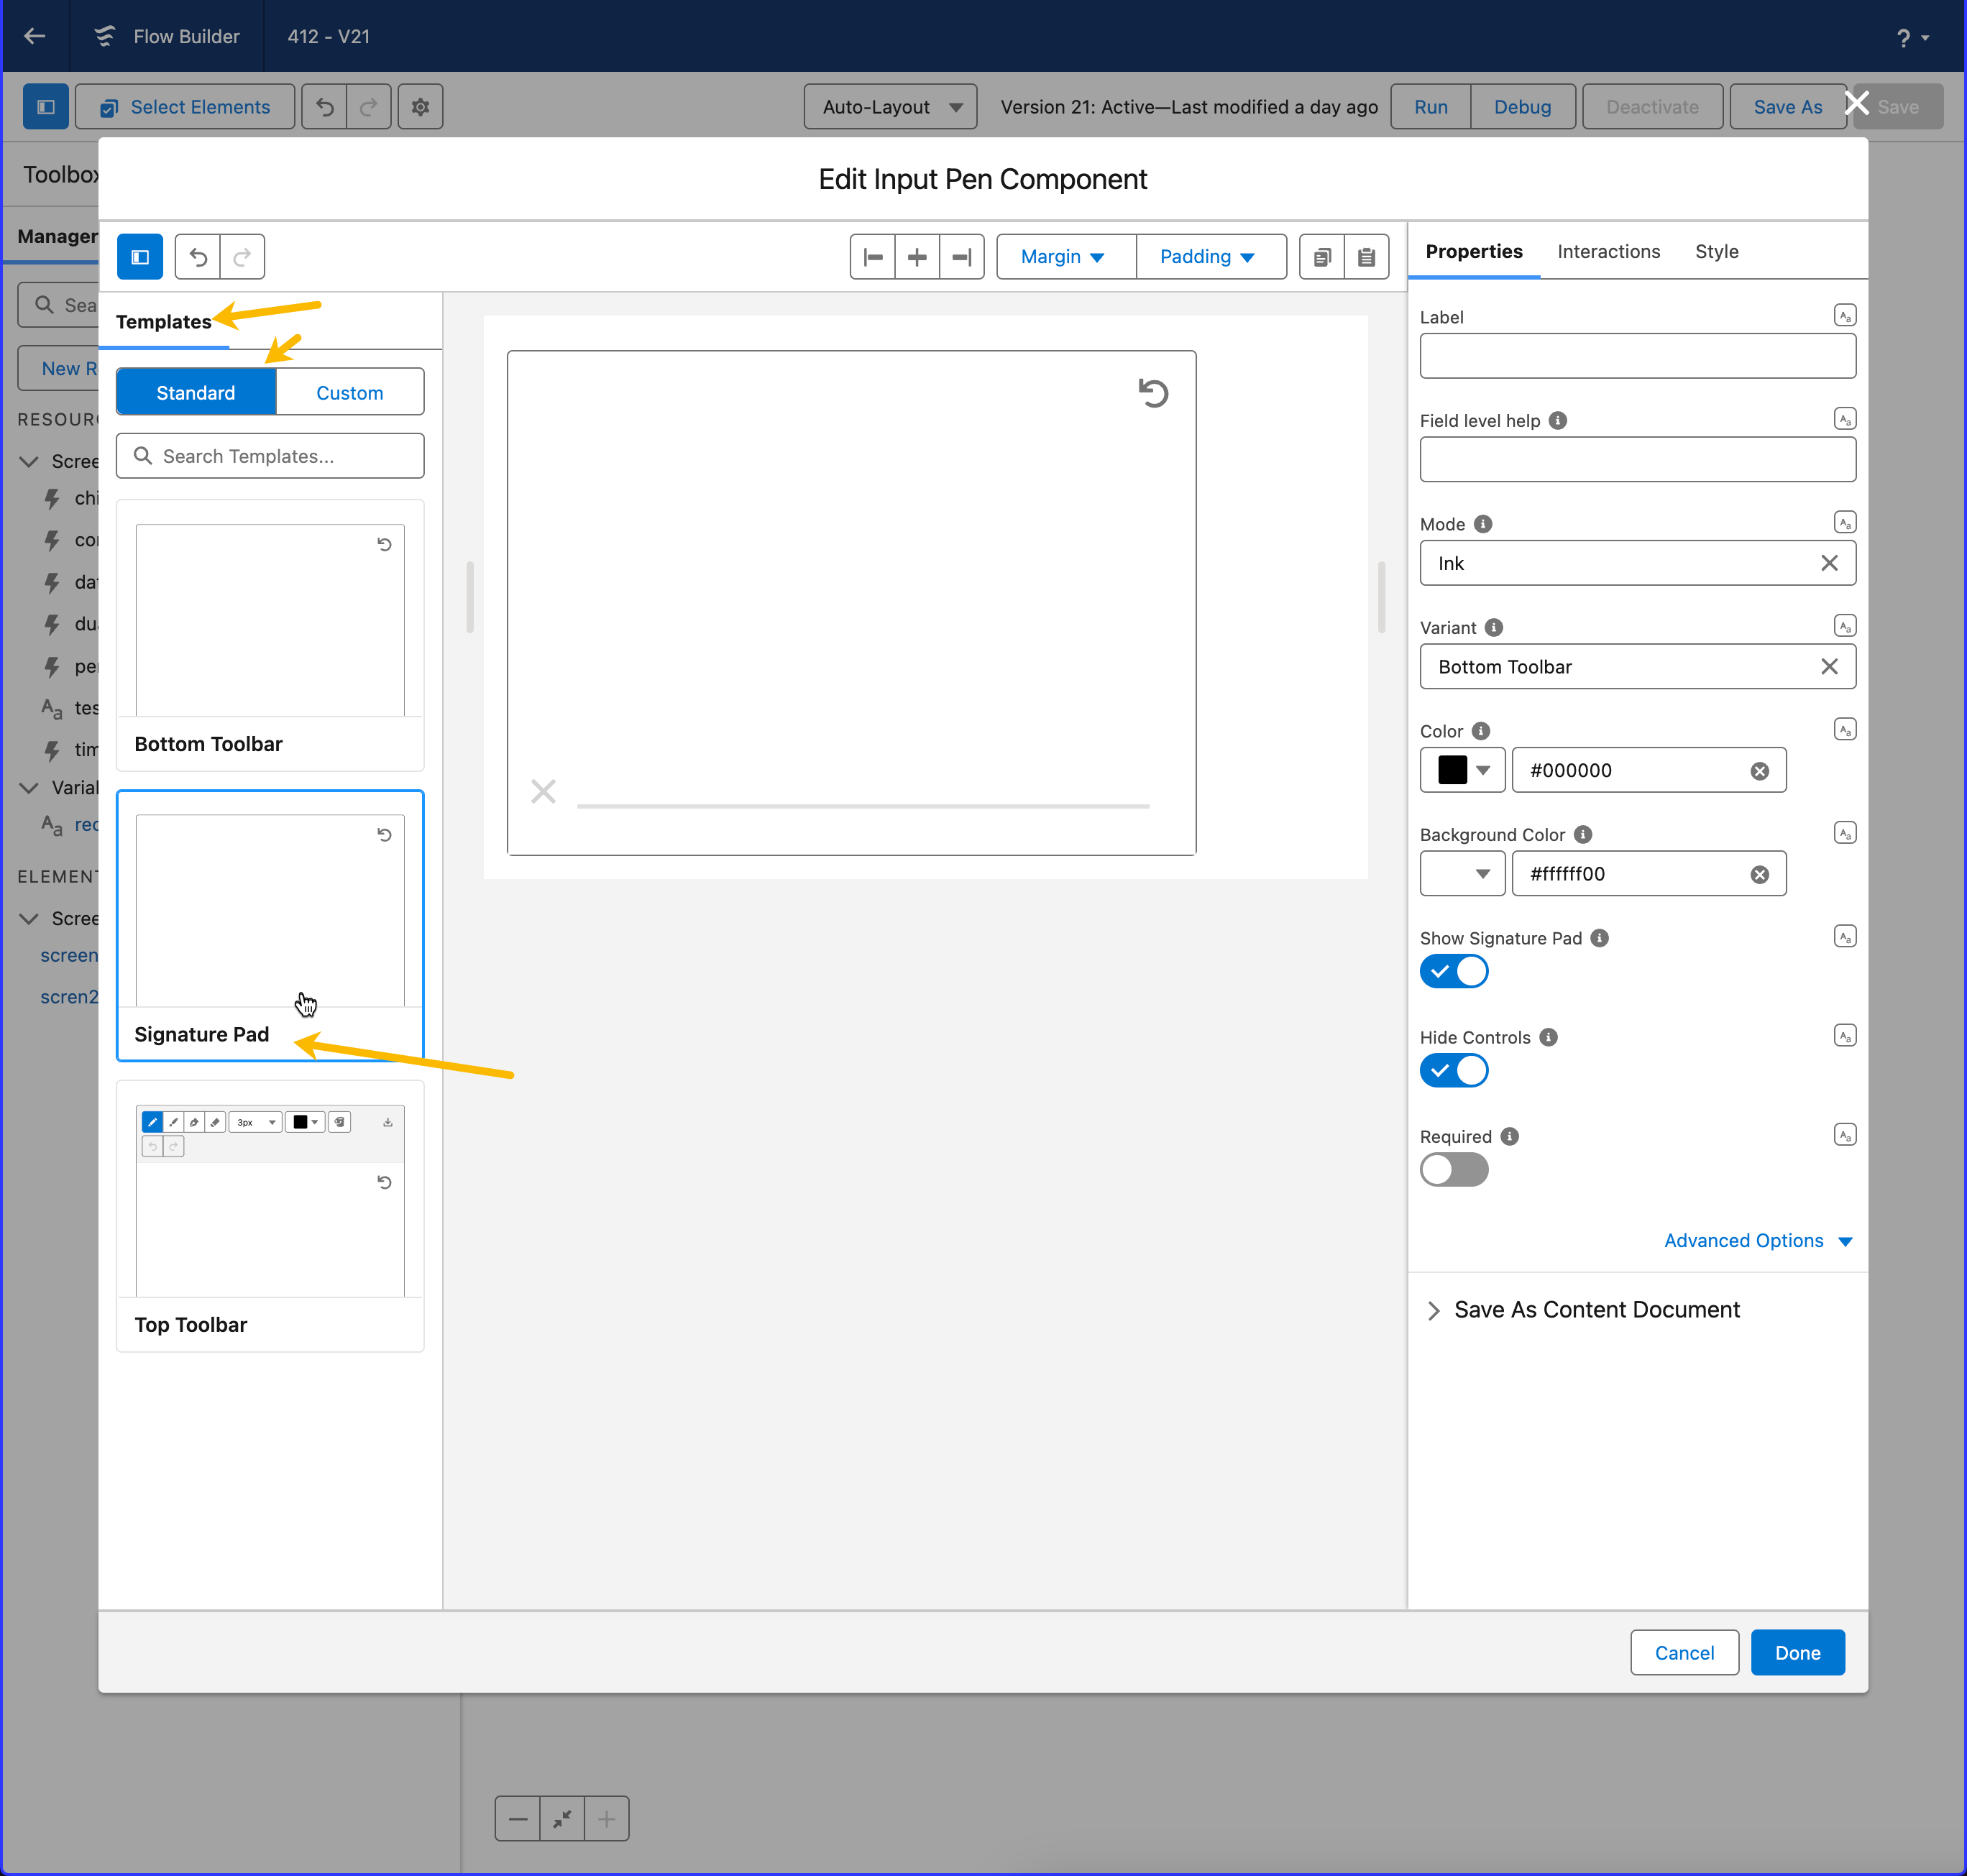
1. **By choosing the signature template, you benefit from a pre-configured setupSelect the Signature Template**: On the left panel of the component builder, you will find various templates. Locate and select the 'Signature' template. This template is specifically designed for capturing signatures or handwritten inputs.
2. **Utilize Pre-Configured Settings**: By choosing the signature template, you benefit from a pre-configured setup. This template is tailored to optimize the input pen component for signature capture, ensuring that essential settings are adjusted.
3. **Review and Customize (Optional)**: Although the Signature template provides a ready-to-use configuration, you can review and customize the settings. Feel free to adjust aspects like pen color, size, or add additional functionalities as per your specific requirements.
{% hint style="warning" %}
#### Info
This tutorial uses the component's built-in *Save as Content Document* feature, which runs under the logged-in user's context. If your flow is deployed to an Experience Site for guest users, this approach will not work. See Using [the Input Pen with guest users for the recommended pattern](/flow/flow-components/input-pen.md#using-the-input-pen-with-guest-users).
{% endhint %}
### 4. Configure the Save As Content document
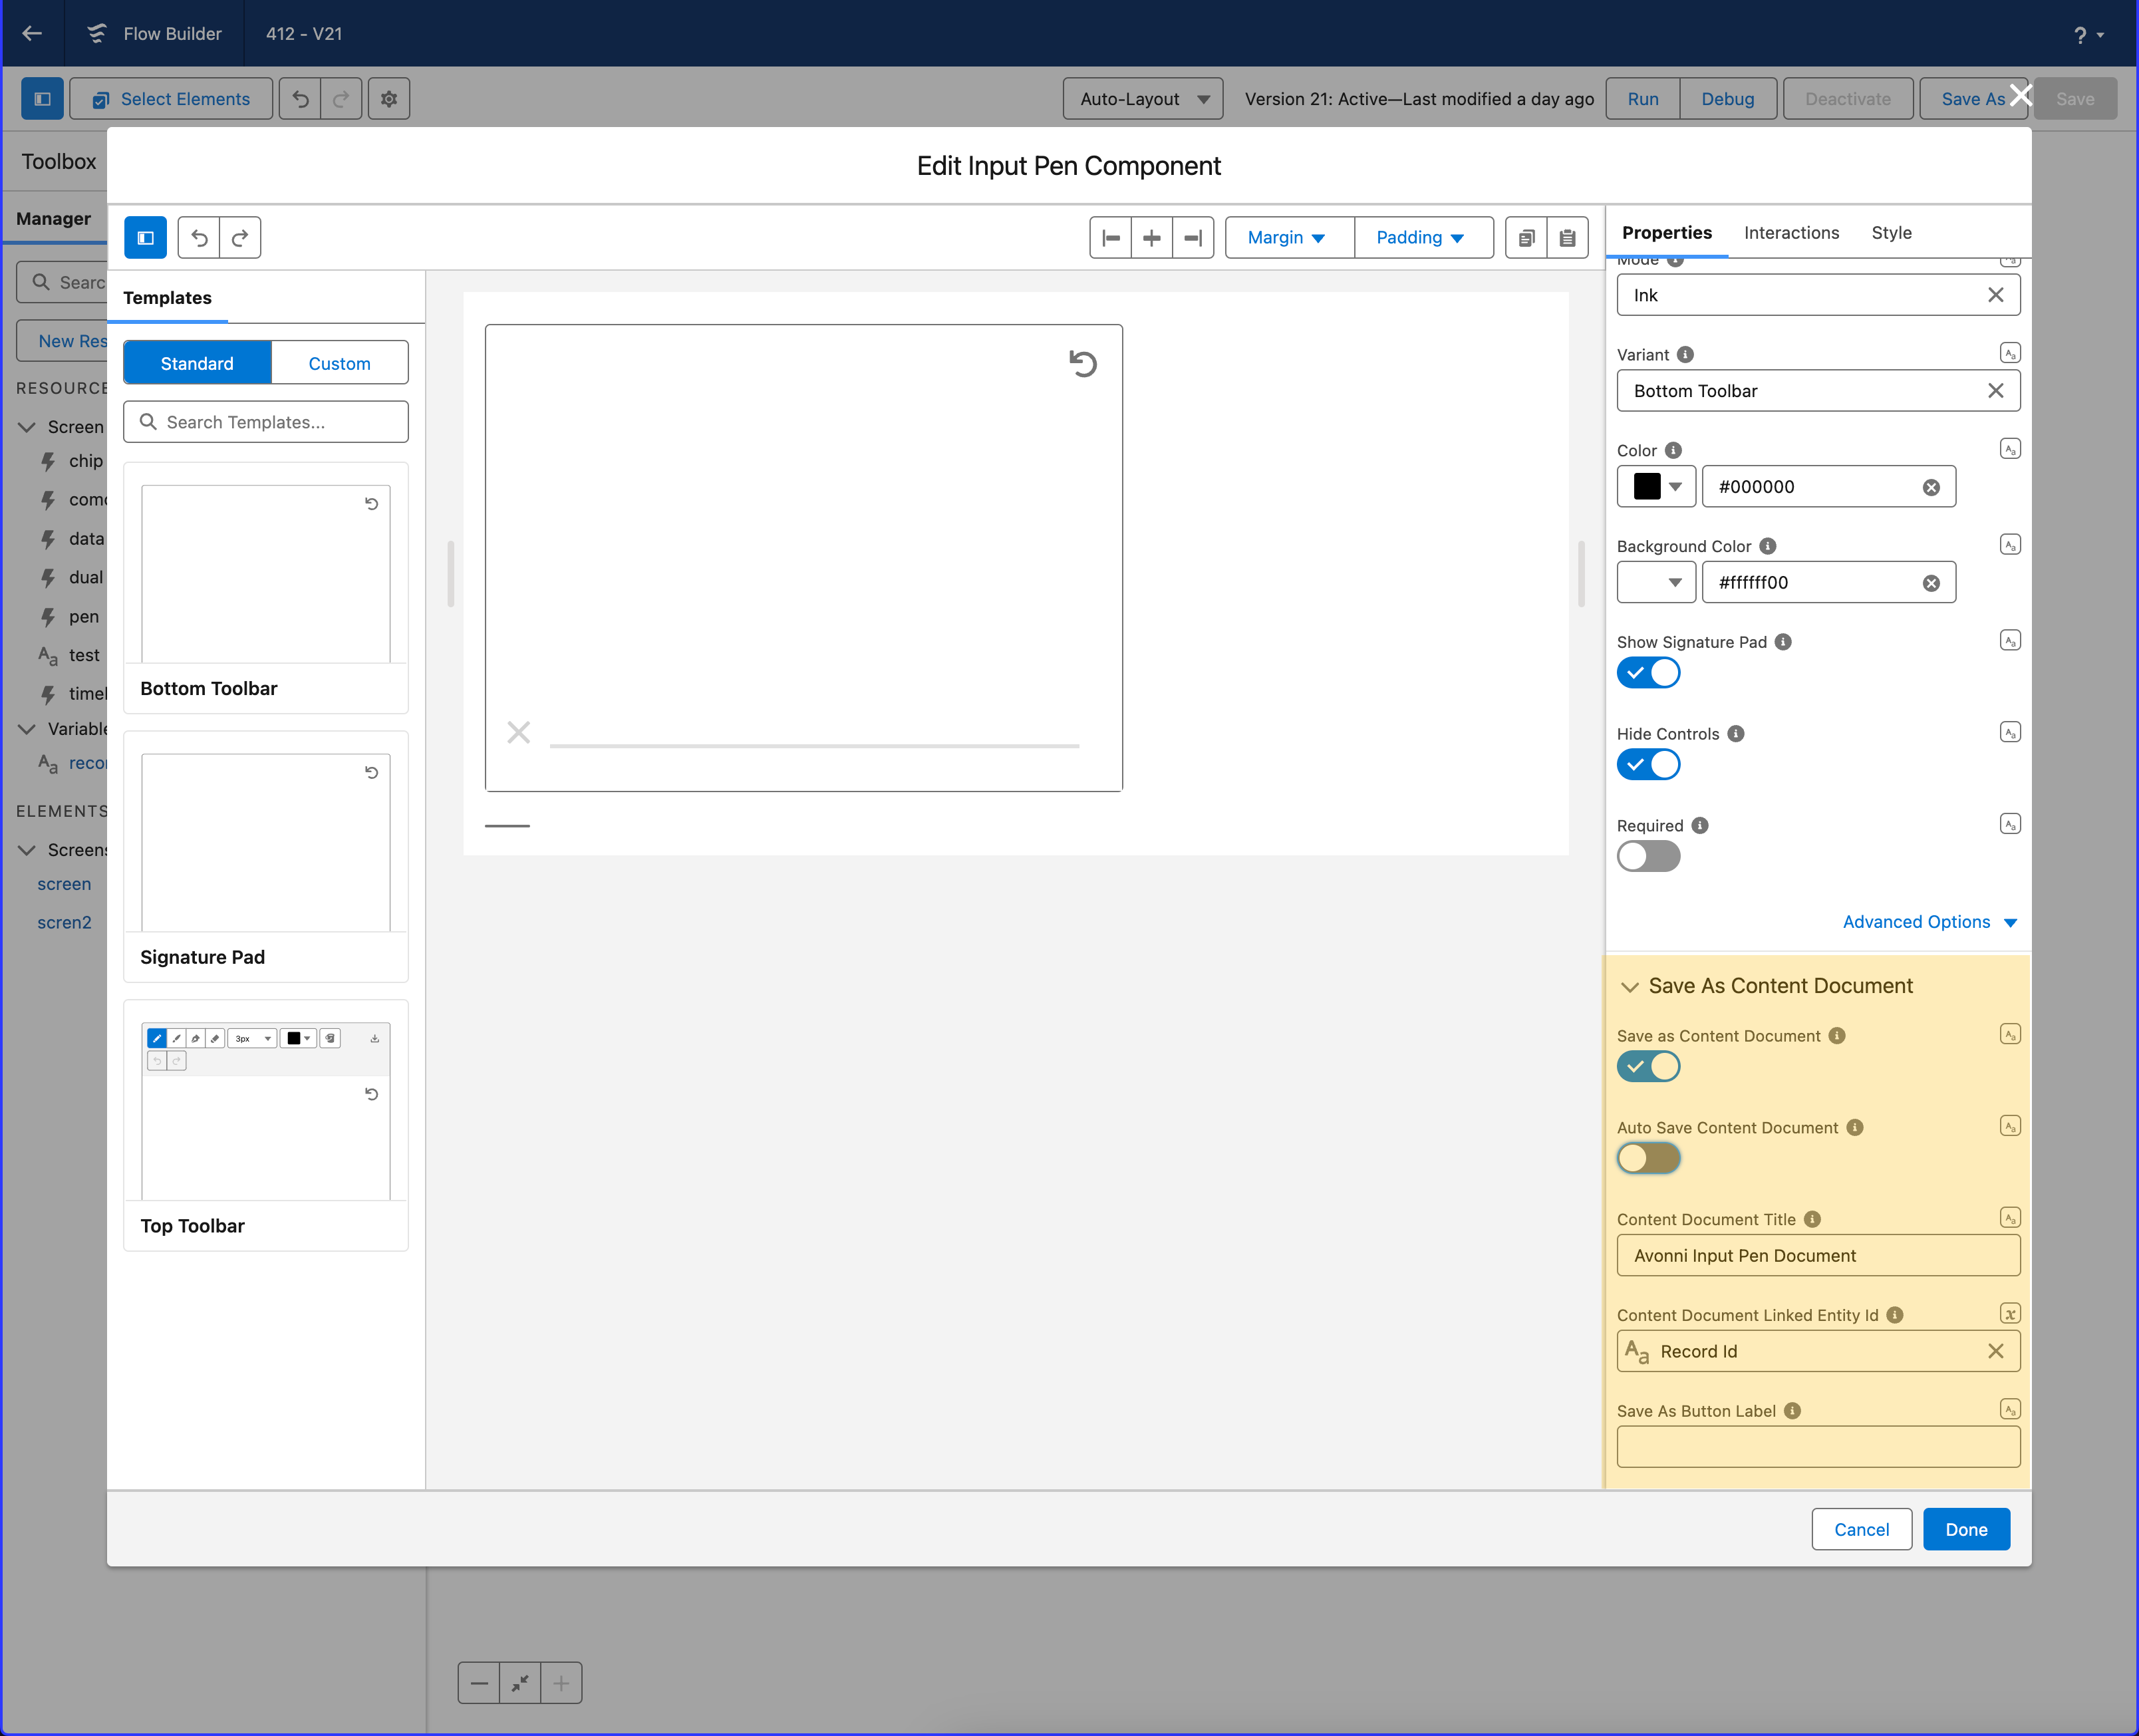
In this step, we will set up the functionality to manually save the input pen signature into the related record's notes and attachments section in Salesforce. Follow these instructions for a clear configuration:
1. **Enable Save Feature**: Locate the 'Save as content document' section in the settings and toggle it on. This action activates the feature that saves the drawing.
2. **Set Up Auto Save (Optional)**:
* Enable the'Auto Save Content Document' option if you want the signature to be saved automatically.
* Every signature drawn is automatically stored as a content document without additional user actions.
3. **Content Document Title**:
* Set the 'Content Document Title' to name the saved file.
* You can provide a fixed title or use a mapped value for a dynamic file name that adapts to different contexts or records.
4. **Link to a Salesforce Record**:
* Use the 'Content Document linked entity ID' setting to connect the signature to a specific Salesforce record.
* Map this setting to the variable you created in Step 1. This step is crucial for the functionality to work correctly.
5. **Customize Save Button (Optional)**:
* If you wish to provide a manual save option, you can edit the label of the 'Save as' button.
* This customization allows you to tailor the button text to suit your users' needs or application context.
By following these steps, you will successfully configure the Avonni Input Pen component to save signatures or drawings directly into Salesforce, with options for both automatic and manual saving
### 5. Add your flow to your Salesforce
Once your flow is created, you can add it directly on Salesforce. For example, we will add it to the contact record page using App Builder.
{% @arcade/embed url="" flowId="Tdzsyc3fnCeTG0w8Tb82" %}
{% hint style="info" %}
Don't forget [to pass your current RecordID](/flow/tutorials/tips-and-tricks/how-to-pass-your-current-recordid-in-your-screen-flow.md) in your screen flow when adding your flow on a page using Lightning App Builder.
{% endhint %}
---
# Agent Instructions
This documentation is published with GitBook. GitBook is the documentation platform designed so that both humans and AI agents can read, navigate, and reason over technical content effectively. Learn more at gitbook.com.
## Querying This Documentation
If you need additional information that is not directly available in this page, you can query the documentation dynamically by asking a question.
Perform an HTTP GET request on the current page URL with the `ask` query parameter, and the optional `goal` query parameter:
```
GET https://docs.avonnicomponents.com/flow/tutorials/components/input-pen/how-to-store-input-pen-drawings-as-attachments-in-salesforce.md?ask=&goal=
```
`ask` is the immediate question: it should be specific, self-contained, and written in natural language.
`goal` is optional and describes the broader end goal you are ultimately trying to accomplish on behalf of the user. GitBook uses it to tailor the answer towards what is most useful for that goal.
The response will contain a direct answer to the question and relevant excerpts and sources from the documentation.
Use this mechanism when the answer is not explicitly present in the current page, you need clarification or additional context, or you want to retrieve related documentation sections.
.gif?alt=media)
.gif?alt=media)