> For the complete documentation index, see [llms.txt](https://docs.avonnicomponents.com/llms.txt). Markdown versions of documentation pages are available by appending `.md` to page URLs; this page is available as [Markdown](https://docs.avonnicomponents.com/flow/flow-components/combobox.md).

# Combobox

## Overview

<figure><img src="/files/d8Rg7F4h2Z8FLyaoz3EK" alt="" width="375"><figcaption></figcaption></figure>

The Avonni Combobox provides a dropdown input for selecting one or multiple options in a Screen Flow. It supports searchable dropdowns, manual lists, Salesforce records, and picklist fields as data sources, with optional custom actions inside the dropdown.

Key features include:

* **Flexible Selection:** Supports single or multi-select with optional search.
* **Customizable UI:** Adjust labels, variants, placeholders, and dropdown alignment.
* **Data Sources:** Manual, Variable, Picklist, or Query for dynamic options.
* **Actions:** Add custom actions within the dropdown for enhanced interactivity.
* **Output Support:** Captures selected values for Flow logic or multi-select picklist fields.

**Audience:** Flow builders, business analysts, or admins creating interactive forms or record pickers in Screen Flows.

**Tip:** Use multi-select for fields like contact roles; bind Value to Flow variables for real-time updates.

**Use Cases:**

* **Case Form:** Select a single Contact or multiple Categories for case classification.
* **Opportunity Page:** Pick a Campaign or multiple Products.
* **Survey Flow:** Allow multi-select of interest areas from a Picklist.
* **Approval Workflow:** Select a single Approver or multiple Reviewers.
* **Dynamic Lookup:** Query Accounts for a searchable dropdown in a custom process.

***

## Tutorials

<table data-view="cards"><thead><tr><th></th><th></th><th></th><th data-hidden data-card-cover data-type="files"></th><th data-hidden data-card-target data-type="content-ref"></th></tr></thead><tbody><tr><td><strong>Creating comboboxes with dependant picklists</strong></td><td></td><td></td><td><a href="/files/V0P092d0gOt5E0DC7uji">/files/V0P092d0gOt5E0DC7uji</a></td><td><a href="/pages/Fnv4mMF20eVwQO5xrgMl">/pages/Fnv4mMF20eVwQO5xrgMl</a></td></tr><tr><td><strong>Dynamically enable/disable dependant picklists</strong></td><td></td><td></td><td><a href="/files/TZH9E4O1k9qreFlFZYJV">/files/TZH9E4O1k9qreFlFZYJV</a></td><td><a href="/pages/AMc1Ejak4w4tKklmUbGg">/pages/AMc1Ejak4w4tKklmUbGg</a></td></tr><tr><td><strong>Combobox: Dependent Picklists &#x26;</strong></td><td></td><td></td><td><a href="/files/VdfaHRLLh8moOPaTb7AL">/files/VdfaHRLLh8moOPaTb7AL</a></td><td><a href="https://youtu.be/bzZ7B1nHDYI">https://youtu.be/bzZ7B1nHDYI</a></td></tr></tbody></table>

***

## Configuration

To configure it, click the component on the Flow screen. The **Edit Combobox Component** panel opens on the right with three tabs: Properties, Interactions, and Style. The sections below mirror the Properties tab.

### Data Source

This section determines where the Combobox gets its list of options. Without a data source, the dropdown is empty.

| Data Source                                                  | Description                                                                            | When to Use                                                       |
| ------------------------------------------------------------ | -------------------------------------------------------------------------------------- | ----------------------------------------------------------------- |
| [Manual](/flow/component-builder/data-sources/manual.md)     | Enter options directly for static lists.                                               | Simple, predefined choices (e.g., "Yes/No").                      |
| [Variable](/flow/component-builder/data-sources/variable.md) | Use a Flow Collection Variable (e.g., from Get Records) for a dynamic list of records. | When options come from queried data (e.g., Contact records).      |
| [Picklist](/flow/component-builder/data-sources/picklist.md) | Pull options from a Picklist field on a Salesforce object.                             | For fixed values from a field (e.g., `StageName` on Opportunity). |
| [Query](/flow/component-builder/data-sources/query.md)       | Run a SOQL query to fetch records dynamically.                                         | Custom, query-based lists.                                        |

### Data Mapping

Map fields from your data source to the Combobox's display properties.

| Property           | Description                                     |
| ------------------ | ----------------------------------------------- |
| **Label**          | Main text displayed for each option.            |
| **Secondary Text** | Additional text below the label for context.    |
| **Disabled**       | Marks an option as unselectable.                |
| **Avatar**         | URL or binding for an image next to the option. |

### Properties

**Label** sets the text label shown above the combobox input.

**Variant** controls label placement: **Standard** (above), **Label Hidden**, **Label Inline** (beside), or **Label Stacked** (animates up on focus).

**Placeholder** sets hint text shown when the field is empty.

**Dropdown Alignment** positions the dropdown relative to the input: Auto, Left, Center, Right, Bottom Left, Bottom Center, or Bottom Right.

**Dropdown Length** caps how many items show before scrolling: 5 Items, 7 Items, or 10 Items.

**Is Multi Select** enables multiple selections. When on, the **Value Collection** binding option appears for pre-filling multiple values.

**Value Collection** pre-fills the Combobox with multiple values when **Is Multi Select** is enabled.

**Show Search** displays a search bar inside the dropdown for filtering options.

**Required** requires a selection before the screen can advance.

**Hide Clear Icon** hides the button that clears the selection.

**Hide Selected Options** hides already-selected options from the dropdown list (multi-select).

**Keep Open on Select** keeps the dropdown open after selecting an option (multi-select).

**Hide Options Until Search** hides all options until the user starts typing (searchable mode only).

**Maximum Selected Items** caps how many items can be selected in multi-select mode.

**Minimum Selected Items** requires a minimum number of selections in multi-select mode.

**Message When Range Overflow** / **Message When Range Underflow** show validation error messages when selection limits are exceeded or not met.

**Field Level Help** adds a tooltip next to the label.

### Controlling Values

When using a Picklist data source, **Controlling Values** lets the Combobox filter picklist options based on a controlling field value — showing only the options relevant to the controlling field's current value.

<figure><img src="/files/0AiNMOrMeDwiLaztkYHD" alt=""><figcaption></figcaption></figure>

How it works:

1. Select a Picklist data source (e.g., `StageName` on Opportunity).
2. Choose a **Controlling Field** (e.g., `Type` on Opportunity).
3. The Combobox updates its options dynamically based on the controlling field value — showing only valid dependent values.

### Actions

Add custom action buttons inside the dropdown (e.g., "Create New", "View All").

| Setting               | Description                                     |
| --------------------- | ----------------------------------------------- |
| **Label**             | Text for the action button.                     |
| **Name**              | Unique identifier for the action.               |
| **Icon Name**         | SLDS icon for the action.                       |
| **Position**          | Top or Bottom of the dropdown.                  |
| **Display on Search** | Shows the action only while the user is typing. |
| **Fixed**             | Keeps the action visible regardless of scroll.  |
| **Disabled**          | Disables the action.                            |

## Interactions

[Interactions](/flow/component-builder/interactions-panel.md) define what happens when users interact with the Combobox. Configure them from the **Interactions** tab of the Edit Combobox panel.

### Change

Fires when the user selects or changes the combobox value. The selected value and record are exposed through outputs such as `value`, `valueCommaSeparated`, `selectedOption`, and `selectedOptions`.

### Action Click

Fires when a user clicks a custom action inside the dropdown. Use the **targetName** output to identify which action was clicked, or read `clickedActionName` to route your flow logic.

***

## Examples

### Example 1: Simple Contact Selection for Case

This example allows users to select a single Contact for a Case form and display the selected Contact ID on a confirmation screen.

{% stepper %}
{% step %}

#### **Create Flow Variables**

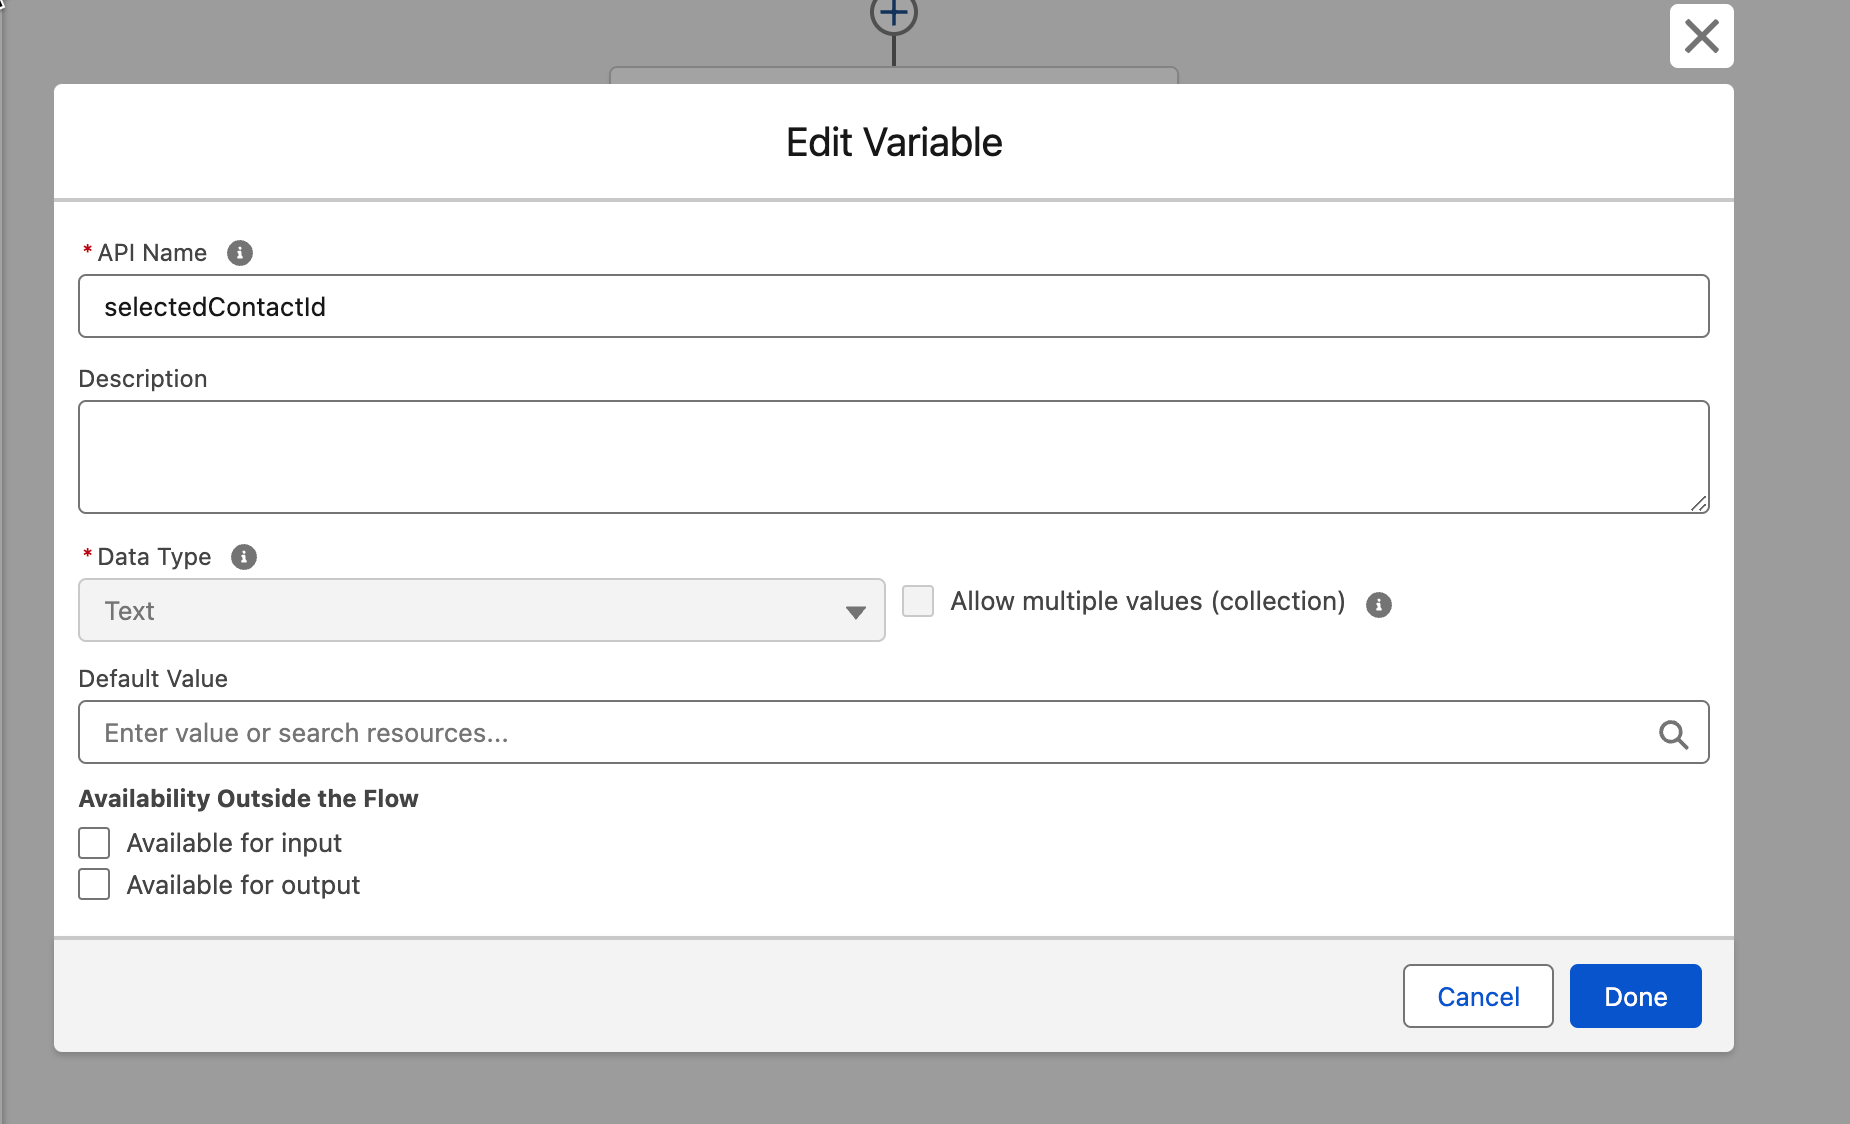
In the **Toolbox** > **Resources** tab:

* Click **New Resource** > **Variable**.
* **API Name:** selectedContactId
* **Data Type:** Text
* **Allow multiple values (collection):** Leave unchecked.
* Click **Done**.

<figure><img src="/files/areEi3Wv251tQu72WcPD" alt=""><figcaption></figcaption></figure>
{% endstep %}

{% step %}

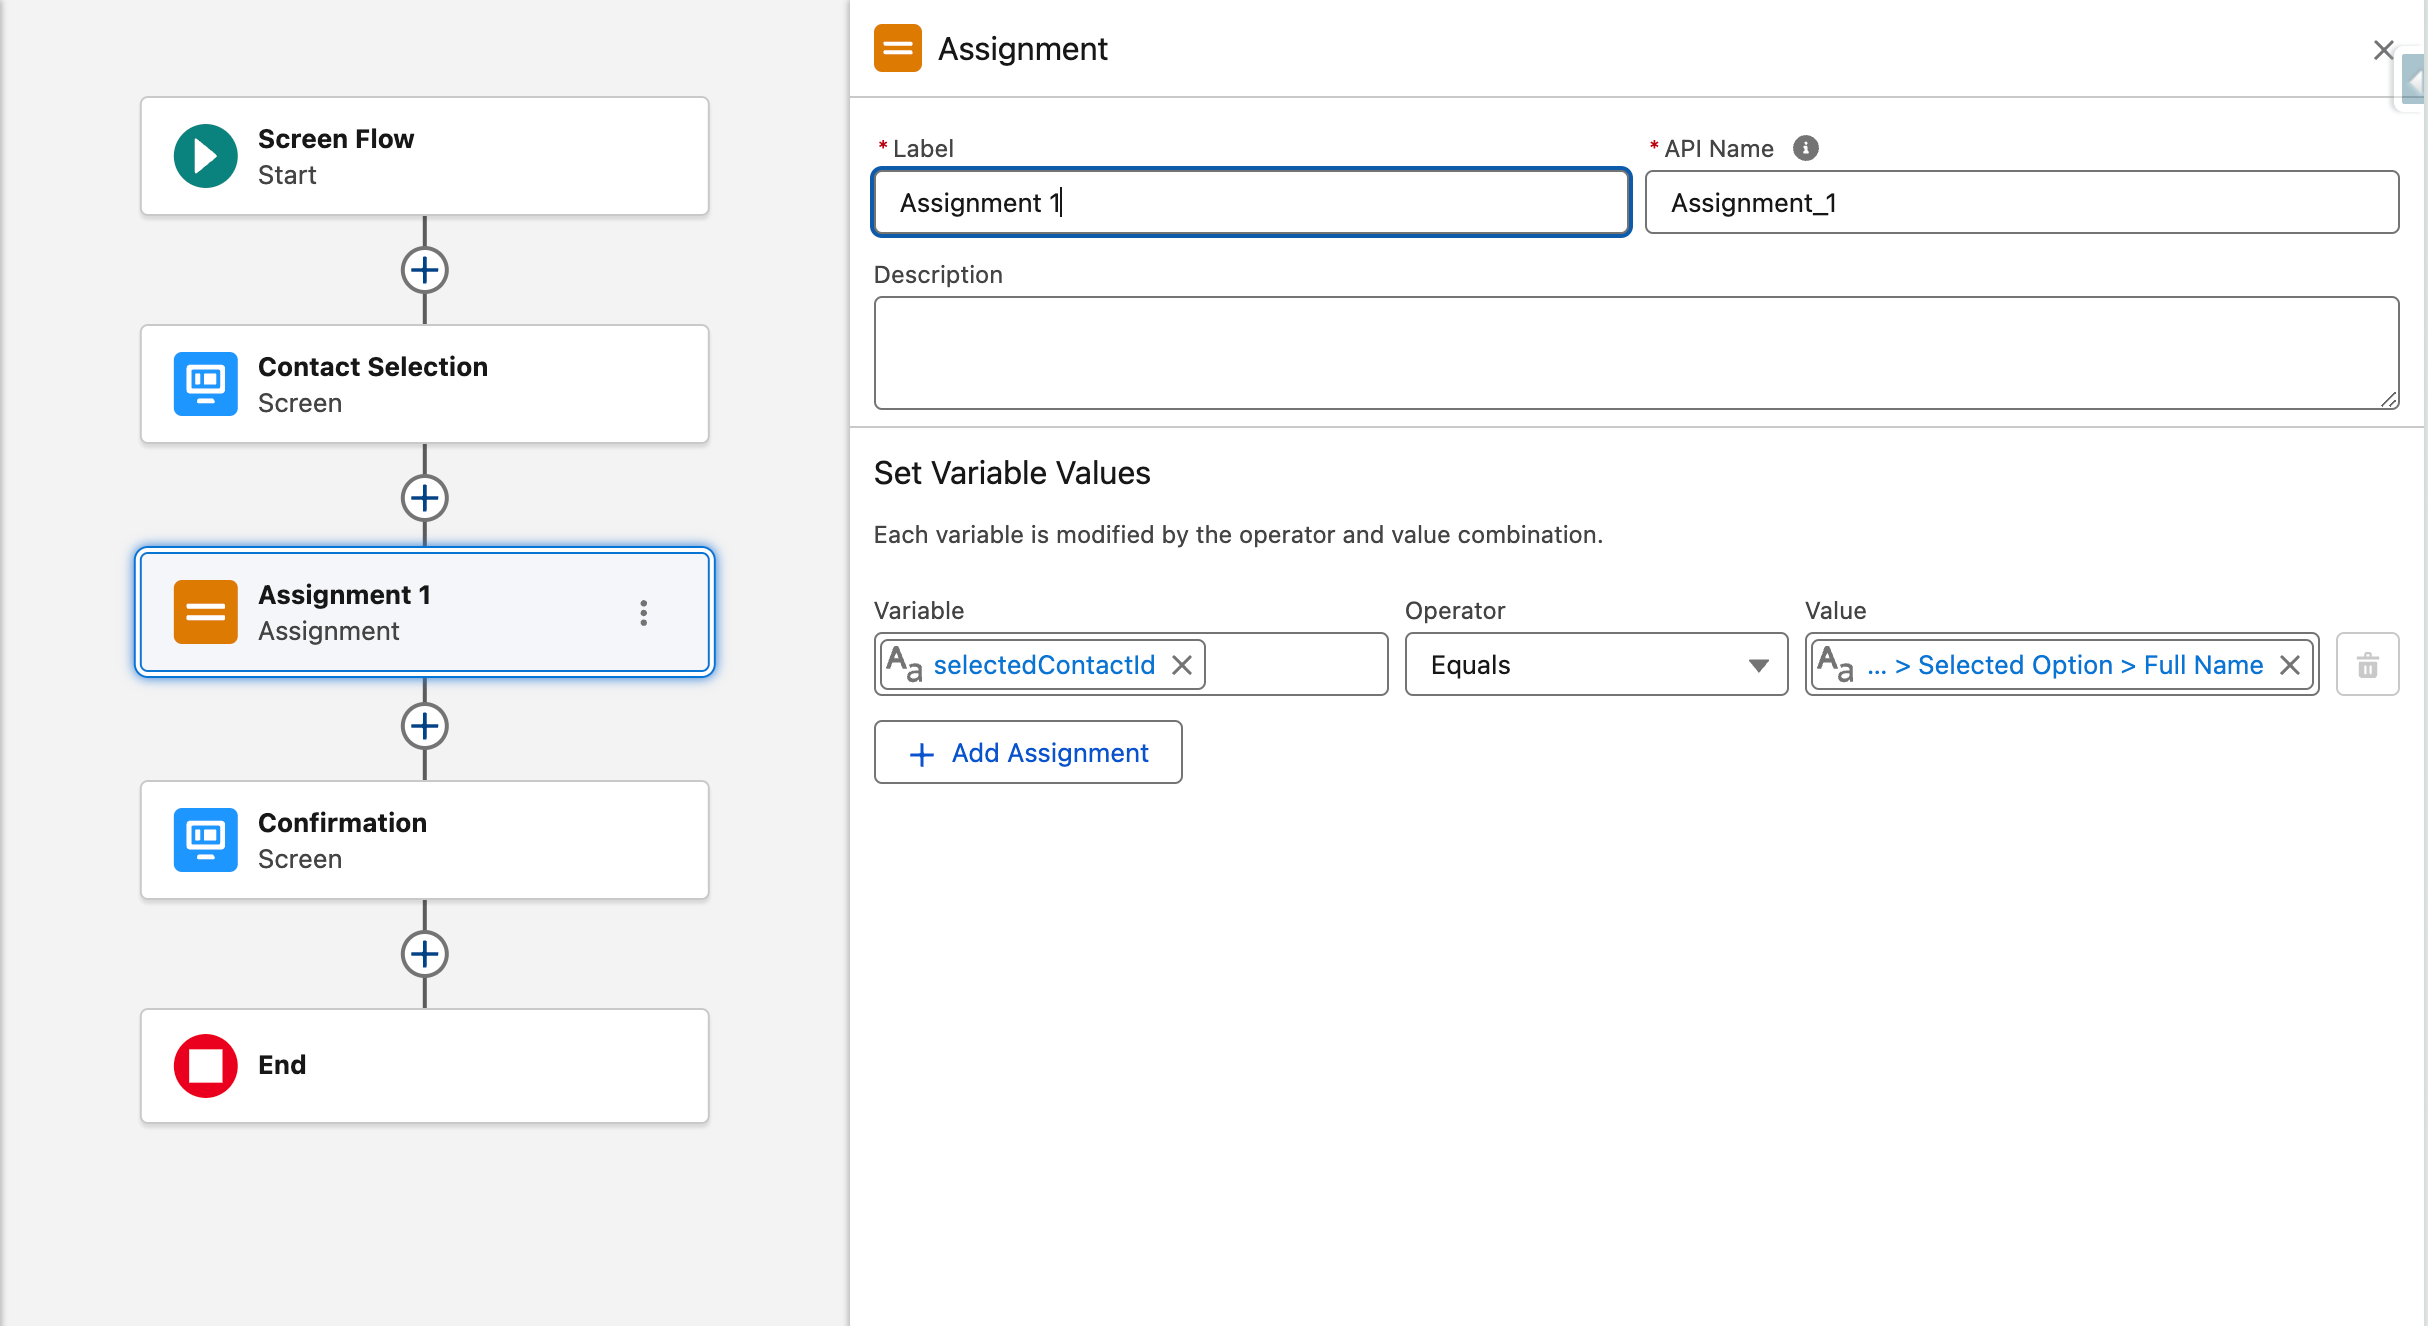
#### **Create Flow Screens and Elements**

* Add the following elements:
  * **Screen 1 (Contact Selection):** Add a **Next** button.
  * **Screen 2 (Confirmation):** Add a Text component with "Selected Contact ID: {!selectedContactId}" and a **Finish** button.
  * **Assignment Element (Assign Contact ID):** Between Screen 1 and Screen 2, set `{!selectedContactId}` = `$Component.ContactPicker.Value`.

<figure><img src="/files/LkkDHPRdr5LXiFs712dk" alt=""><figcaption></figcaption></figure>
{% endstep %}

{% step %}

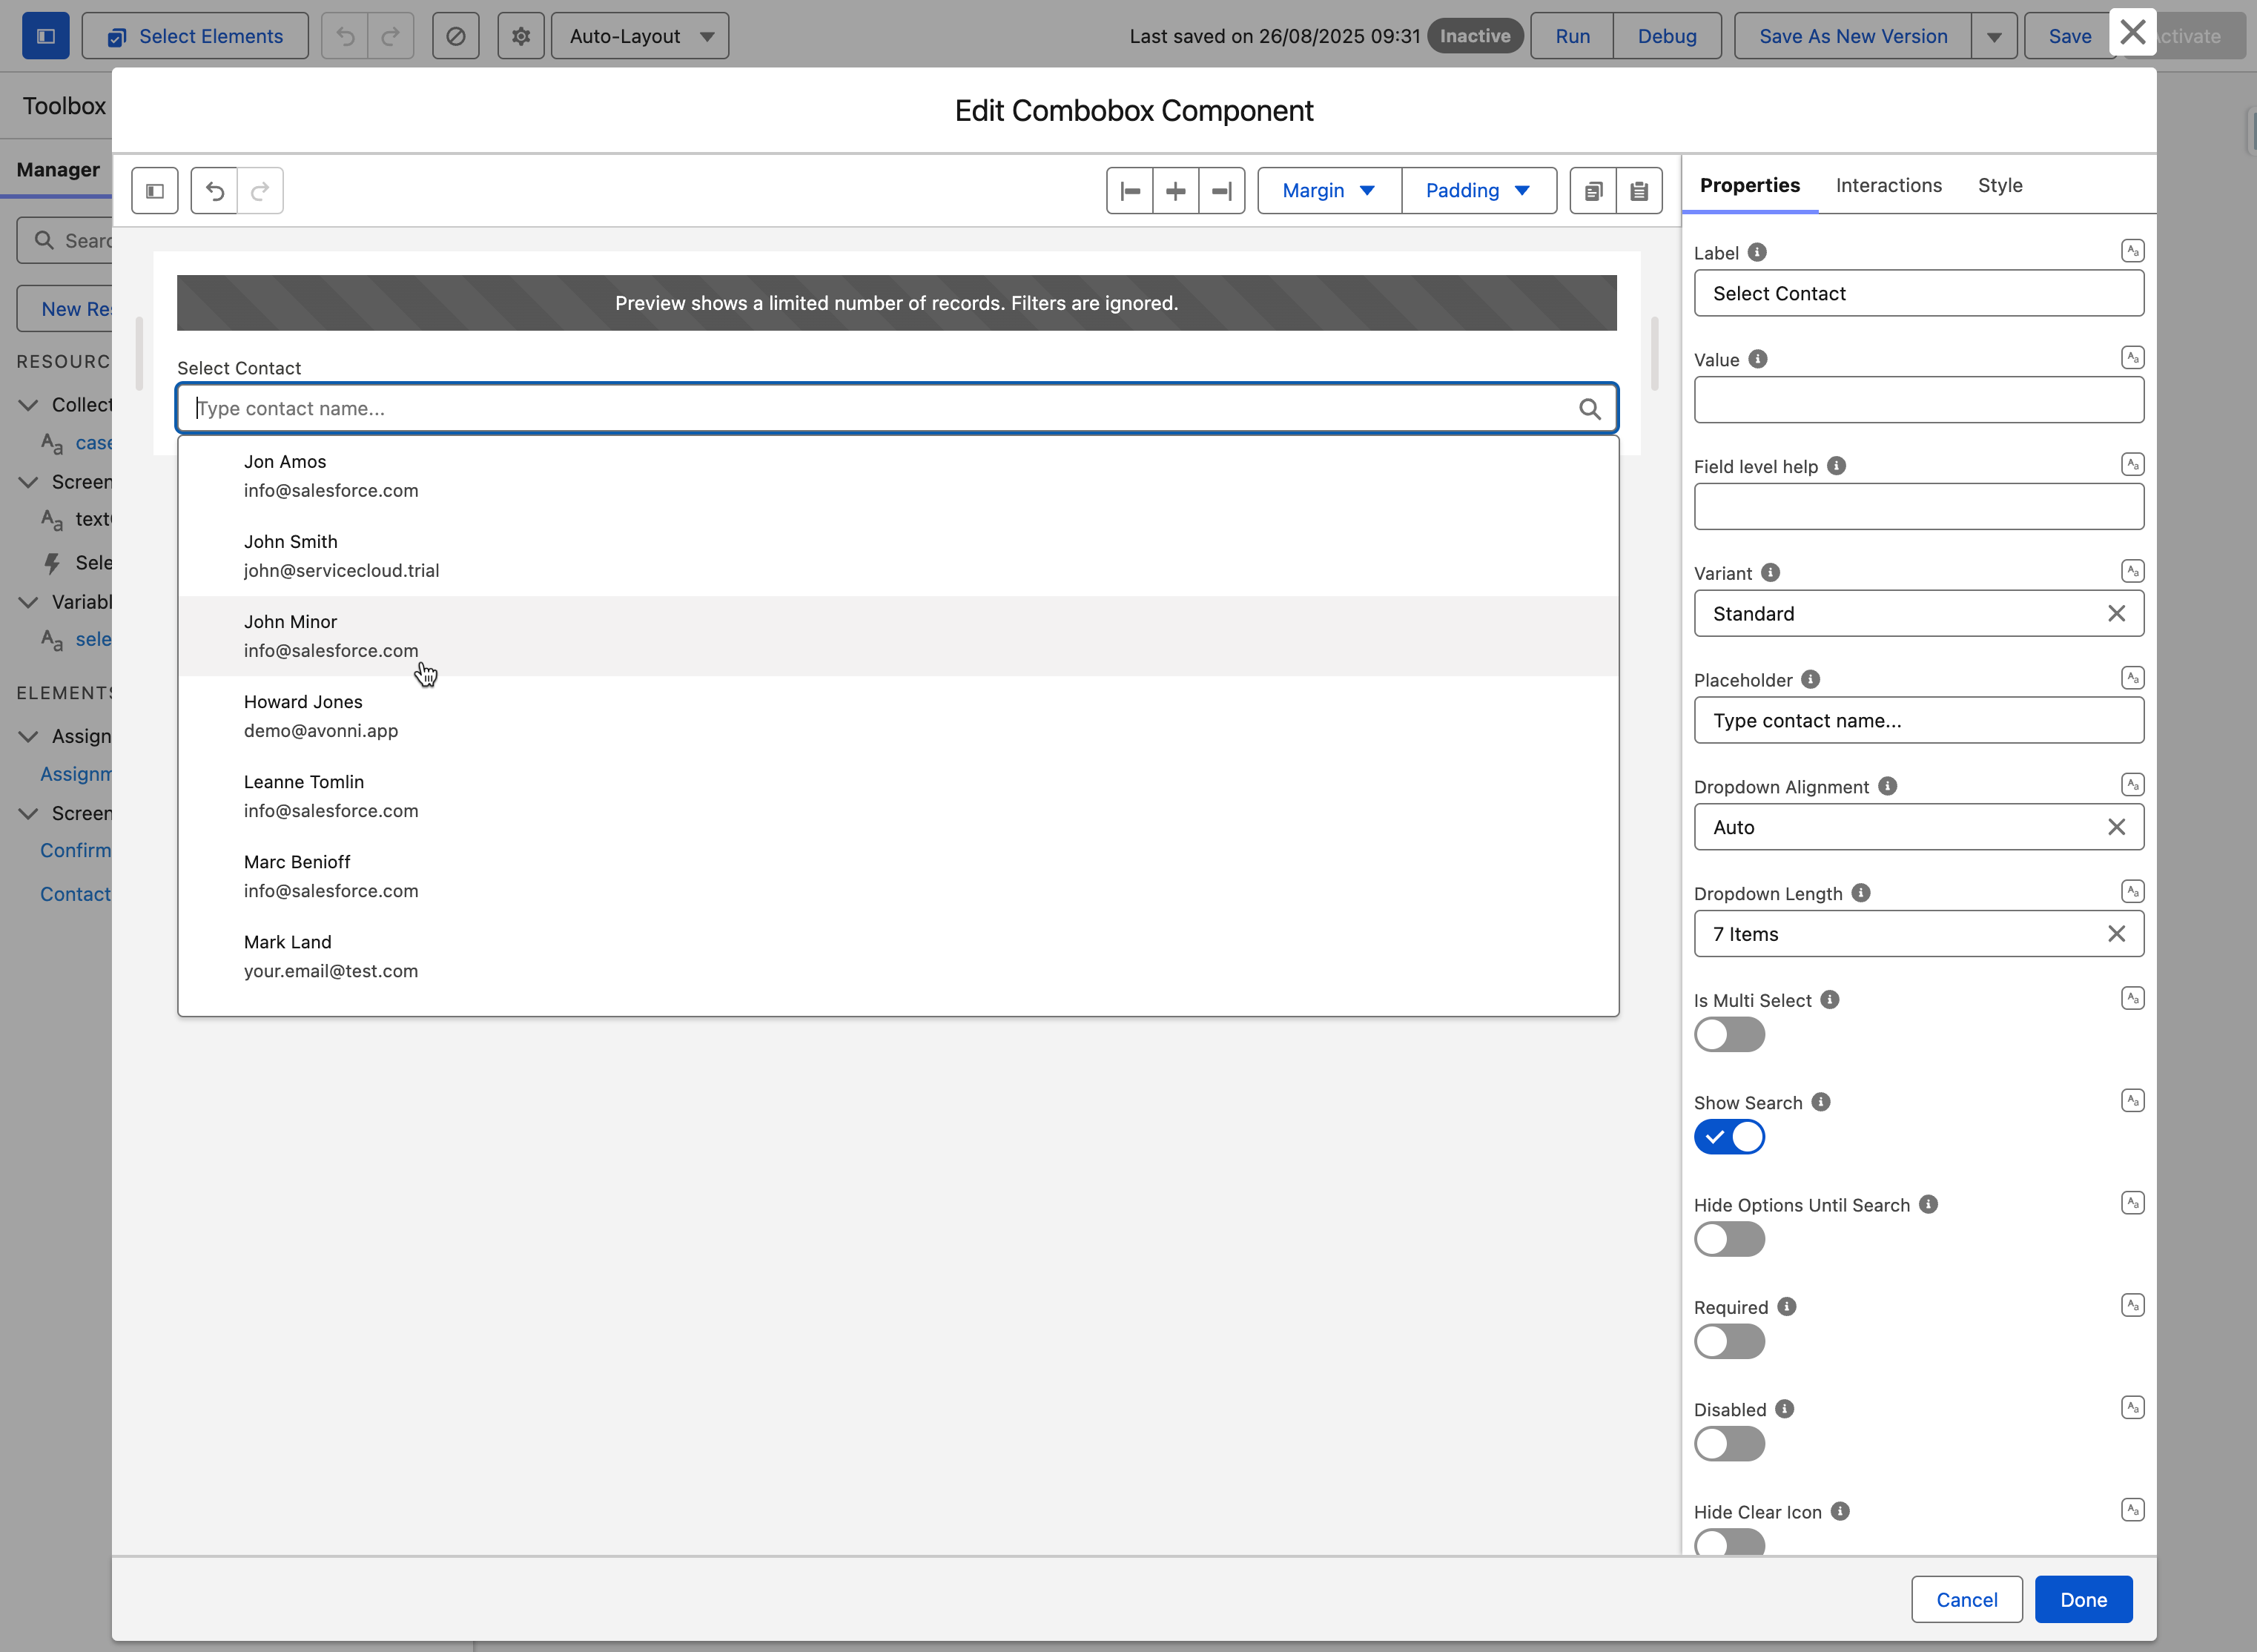
#### **Configure Combobox on Screen 1**

* Add the Avonni Combobox to **Screen 1**.
* Configure:
  * **API Name:** ContactPicker
  * **Label:** "Select Contact"
  * **Placeholder:** "Type contact name..."
  * **Show Search:** On
  * **Data Source:** Query on the Contact object
  * **Data Mappings:** Label → Name, Secondary Text → Email

<figure><img src="/files/HczAXs4oTKJTS1d6ESmL" alt=""><figcaption></figcaption></figure>
{% endstep %}

{% step %}

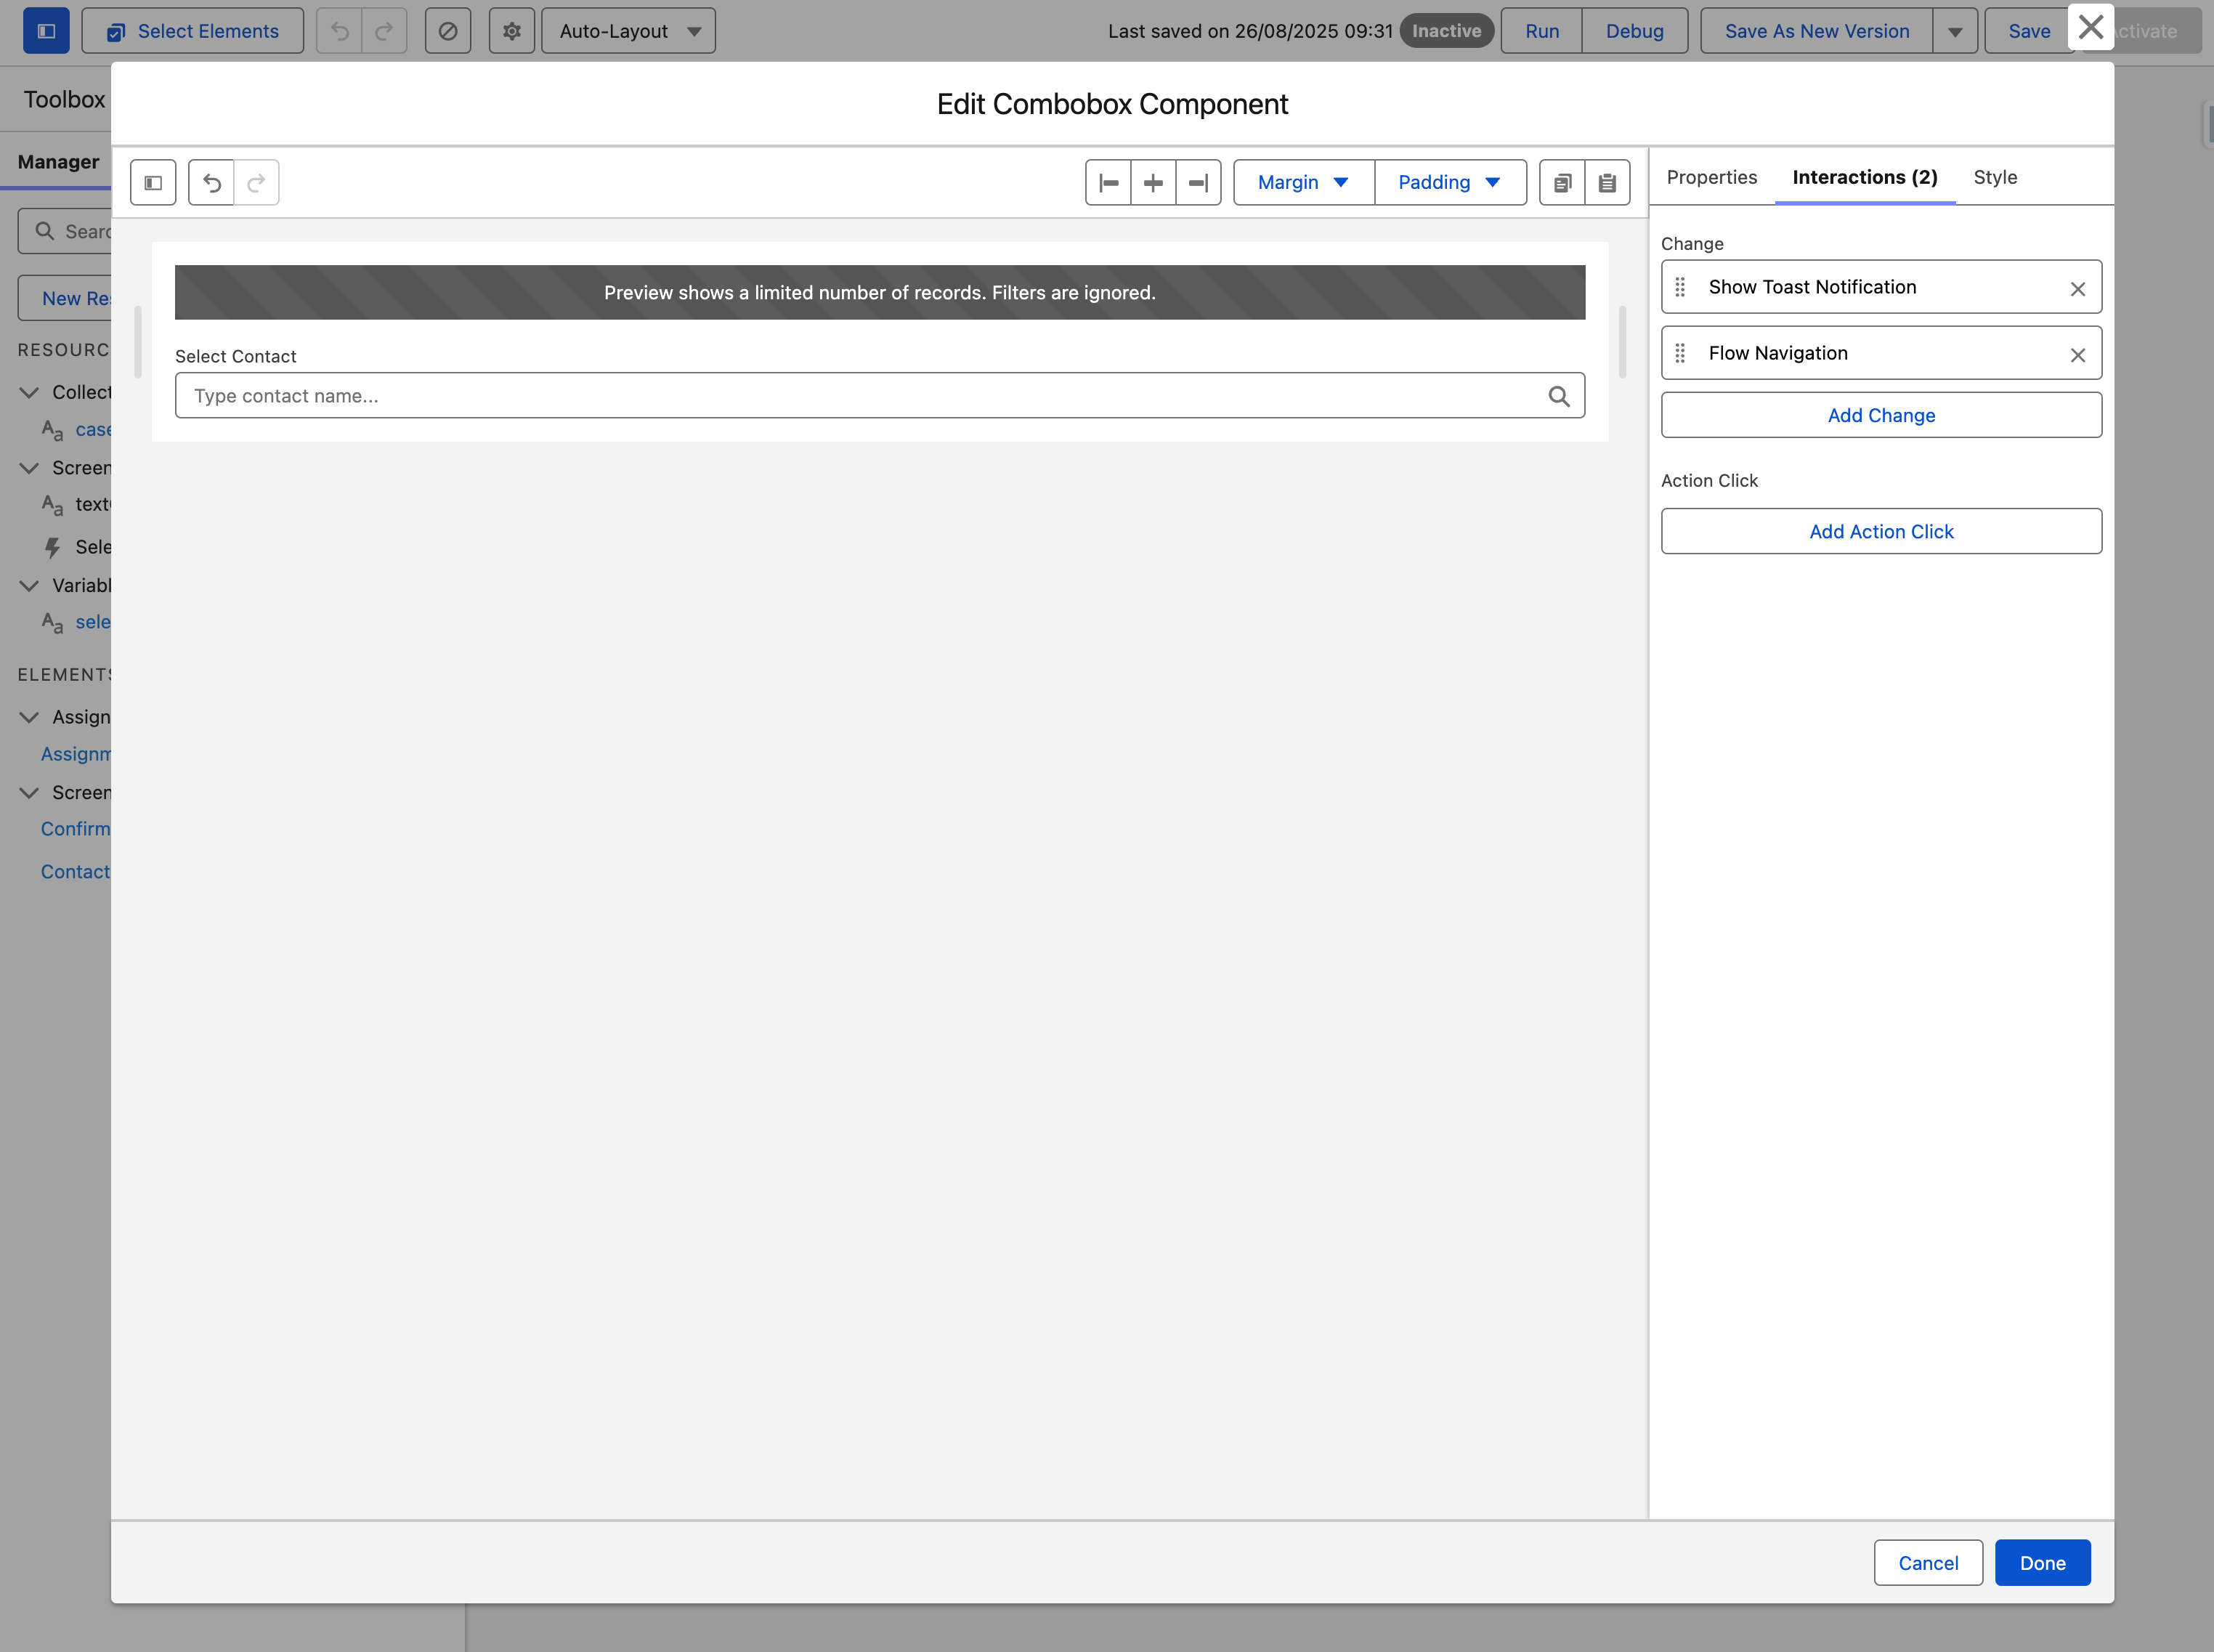
#### **Set Interactions on Screen 1**

* In the Interactions Tab, configure **On Change**:
  * Add a **Show Toast** action: Message: "Contact selected!", Type: Info.

<figure><img src="/files/VDO4pLcY66QkxSVFcEm0" alt=""><figcaption></figcaption></figure>
{% endstep %}

{% step %}

#### **Set Interaction on Screen 2**

For the "Finish" button on **Screen 2**: use Flow Builder's screen button to end the Flow.
{% endstep %}
{% endstepper %}

**Result:** Users select a Contact on Screen 1, see a toast, click Next to assign the Contact ID to `{!selectedContactId}`, and view it on Screen 2.

<figure><img src="/files/odUforrZaa5KUD8w1oel" alt=""><figcaption></figcaption></figure>

### Example 2: Outputting Multi-Select Values to a Picklist Field

Enable **Is Multi Select** and bind the Combobox's **Value** to a Text Collection Variable. Use the `valueCollectionSerialized` output (semicolon-separated, e.g., `Hiking;Reading`) in an **Update Records** element to save directly to a multi-select picklist field.

**Prerequisites:** The target multi-select picklist field must already exist on the object.

<figure><img src="/files/aR8L3LH6Rb3XHM9rusyz" alt="" width="563"><figcaption></figcaption></figure>

***

## Styling

The **Style** tab gives you fine-grained control over the Combobox's appearance. Configure it from the **Style** tab of the Edit Combobox panel.

{% tabs %}
{% tab title="Margin" %}
Controls the *outer* spacing around the combobox, creating space between it and other elements on the screen.

* **Top / Right / Bottom / Left:** Adjust the space on each side.
  {% endtab %}

{% tab title="Padding" %}
Controls the *inner* spacing between the combobox content and its border.

* **Top / Right / Bottom / Left:** Adjust the inner spacing on each side.
  {% endtab %}

{% tab title="Label" %}
Styles the combobox label.

* **Color:** Set the label text color.
* **Font Size / Font Style / Font Weight:** Control the label typography.
  {% endtab %}

{% tab title="Border" %}
Customizes the border surrounding the combobox input.

* **Color:** Set the border color.
* **Size:** Adjust the border thickness.
* **Style:** Choose a border style (e.g. solid, dashed, dotted).
* **Radius:** Control the roundness of the corners.
  {% endtab %}

{% tab title="Options" %}
Styles the dropdown options. Colors are set per state (default, hover, disabled).

* **Background Color:** Set the option background in each state.
  {% endtab %}

{% tab title="Options Label" %}
Styles the option label text. Colors are set per state (default, hover, disabled).

* **Color:** Set the label color in each state.
* **Font Size / Font Style / Font Weight:** Control the label typography.
  {% endtab %}

{% tab title="Options Secondary Text" %}
Styles the secondary text shown under each option. Colors are set per state (default, hover, disabled).

* **Color:** Set the secondary text color in each state.
* **Font Size / Font Style / Font Weight:** Control the secondary text typography.
  {% endtab %}

{% tab title="Options Avatar" %}
Styles the avatar shown beside an option. Icon and initials colors are set per state (default, hover, disabled).

* **Border Color / Size / Style / Radius:** Style the avatar border.
* **Icon Background / Foreground Color:** Set the fallback icon colors.
* **Image Object Fit:** Control how the avatar image fits.
* **Initials Color / Font Style / Font Weight:** Style the avatar initials.
  {% endtab %}

{% tab title="Options Avatar Presence" %}
Styles the presence indicator on option avatars. Background color is set per presence status.

* **Border Color / Radius:** Style the presence indicator border.
* **Background Color:** Set the indicator color for each status (Away, Blocked, Busy, Focus, Offline, Online).
  {% endtab %}

{% tab title="Actions" %}
Styles the action items in the dropdown. Colors are set per state (default, hover, disabled).

* **Background Color:** Set the action background in each state.
  {% endtab %}

{% tab title="Actions Label" %}
Styles the action label text. Colors are set per state (default, hover, disabled).

* **Color:** Set the label color in each state.
* **Font Size / Font Style / Font Weight:** Control the label typography.
  {% endtab %}

{% tab title="Actions Icon" %}
Styles the action icons. Colors are set per state (default, hover, disabled).

* **Background / Foreground Color:** Set the icon colors in each state.
* **Radius:** Control the roundness of the icon corners.
  {% endtab %}

{% tab title="Pill" %}
Styles the selection pills shown for chosen values. Colors are set per state (default, hover).

* **Background Color / Text Color:** Set the pill colors in each state.
* **Border Color / Size / Style / Radius:** Style the pill border.
  {% endtab %}
  {% endtabs %}

***

## Output Variables

The Combobox exposes these output variables you can reference in your flow after the screen. To use them, select the screen element in Flow Builder, then the Combobox component, and pick the output variable you need.

### Item Selection

Updated each time the user selects or clears a value.

| Output variable           | Type              | What it returns                                                                                           |
| ------------------------- | ----------------- | --------------------------------------------------------------------------------------------------------- |
| **Selected Option**       | Record (SObject)  | The full record behind the selected option (single-select).                                               |
| **Selected Options**      | Record Collection | All selected records when multi-select is enabled.                                                        |
| **Value Comma Separated** | Text (String)     | The selected value(s) as a comma-separated string — useful for display or storing in a single Text field. |
| **Search Term**           | Text (String)     | The text the user typed in the search box at the moment the interaction fired.                            |

> **Example:** After a Contact picker combobox fires On Change, read **Selected Option** to get the full Contact record and use its Id in a Create Records element downstream.

### Action Click

Updated when the user clicks a custom action inside the dropdown.

| Output variable         | Type          | What it returns                                                                                   |
| ----------------------- | ------------- | ------------------------------------------------------------------------------------------------- |
| **Clicked Action Name** | Text (String) | The unique name of the action the user clicked, matching the Name you set in the Actions section. |

> **Example:** If you have a "Create New" action with Name `createNew`, check **Clicked Action Name** in a Decision element to branch into a record-creation sub-flow.

### Others

| Output variable     | Type    | What it returns                                               |
| ------------------- | ------- | ------------------------------------------------------------- |
| **Number of Items** | Integer | The total number of options currently loaded in the dropdown. |

### Flow Interaction Output Variables

Like all interactive Flow components, the Combobox exposes generic output slots (Variable 1–10) that an [Open Flow Dialog](/flow/component-builder/interactions-panel/open-flow-dialog.md) or [Open Flow Panel](/flow/component-builder/interactions-panel/open-flow-panel.md) interaction can fill with values from a launched flow. See [Flow Interaction Output Variables](/flow/component-builder/interactions-panel/flow-interaction-output-variables.md).

## Key Considerations

* **Data Source Choice:** Use Query for dynamic records; Picklist for fixed options; map fields accurately.
* **Multi-Select Output:** Bind Value to a Text Collection Variable for multi-select; use `valueCollectionSerialized` for picklist fields.
* **Actions Use Case:** Actions (e.g., "Create New") enhance workflows; use sparingly to avoid clutter.
* **Performance:** Limit Dropdown Length and Query results for speed.
* **Accessibility:** Ensure clear Labels and Placeholders; test keyboard navigation.

***

## Troubleshooting Common Issues

* **No Options Shown** — Verify the Data Source is configured and field mappings are correct; check that the running user has object-level read permissions.
* **Search Not Working** — Enable the Show Search property; ensure the fields used for searching are Text-based, as other field types are not searchable.
* **Value Not Captured** — Bind the Value output to a Flow variable in the Interactions tab; confirm the interaction is set to fire on Change.
* **Multi-Select Values Not Saving** — Bind Value to a Text Collection Variable for multi-select; use the `valueCollectionSerialized` output when writing to a multi-select picklist field.
* **Dropdown Overlapping Other Elements** — Adjust the Dropdown Alignment and Dropdown Length settings; test the layout on mobile to confirm there are no overlap issues.
* **Custom Actions Not Appearing** — Add actions in the Actions section of the Properties tab and ensure each action has a unique Name value.

***


---

# Agent Instructions
This documentation is published with GitBook. GitBook is the documentation platform designed so that both humans and AI agents can read, navigate, and reason over technical content effectively. Learn more at gitbook.com.

## Querying This Documentation
If you need additional information that is not directly available in this page, you can query the documentation dynamically by asking a question.

Perform an HTTP GET request on the current page URL with the `ask` query parameter, and the optional `goal` query parameter:

```
GET https://docs.avonnicomponents.com/flow/flow-components/combobox.md?ask=<question>&goal=<endgoal>
```

`ask` is the immediate question: it should be specific, self-contained, and written in natural language.
`goal` is optional and describes the broader end goal you are ultimately trying to accomplish on behalf of the user. GitBook uses it to tailor the answer towards what is most useful for that goal.

The response will contain a direct answer to the question and relevant excerpts and sources from the documentation.

Use this mechanism when the answer is not explicitly present in the current page, you need clarification or additional context, or you want to retrieve related documentation sections.