> For the complete documentation index, see [llms.txt](https://docs.avonnicomponents.com/llms.txt). Markdown versions of documentation pages are available by appending `.md` to page URLs; this page is available as [Markdown](https://docs.avonnicomponents.com/dynamic-components/components/section.md).
# Expandable Section
The Avonni Expandable Section component displays a section of content with a header that can optionally be expanded or collapsed. Use it to organize related components — forms, lists, data displays — into clearly delimited, toggleable panels.
## Overview
The Expandable Section supports a title and caption in the header, a rich text body, optional collapsible behavior with customizable icons, and additional enhancements such as an avatar, actions, a progress indicator, and badge-like tags.
### Key features
* **Expandable Design:** Toggle content visibility for better UX in dense interfaces.
* **Customization:** Variants for styling, avatars for visual cues, and icons for collapsibility.
* **Interactivity:** Support for actions, progress indicators, and tags.
* **Slot Integration:** Embed other components (e.g., Text Areas, Sliders) within the section's content area.
{% hint style="success" %}
**Tip**
For creating accordion-like structures with multiple expandable panels, use the dedicated [Avonni Accordion component](/dynamic-components/components/accordion.md)
{% endhint %}
### Use Cases
* Group form fields in expandable panels (e.g., "Contact Details" section).
* Organize dashboard widgets, collapsing less-used ones.
* Display collapsible help content or FAQs.
* Structure reports with tagged, progress-tracked sections.
* Build nested UIs, like a section containing a Data Table for filtered views.
## Configuration
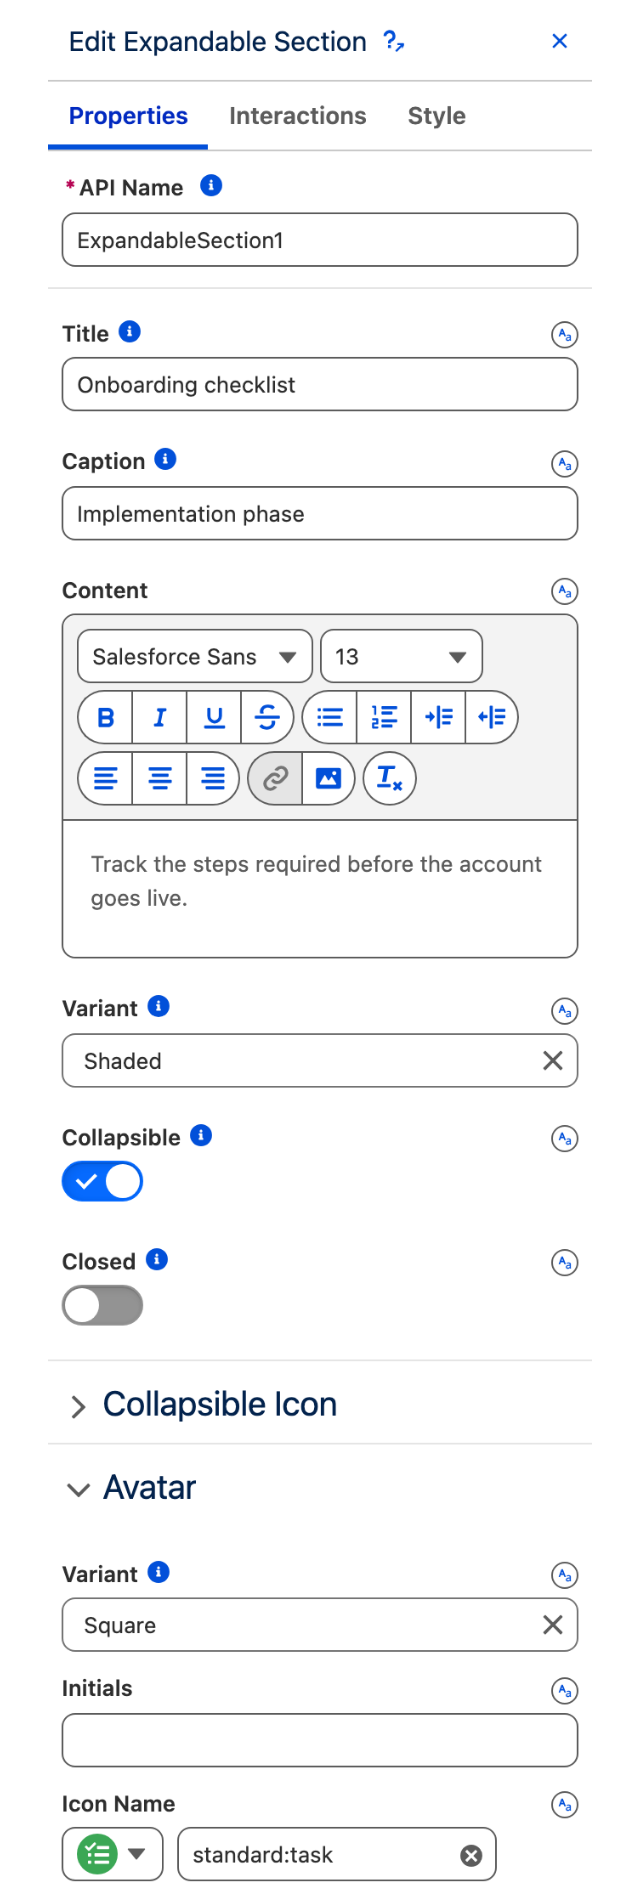
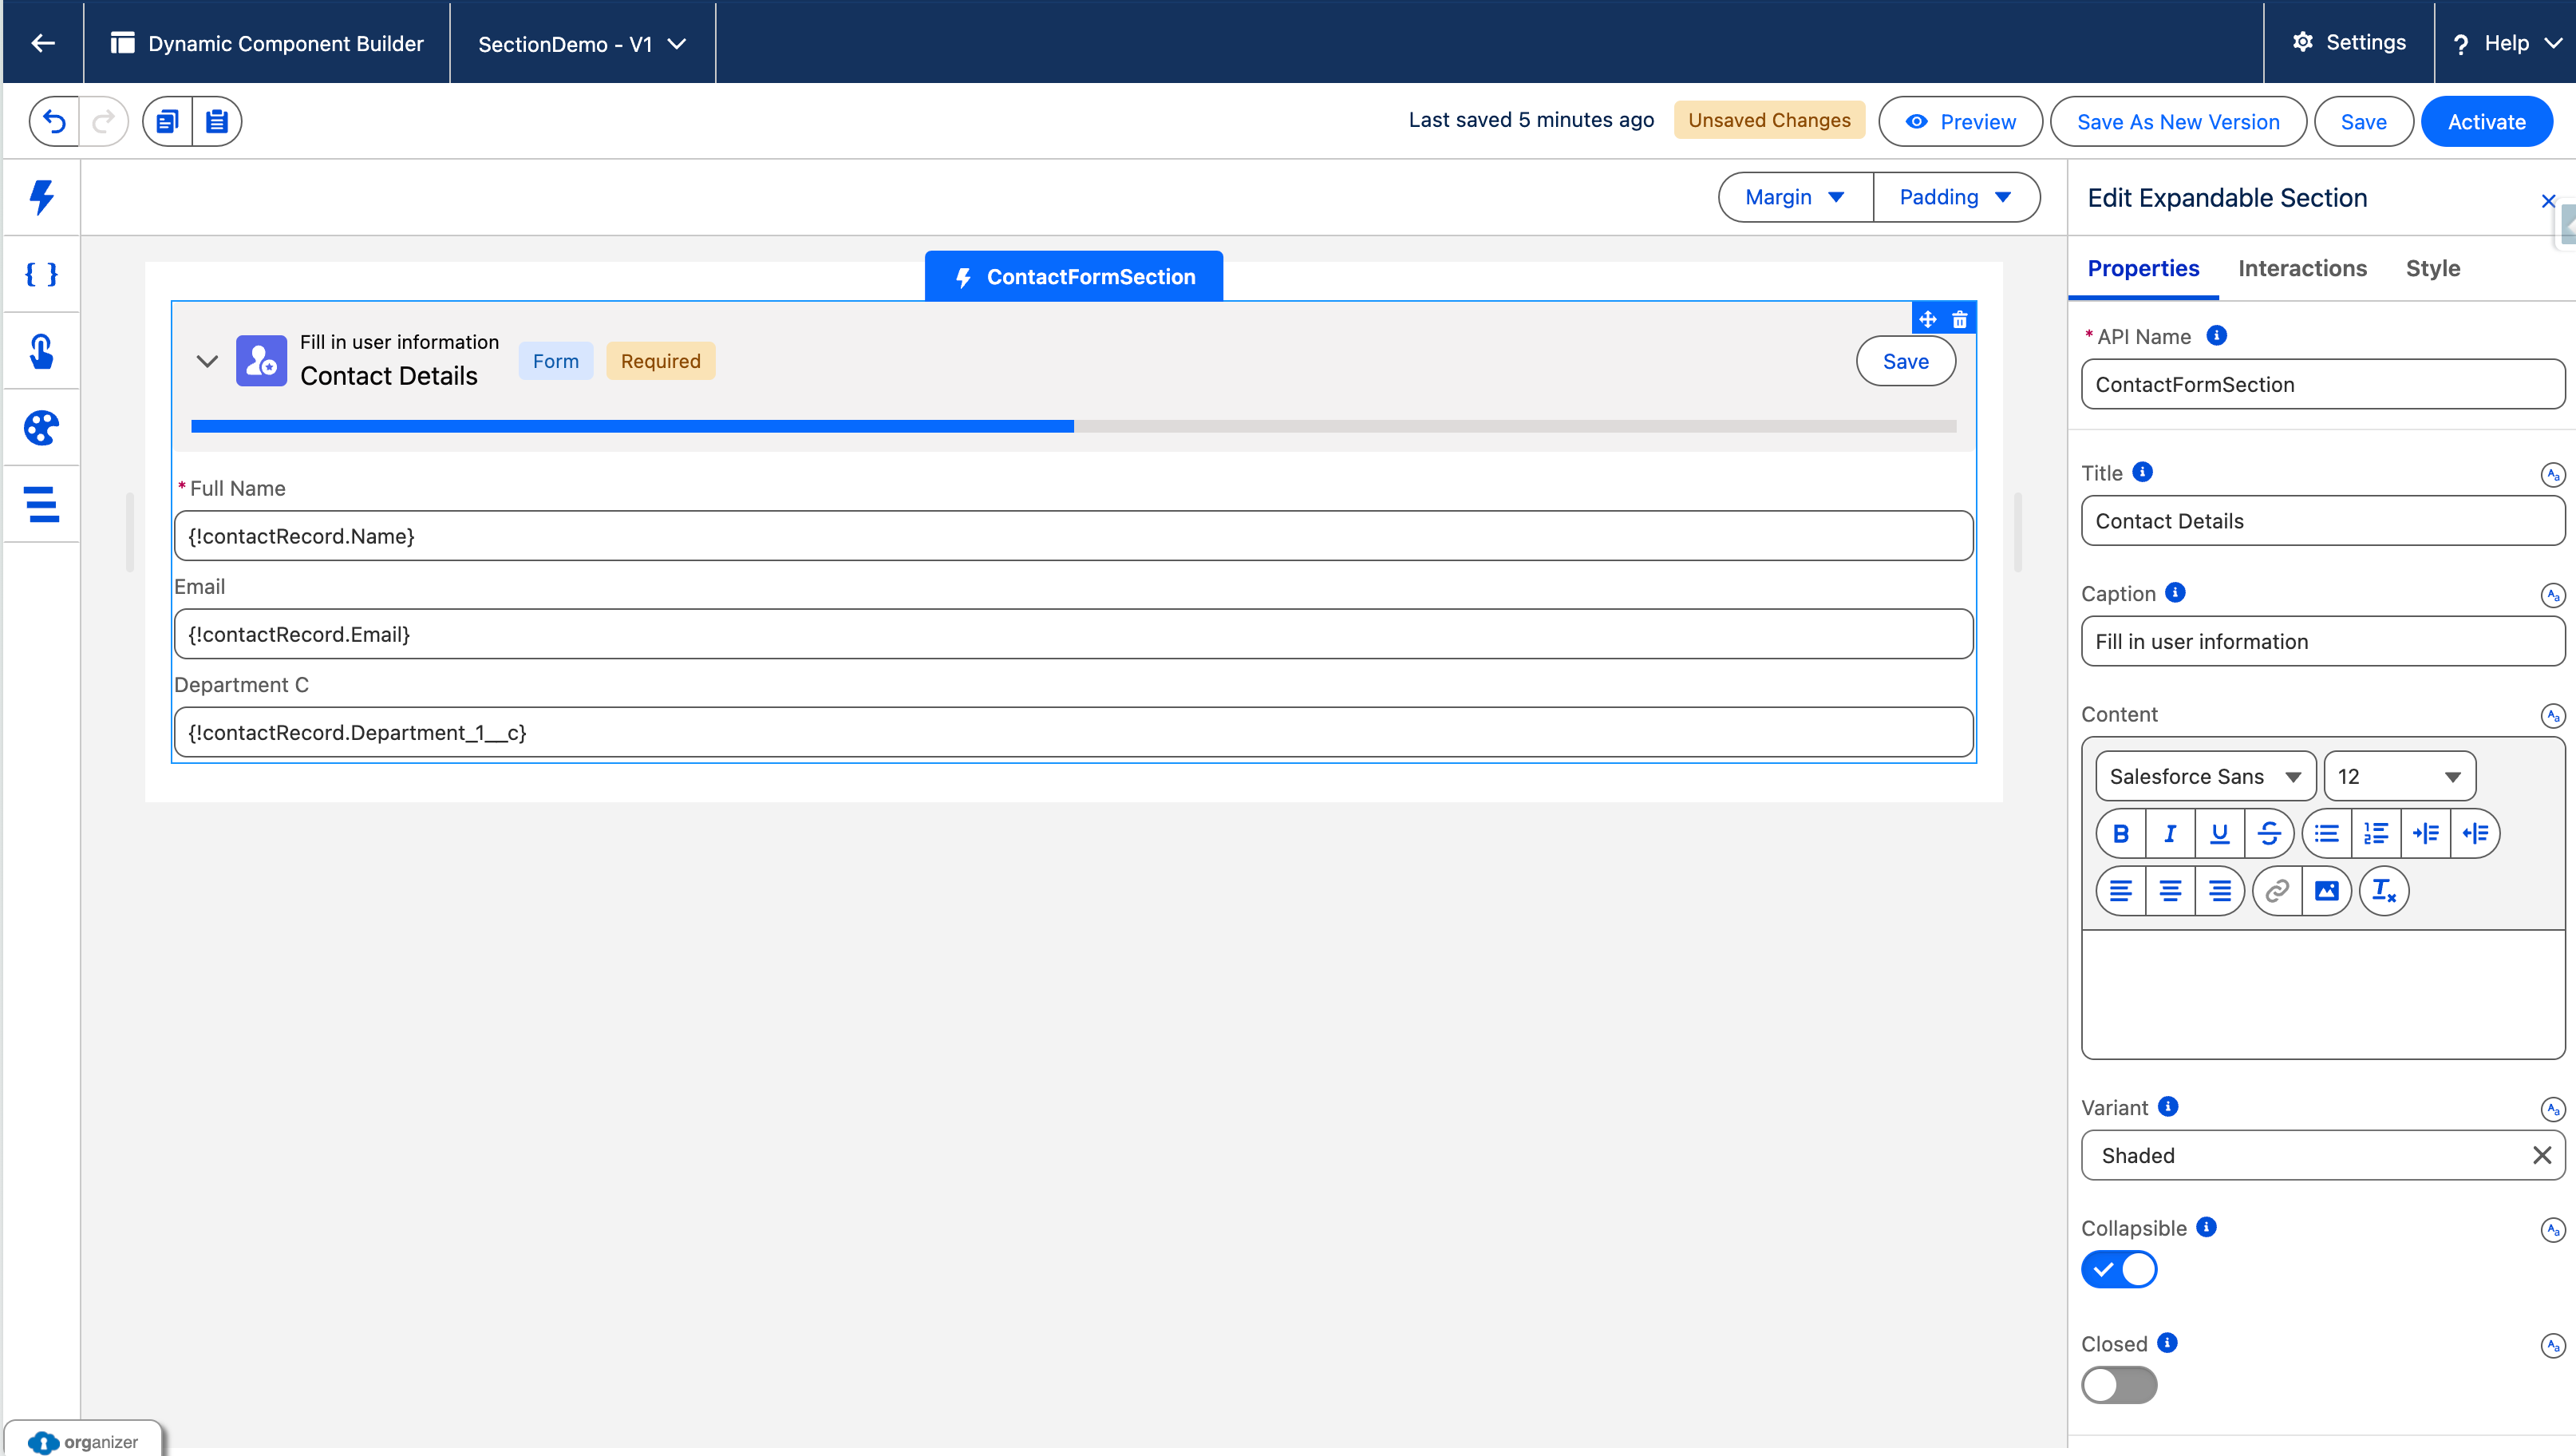
To configure the Expandable Section, select it on the canvas. The **Edit Expandable Section** panel opens on the right. The sections below mirror the Properties tab from top to bottom.
The Properties tab of the Edit Expandable Section panel.
### Properties
**Title** sets the main heading displayed in the section header. **Caption** adds a short line of text above the title for additional context.
**Content** is a rich text field for the section body. You can include static text, dynamic expressions, and references to other component values.
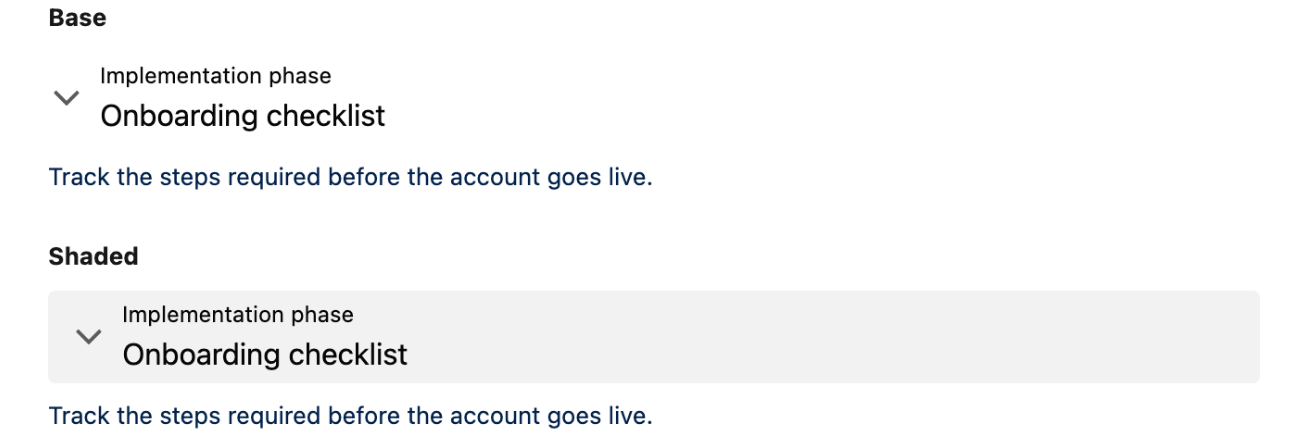
**Variant** controls the overall visual style of the section. Choose **Base** (default) for a clean, borderless look, or **Shaded** to apply a background fill that visually separates the section from the page.
The same section as Base and as Shaded.
**Collapsible** enables the toggle behavior that lets users expand and collapse the section. When this setting is off, the section is always open and the toggle icon is hidden.
**Closed** sets the initial state of the section to collapsed. Requires: **Collapsible** = enabled.
### Collapsible Icon
This group is only visible when **Collapsible** is enabled.
**Hide** removes the toggle icon entirely — useful when you want to control the open/closed state programmatically.
**Open Icon Name** sets the Lightning Design System icon shown when the section is expanded (default: `utility:chevrondown`). Requires: **Hide** = disabled.
**Close Icon Name** sets the Lightning Design System icon shown when the section is collapsed (default: `utility:chevronright`). Requires: **Hide** = disabled.
**Position** controls where the icon appears relative to the title. Choose **Left** (default) or **Right**. Requires: **Hide** = disabled.
### Avatar
Add a visual element to the left of the title to help users identify the section at a glance.
* **Variant** — Shape of the avatar: **Circle** or **Square** (default).
* **Initials** — Text overlay shown when no image is provided (e.g., user initials).
* **Icon Name** — A Lightning Design System icon used as a fallback when no image is set.
* **Icon Size** — Size of the avatar: X-Small, Small, Medium (default), Large, X Large, Xx Large.
* **Image** — URL of an image to display inside the avatar.
* **Alternative Text** — Accessible text describing the avatar image.
### Actions
Add clickable buttons to the section header. Each action is configured with:
* **Label** — Text displayed on the action button.
* **Name** — Unique identifier used to route the click to the correct interaction.
* **Icon Name** — Optional Lightning Design System icon for the button.
* **Disabled** — Prevents the action from being clicked.
* **Hidden** — Hides the action from view.
* **Alternative Text** — Accessible description of the action button icon (advanced).
**Visible Actions Buttons** sets how many action buttons are shown inline before remaining actions are collapsed into an overflow menu.
**Hide Actions** hides all actions at once — useful for conditionally showing them via a variable.
**Disable Actions** disables all actions at once.
{% hint style="success" %}
**Best Practice**
Limit to 2–3 actions to avoid clutter. Use **Visible Actions Buttons** to control overflow.
{% endhint %}
### Progress
Display a progress indicator in or around the section header to communicate completion status.
**Value** sets the numeric progress value (0–100). Requires: **Value** to be set before the sub-properties below appear.
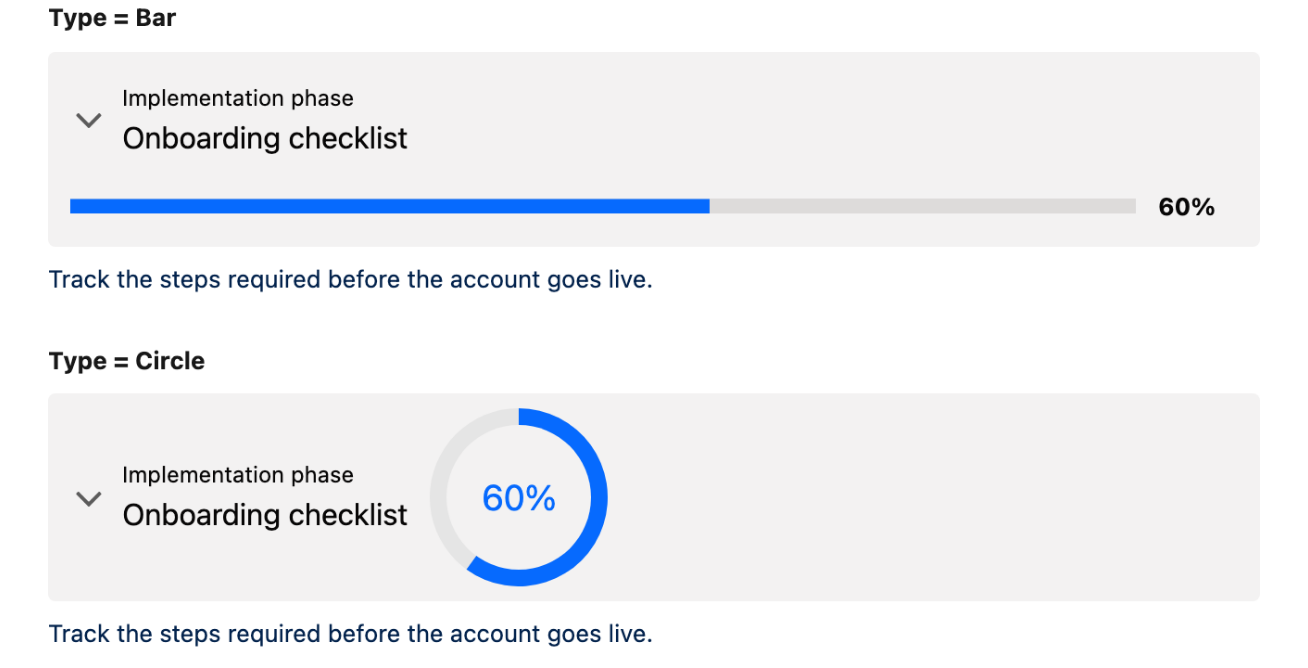
* **Type** — Style of the indicator: **Bar** (default) or **Circle**.
* **Position** — Where the indicator appears relative to the header. Bar type supports **Top** and **Bottom**; Circle type supports **Left** and **Right**.
* **Label** — Optional text displayed alongside the indicator.
* **Size** — Indicator size, with no default. Bar: X-Small, Small, Medium, Large, Full. Circle: XX-Small through X-Large.
* **Thickness** — Stroke/bar thickness: X-Small, Small, Medium, Large, X-Large.
* **Rounded** — Applies rounded end caps to the bar style. Requires: **Type** = Bar.
* **Show Value** — Displays the numeric value inside or next to the indicator.
* **Alternative Text** — Accessible description of the progress indicator (advanced).
The progress indicator as a bar and as a circle.
{% hint style="success" %}
**Tip**
For Progress, binding to a [variable](/dynamic-components/component-builder/resources/variable.md) enables real-time changes — for example, updating based on form completion or query results.
{% endhint %}
### Tags
Add badge-like tags to the header to surface metadata or status at a glance. Each tag has:
* **Label** — Text displayed in the badge.
* **Variant** — Color style: Base (default), Brand, Inverse, Alt-Inverse, Success, Info, Warning, Error, Offline.
The nine tag variants, in the section header.
### Set Component Visibility
All components support conditional visibility — see [Component Visibility](/dynamic-components/core-concepts/component-visibility.md).
## Use Cases
### Collapsible Contact Form Section
{% stepper %}
{% step %}
#### **Add Section Component**
* **API Name**: ContactFormSection
* **Title**: "Contact Details"
* **Caption**: "Fill in user information"
* **Variant**: shaded
* **Collapsible**: On
* **Closed**: On (starts collapsed)
* **Collapsible Icon**: Open Icon Name = utility:chevronup, Close Icon Name = utility:chevrondown, Position = left
{% endstep %}
{% step %}
#### **Add Avatar**
* **Variant**: circle
* **Icon Name**: standard:contact
* **Icon Size**: medium
{% endstep %}
{% step %}
#### **Configure Actions**
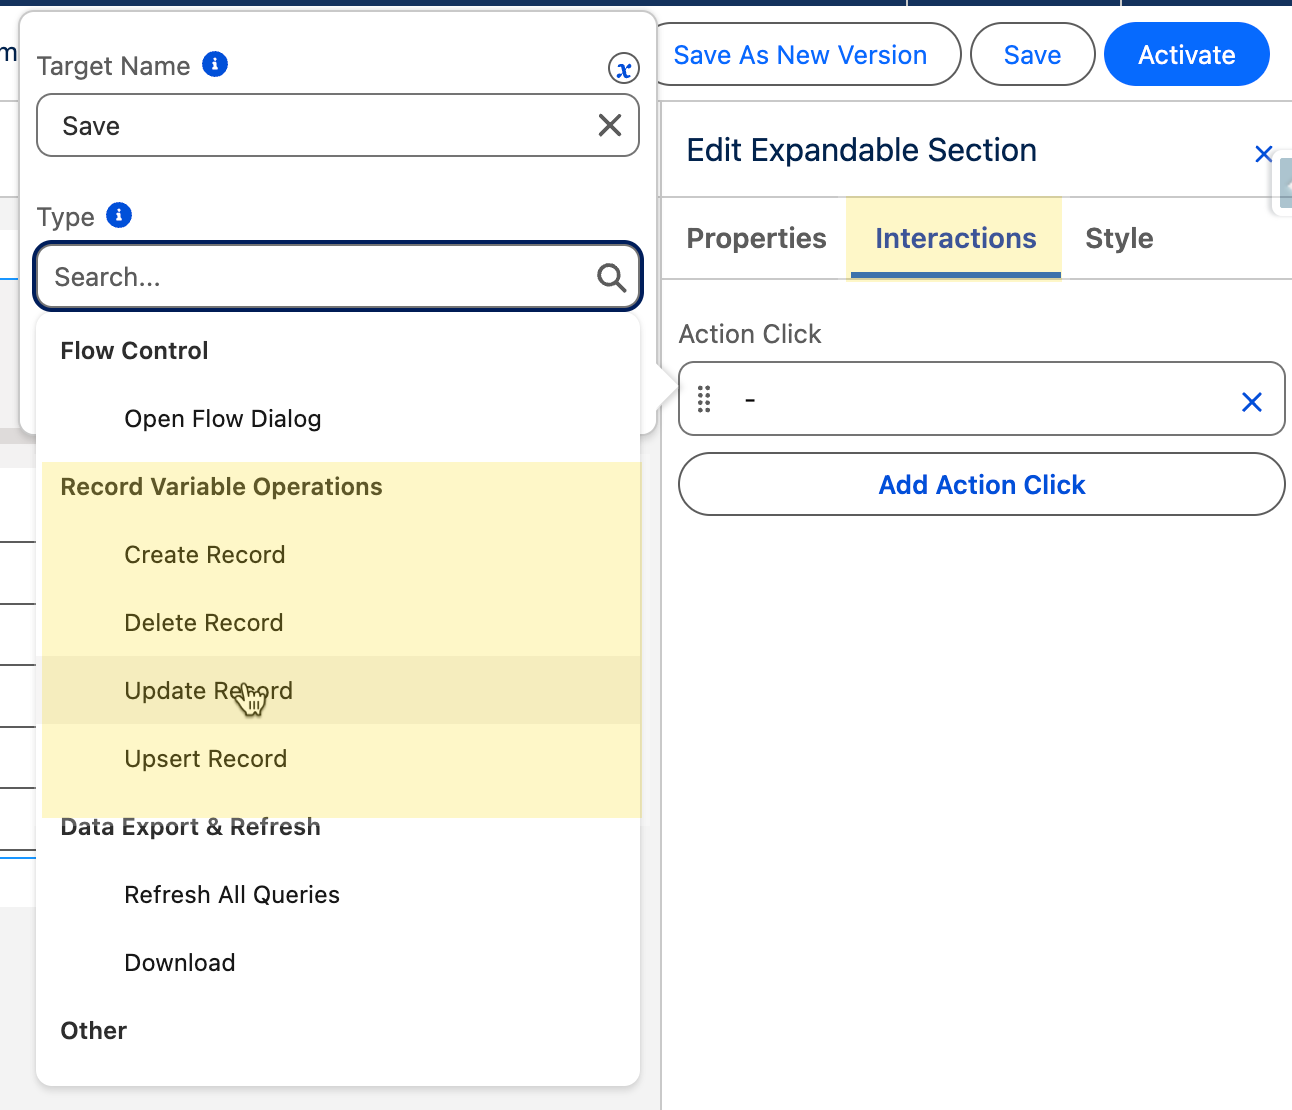
First, create a Record Variable in Resources for the desired object (e.g., Contact) to hold form data. Then, in the Interactions Panel, add a "Save" button that triggers a record update action (e.g., Update Record), binding it to the Record Variable.
{% endstep %}
{% step %}
#### **Add Progress and Tags**
Progress = 50, Tags = "Form", "Required"
{% endstep %}
{% step %}
#### **Slot Content**
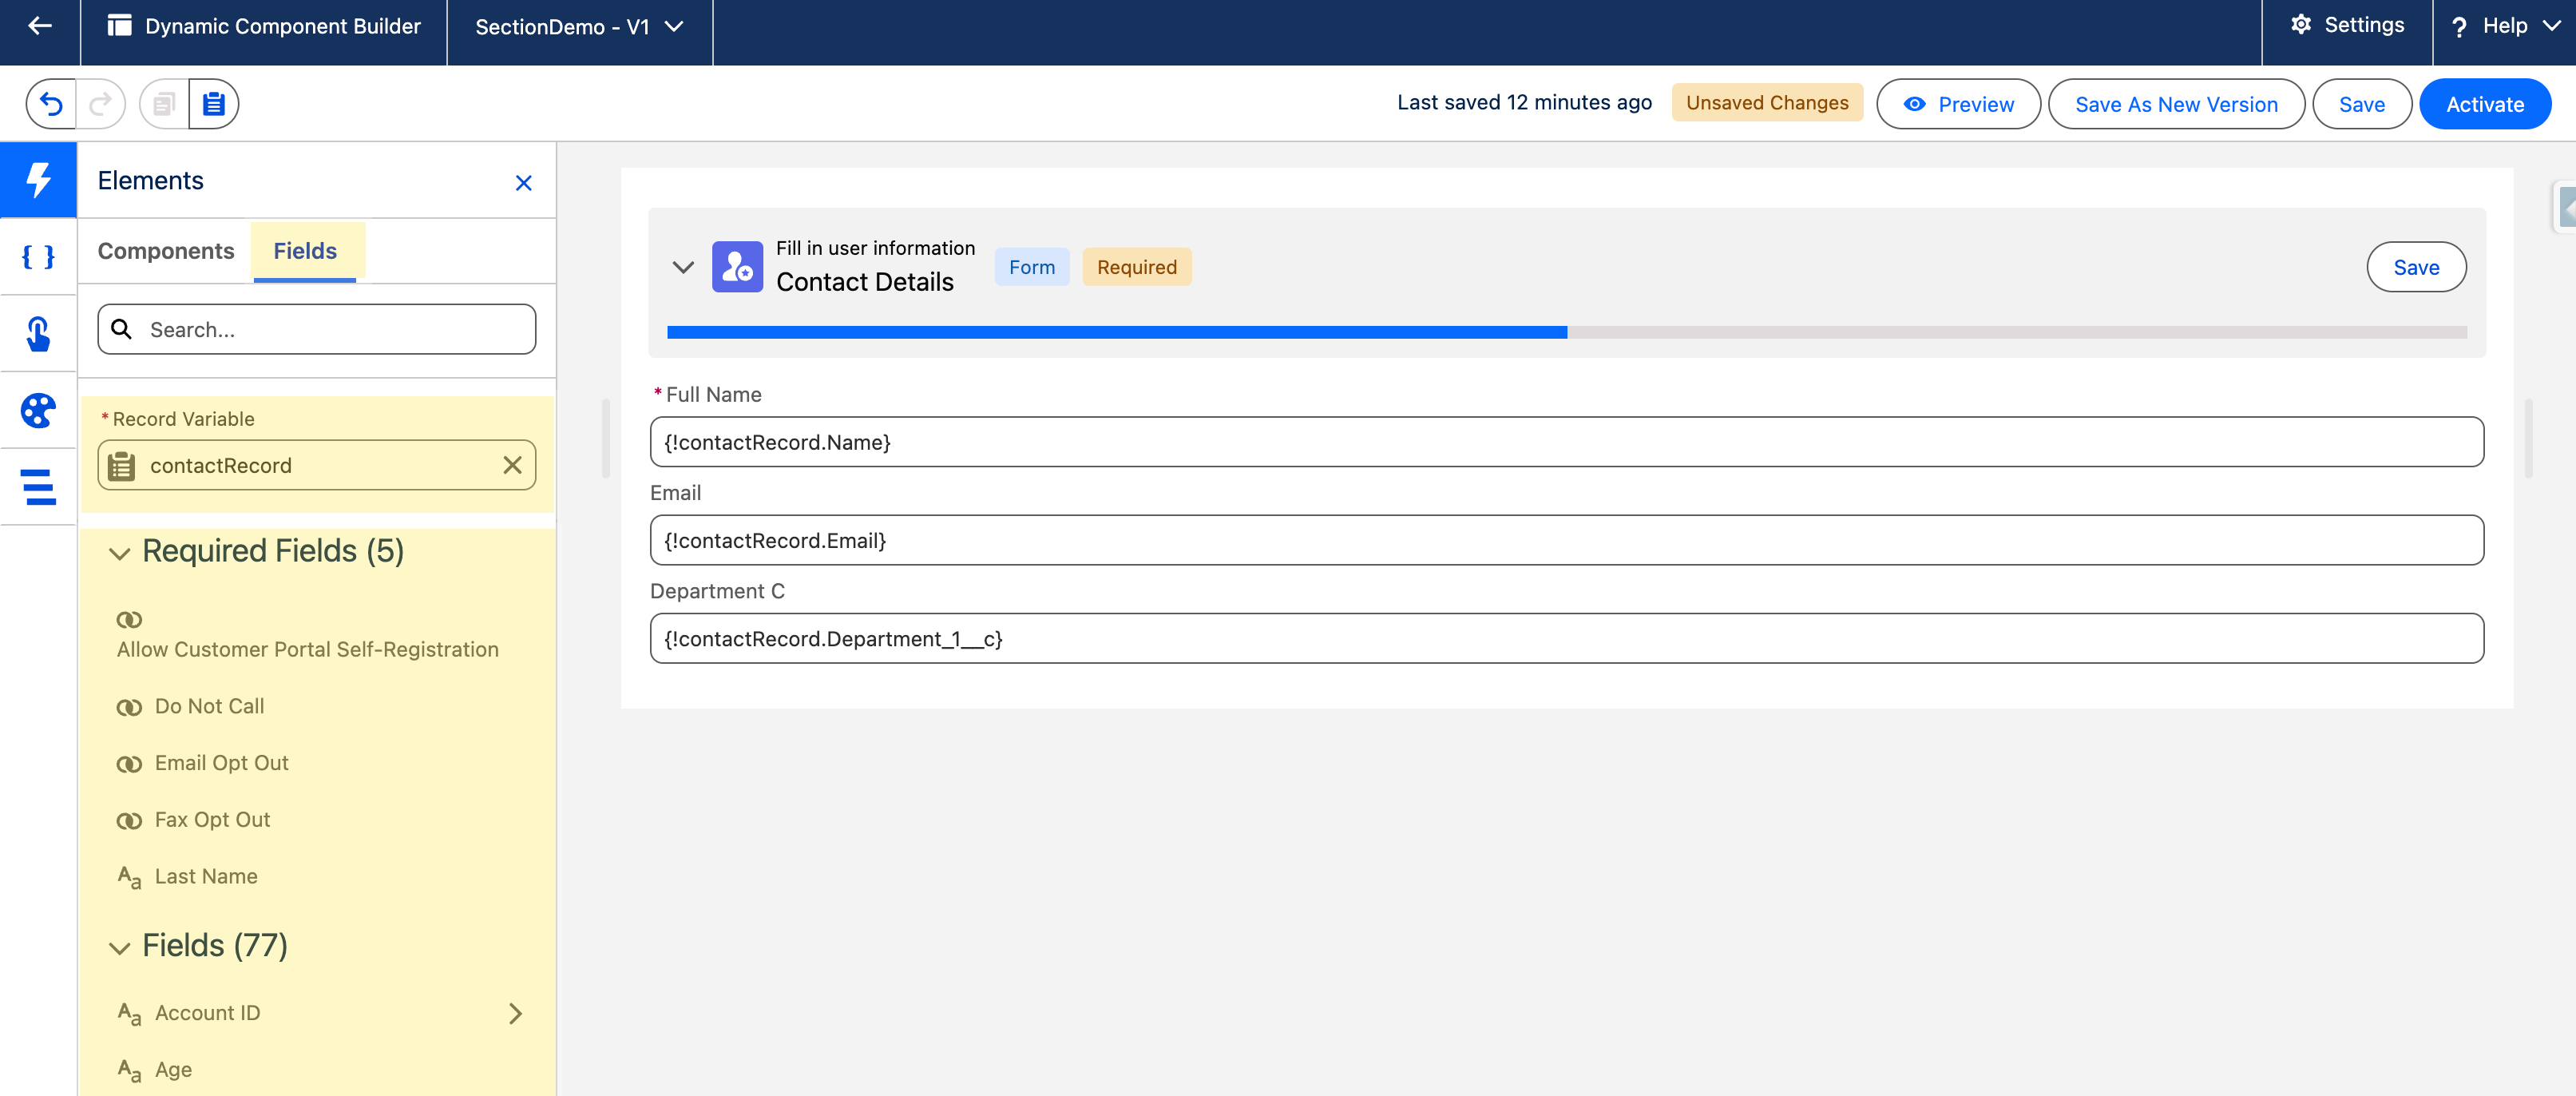
To populate the section with form fields linked to your Contact record, base it on the Record Variable created earlier (e.g., for the Contact object).
**Steps:**
1. Select the Section component on the canvas.
2. In the Elements Panel (typically left or right side), switch to the [**Fields** tab](/dynamic-components/component-builder/configuring-components/fields.md)—this displays available fields from the bound Record Variable.
3. Drag relevant fields (e.g., Name, Email) directly into the section's slot on the canvas.
{% endstep %}
{% endstepper %}
**Result:** A shaded, collapsible section with avatar, progress bar, tags, and actions—expands to reveal form fields.
## Interactions
[Interactions](/dynamic-components/component-builder/interactions.md) define what happens when users interact with the Expandable Section. Configure them from the **Interactions** tab of the Edit Expandable Section panel.
### Action Click
Fires when a user clicks one of the header action buttons. Use the **targetName** output to identify which action was clicked and branch your flow logic accordingly — for example, opening a record edit form or triggering a different action per button.
## Styling
Configure the Expandable Section's appearance from the **Style** tab of the Edit Expandable Section panel.
{% tabs %}
{% tab title="Margin" %}
Controls the *outer* spacing around the section.
* **Top / Right / Bottom / Left:** Adjust the space on each side.
{% endtab %}
{% tab title="Padding" %}
Controls the *inner* spacing between the section's content and its border.
* **Top / Right / Bottom / Left:** Adjust the inner spacing on each side.
{% endtab %}
{% tab title="Spacing" %}
Adjusts the block spacing around the section.
* **Block Start / Block End:** Set the vertical spacing.
{% endtab %}
{% tab title="Main Container" %}
Styles the section container.
* **Background Color:** Set the container background.
* **Border Color / Border Size / Border Style / Border Radius:** Customize the container border.
{% endtab %}
{% tab title="Title" %}
Styles the section title.
* **Color / Font Size / Font Style / Font Weight:** Set the title color and typography.
{% endtab %}
{% tab title="Caption" %}
Styles the section caption.
* **Color / Font Size / Font Style / Font Weight:** Set the caption color and typography.
{% endtab %}
{% tab title="Icon" %}
Styles the collapse/expand icon.
* **Icon:** Background Color / Color / Color Hover.
* **Border:** Color / Size / Style / Radius.
{% endtab %}
{% tab title="Progress" %}
Styles the progress indicator (when one is shown).
* **Bar:** Color / Completed Color; Label Font Color / Font Size / Font Style / Font Weight; Value Color / Value Font Size / Font Style / Font Weight.
* **Circle:** Background Color / Color / Completed Color; Value Color / Value Font Style / Font Weight; Label Font Color / Font Style / Font Weight.
{% endtab %}
{% endtabs %}
---
# Agent Instructions
This documentation is published with GitBook. GitBook is the documentation platform designed so that both humans and AI agents can read, navigate, and reason over technical content effectively. Learn more at gitbook.com.
## Querying This Documentation
If you need additional information that is not directly available in this page, you can query the documentation dynamically by asking a question.
Perform an HTTP GET request on the current page URL with the `ask` query parameter, and the optional `goal` query parameter:
```
GET https://docs.avonnicomponents.com/dynamic-components/components/section.md?ask=&goal=
```
`ask` is the immediate question: it should be specific, self-contained, and written in natural language.
`goal` is optional and describes the broader end goal you are ultimately trying to accomplish on behalf of the user. GitBook uses it to tailor the answer towards what is most useful for that goal.
The response will contain a direct answer to the question and relevant excerpts and sources from the documentation.
Use this mechanism when the answer is not explicitly present in the current page, you need clarification or additional context, or you want to retrieve related documentation sections.