> For the complete documentation index, see [llms.txt](https://docs.avonnicomponents.com/llms.txt). Markdown versions of documentation pages are available by appending `.md` to page URLs; this page is available as [Markdown](https://docs.avonnicomponents.com/dynamic-components/components/record-detail.md).
# Record Detail
The Avonni Record Detail component displays and optionally edits a single Salesforce record within your Dynamic Component. Use it to surface compact or full field layouts, allow inline or input-based editing, and capture save or cancel events.
## Overview
The Record Detail component is designed to work with *one* Salesforce record at a time. Key features include:
* **Multiple Layout Options:** Display fields using standard Salesforce layouts (Compact or Full) or a fully Custom layout you define.
* **View and Edit Modes:** Control whether the fields are read-only or editable.
* **Data Binding:** The component automatically fetches and displays the record data based on a provided Record ID.
* **Saving Changes:** To save changes to Salesforce, use the interactions tab. [Learn more](/dynamic-components/tutorials/components/record-detail/saving-changes.md).
* **Conditional Visibility:** The component supports conditional visibility.
## Configuration
To configure the Record Detail, select it on the canvas. The **Edit Record Detail** panel opens on the right with three tabs: **Properties**, **Interactions**, and **Style**. The sections below mirror the Properties tab.
### Properties
The top section of the panel contains the core settings for the component.
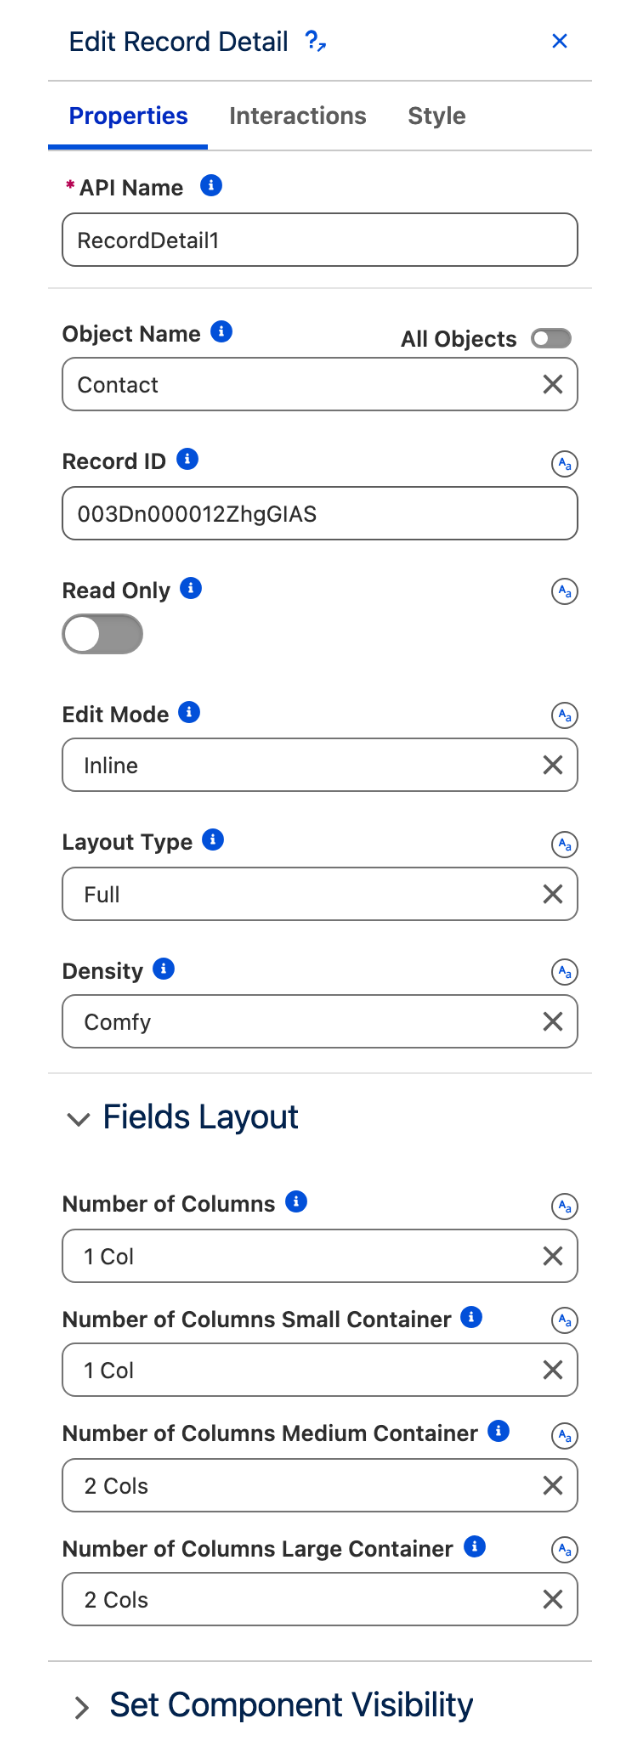
The Properties tab of the Edit Record Detail panel.
**Object Name** sets the API name of the Salesforce object whose record you want to display or edit (for example, `Account`, `Contact`, or `My_Custom_Object__c`).
**Record ID** identifies the specific record to display or update. Provide a 15- or 18-character Salesforce record ID. If left empty, the component creates a new record instead.
* On record pages, bind this to a record variable or use a `$Component` attribute if you have configured a [Target Object Page](/dynamic-components/core-concepts/target-page-object.md).
* In other contexts, bind it to a Variable resource (for example, an ID coming from a URL parameter or another component).
**Record Type** selects the record type to use when creating a new record. If not provided, the default record type is used. Requires: **Record ID** is empty (new record mode only).
**Read Only** displays the record without enabling any edits when enabled.
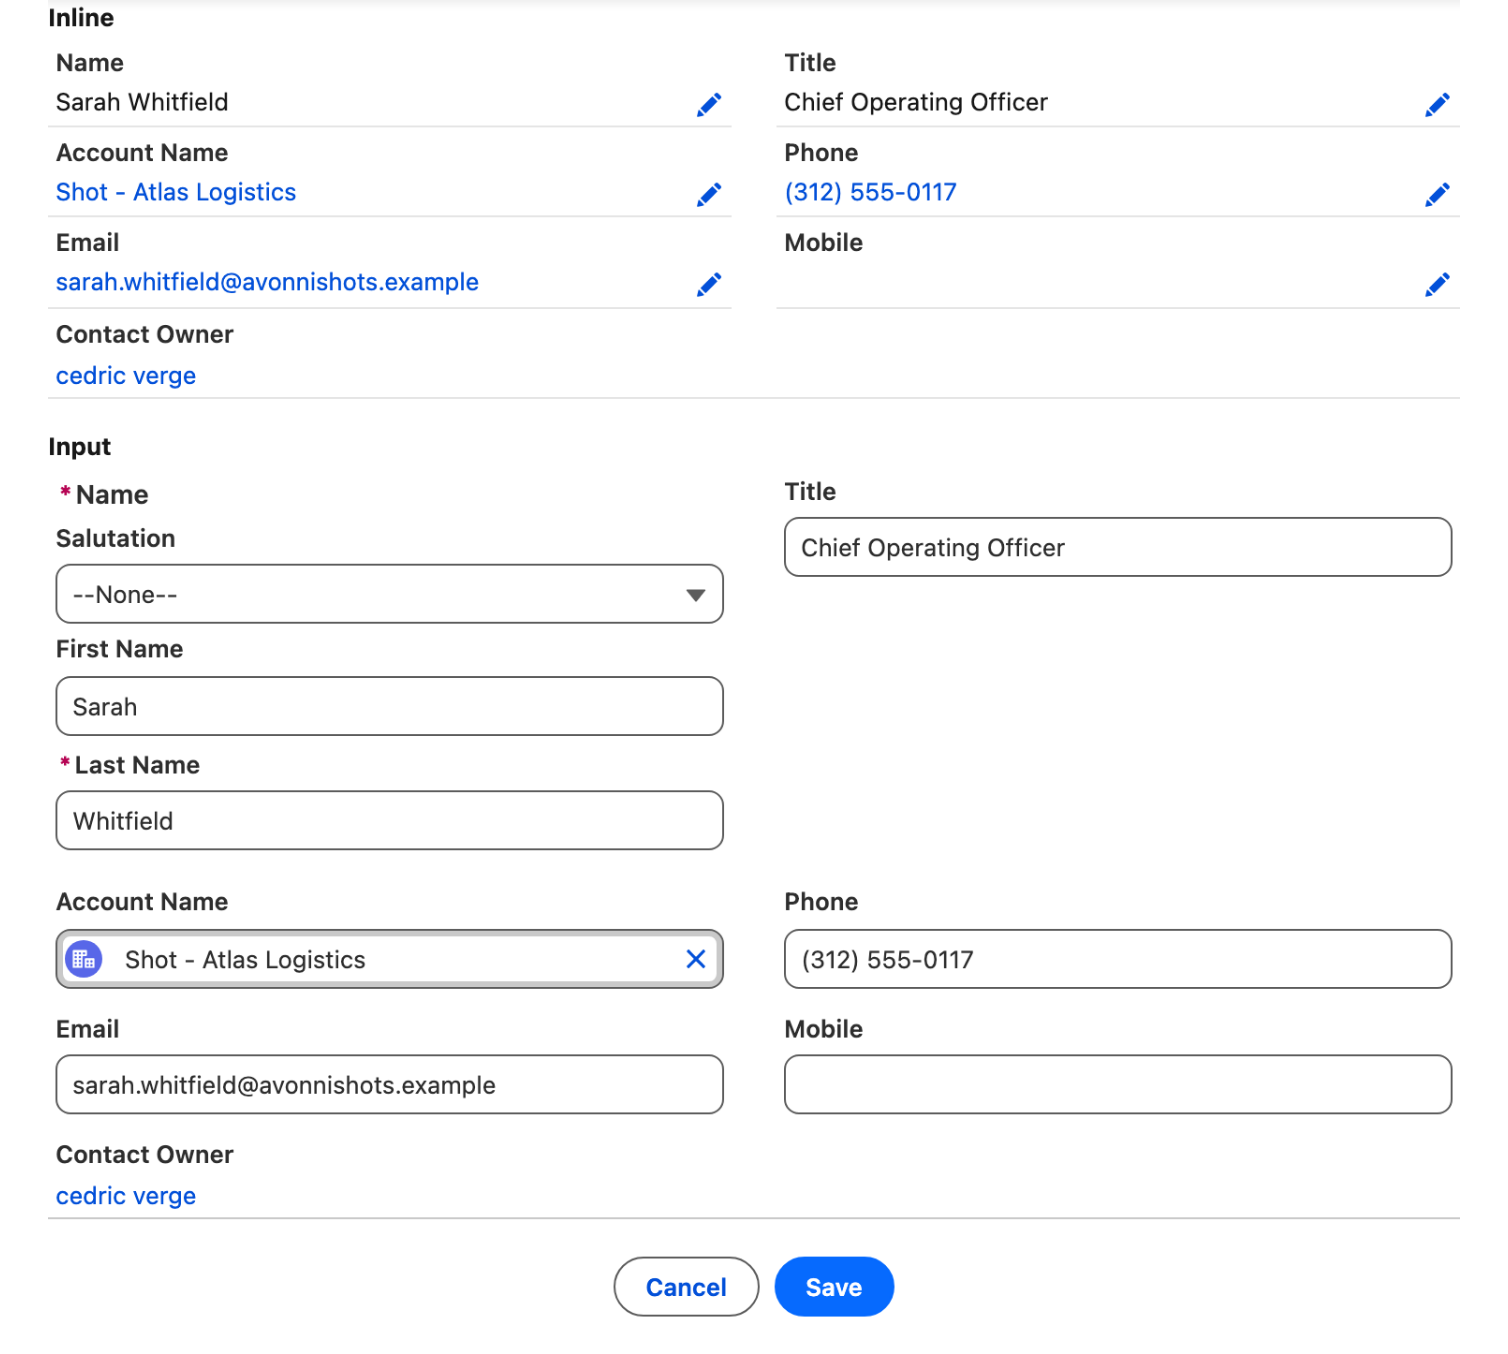
**Edit Mode** controls how users edit the form fields. Requires: **Read Only** is not enabled.
* **Inline** (default) — users click directly on field values to edit them in place.
* **Input** — all fields render as input controls immediately.
The same contact in Inline and in Input edit mode.
**Layout Type** determines which field set to display:
* **Full** (default) — uses the object's page layout as defined in Salesforce Setup.
* **Compact** — uses the object's compact layout as defined in Salesforce Setup.
* **Custom** — lets you define exactly which fields appear and in which sections using the **Edit Custom Layout** editor.
{% hint style="warning" %}
**The Custom View feature** is not available at this time. We plan to include it in a future update
{% endhint %}
**Edit Custom Layout** opens a layout editor where you build sections and choose the fields to include. Requires: **Layout Type** = **Custom**.
**Show Record Type Layout Fields Only** restricts the custom layout to the fields that also appear on the page layout assigned to the record's record type. Fields you placed that are not on that page layout are hidden. Requires: **Layout Type** = **Custom**.
This lets one custom layout serve several record types: place every field the object needs, and each record shows only the ones its record type uses. Leave it off to show every field you placed, whatever the record type.
**Place mutually exclusive fields on the same row.** When a field is hidden, the remaining fields on that row move up to fill the gap, but fields never move between rows. So put the per-record-type alternatives — State for US, Province for Canada — side by side on one row, and every record type gets a full row. Spread across separate rows, each record type leaves a gap where the other's field would be.
{% hint style="info" %}
Salesforce assigns page layouts by record type **and by profile**, so the fields a user sees follow the assignment for their profile. On a record with no record type, the component falls back to the object's default page layout.
{% endhint %}
**Section Variant** changes the appearance of the custom layout sections. Requires: **Layout Type** = **Custom**.
* **Base** (default) — standard section appearance.
* **Shaded** — sections display with a shaded background.
**Density** sets the arrangement style of fields and labels in the form.
* **Comfy** (default) — standard spacing between fields and labels.
* **Compact** — reduces spacing for a denser display.
* **Auto** — adapts density based on the available container width.
### Fields Layout
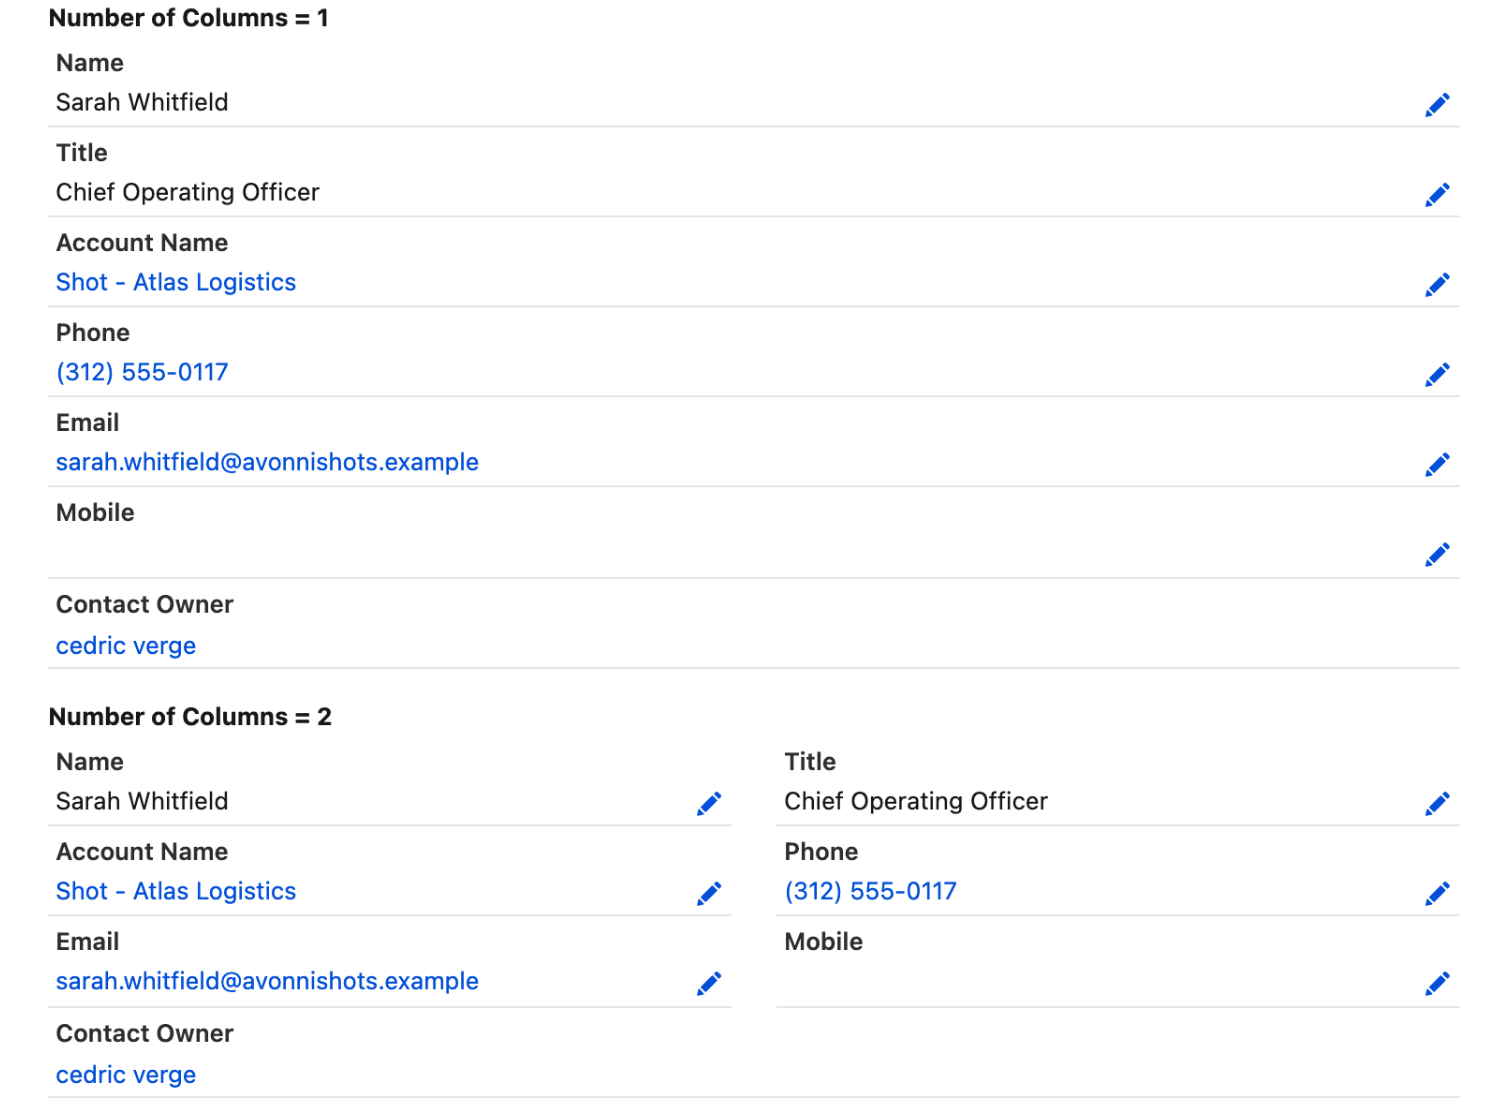
The **Fields Layout** section controls how many columns the fields are arranged in, with responsive breakpoints for different container sizes.
* **Number of Columns** — columns per row in the smallest container (smaller than 480 px). Also acts as the fallback for all container sizes. Default: 1.
* **Number of Columns Small Container** — columns per row when the container is wider than 480 px. Default: 1.
* **Number of Columns Medium Container** — columns per row when the container is wider than 768 px. Default: 2.
* **Number of Columns Large Container** — columns per row when the container is wider than 1024 px. Default: 3.
Available values for all column settings: 1, 2, 3, 4, 6, or 12.
The same fields at one column and at two.
### Set Component Visibility
All components support conditional visibility — see [Component Visibility](/dynamic-components/core-concepts/component-visibility.md).
## Interactions
[Interactions](/dynamic-components/component-builder/interactions.md) define what happens when users interact with the Record Detail. Configure them from the **Interactions** tab of the Edit Record Detail panel.
### Save
Fires when the user submits the form. The **editedRecord** and **editedRecordSerialized** output variables are populated with the draft field values at the moment of submission, and **buttonSaveClicked** is set to true. Use this interaction to save the record back to Salesforce or trigger downstream flow logic — see [Saving Changes](/dynamic-components/tutorials/components/record-detail/saving-changes.md) for a step-by-step guide.
### Cancel
Fires when the user cancels an edit operation. The **buttonCancelClicked** output variable is set to true. Use this interaction to reset the form state or navigate the user away from the edit view.
## Output Variables
The Record Detail exposes these output variables you can reference elsewhere on the page after the user interacts with it.
### Form Submission
When the user submits the form, these variables are populated with the draft field values at the moment of save.
| Output variable | Type | What it returns |
| ---------------------------- | ---------------- | --------------------------------------------------------------------------------------------------------------- |
| **Button Save Clicked** | Boolean | `true` when the user submits the form. |
| **Edited Record** | Record (SObject) | The draft field values of the record at the time of submission. |
| **Edited Record Serialized** | Text (String) | The same draft values serialized as a JSON string. Useful for passing the record data to a Flow or Apex action. |
> **Example:** When a user clicks Save on a Contact form, use **Edited Record** to pass the updated field values to a Flow that writes them back to Salesforce.
### Form Cancellation
| Output variable | Type | What it returns |
| ------------------------- | ------- | ----------------------------------------------- |
| **Button Cancel Clicked** | Boolean | `true` when the user cancels an edit operation. |
### Others
| Output variable | Type | What it returns |
| --------------- | ---------------- | ------------------------------------------------------------------------------------------------------------------- |
| **Record** | Record (SObject) | The full Salesforce record loaded from the provided Record ID. Available as soon as the component finishes loading. |
## Styling
Configure the Record Detail's appearance from the **Style** tab of the Edit Record Detail panel.
{% tabs %}
{% tab title="Margin" %}
Controls the *outer* spacing around the component.
* **Top / Right / Bottom / Left:** Adjust the space on each side.
{% endtab %}
{% tab title="Padding" %}
Controls the *inner* spacing between the component's content and its border.
* **Top / Right / Bottom / Left:** Adjust the inner spacing on each side.
{% endtab %}
{% tab title="Size" %}
Controls the component's dimensions.
* **Width / Height:** Set fixed dimensions.
* **Min Width / Max Width / Min Height / Max Height:** Constrain the size within bounds.
* **Overflow:** Control how content that exceeds the bounds is handled.
{% endtab %}
{% tab title="Border" %}
Customizes the border surrounding the component.
* **Color / Size / Style / Radius:** Set the border color, thickness, style, and corner rounding.
{% endtab %}
{% endtabs %}
---
# Agent Instructions
This documentation is published with GitBook. GitBook is the documentation platform designed so that both humans and AI agents can read, navigate, and reason over technical content effectively. Learn more at gitbook.com.
## Querying This Documentation
If you need additional information that is not directly available in this page, you can query the documentation dynamically by asking a question.
Perform an HTTP GET request on the current page URL with the `ask` query parameter, and the optional `goal` query parameter:
```
GET https://docs.avonnicomponents.com/dynamic-components/components/record-detail.md?ask=&goal=
```
`ask` is the immediate question: it should be specific, self-contained, and written in natural language.
`goal` is optional and describes the broader end goal you are ultimately trying to accomplish on behalf of the user. GitBook uses it to tailor the answer towards what is most useful for that goal.
The response will contain a direct answer to the question and relevant excerpts and sources from the documentation.
Use this mechanism when the answer is not explicitly present in the current page, you need clarification or additional context, or you want to retrieve related documentation sections.