> For the complete documentation index, see [llms.txt](https://docs.avonnicomponents.com/llms.txt). Markdown versions of documentation pages are available by appending `.md` to page URLs; this page is available as [Markdown](https://docs.avonnicomponents.com/experience-cloud/getting-started/license-management.md).
# License Management
## License & Permission Management
To ensure users can view and interact with Avonni Components, specifically on Experience Cloud sites, you must complete a two-step configuration process.
**⚠️ Configuration Requirement:** For a user to successfully access Avonni Components, you must assign BOTH:
1. **A Package License** (Allocates a seat to the user).
2. **A Permission Set** (Grants technical access to the components).
{% hint style="warning" %}
#### Important
If a user has a License but no Permission Set (or vice versa), the components will not load, and the user will see an error message.
{% endhint %}
***
## Step 1: Assign Package Licenses
The package license grants the user the fundamental right to use the software within Salesforce.
License Availability:
* Production: Includes 10 Freemium licenses.
* Sandbox: Includes a Site License (Unlimited users/No expiration).
### How many licenses do you need?
Assign one Avonni license to every user who needs to log in to the site. There is nothing to calculate.
This stays true when your Salesforce Experience Cloud licenses are login-based. Avonni seats are not counted against logins, sessions, or how often someone visits, so you cannot size them from expected traffic. The number that matters is how many users hold the license in your org.
The reason is a platform limit rather than a choice on our side: Salesforce does not tell us whether a login-based user has actually connected to a site, so there is no usage to measure. Assigning a license to every user who can log in is what keeps any of them from hitting an access error.
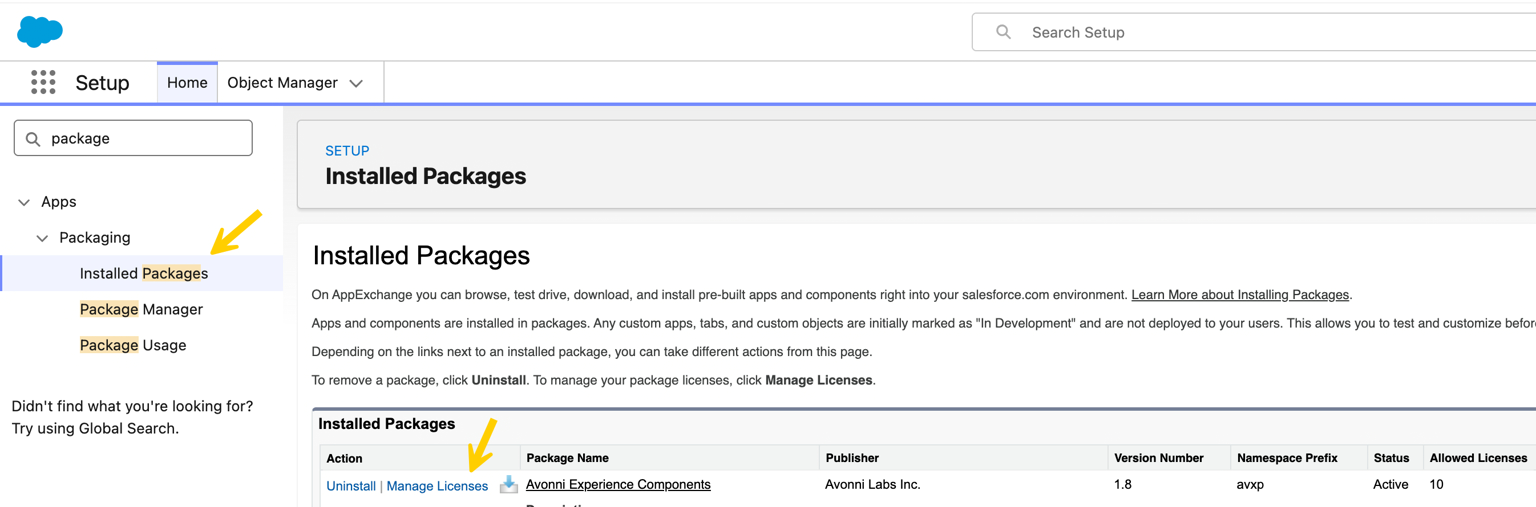
To see where you stand today, open **Setup** > **Installed Packages**, find **Avonni Experience Components** and click **Manage Licenses**. The page lists the users who hold a license and how many of your licenses are in use.
How to Assign:
1. Navigate to **Setup**.
2. Search for and select **Installed Packages**.
3. Locate **Avonni Experience Components** and click **Manage Licenses**.
4. Click **Add Users**.
5. Select all users who require access and click **Save**.
***
## Step 2: Assign Permission Sets
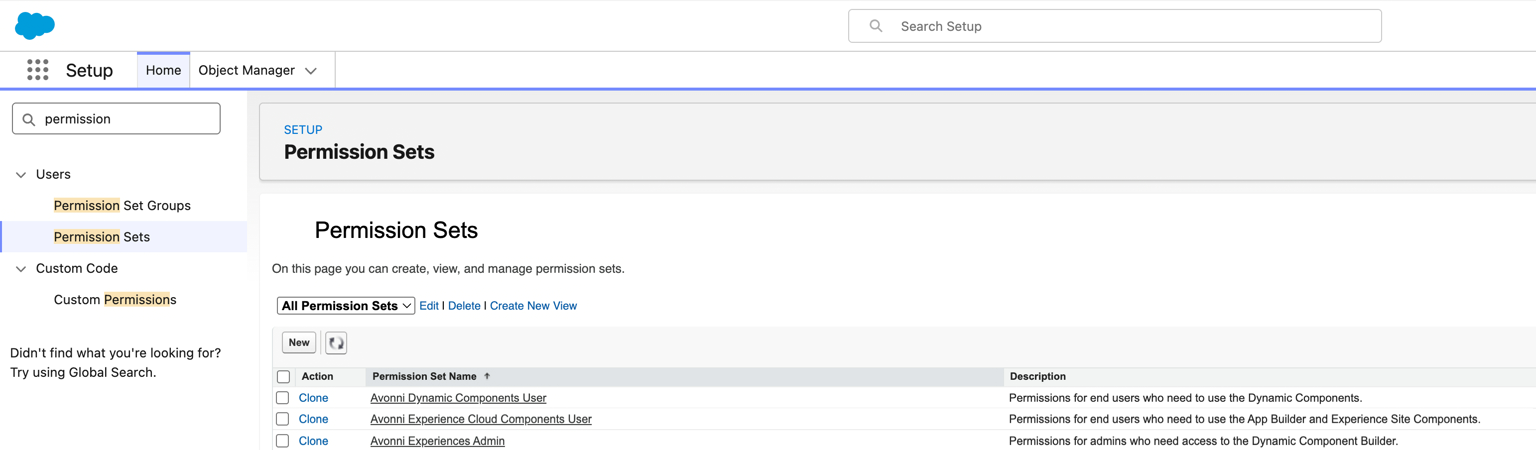
Once the license is assigned, you must assign the correct Permission Set based on the user's role. The Avonni package includes three distinct permission sets.
Choose the correct permission set for your user:
| Role | Permission Set Name | Function |
| ----------------------------------------------------------------------------------------- | --------------------------------------- | -------------------------------------------------------------------------------------------------------------------- |
|
End Users
(Experience Cloud & App Builder)
| Avonni Experience Cloud Components User | Required for users viewing components on Experience Sites or standard Lightning App Builder pages. |
|
End Users
(Dynamic Components)
| Avonni Dynamic Components User | Required for users interacting with Dynamic Components (e.g., custom Data Tables, action buttons) inside Salesforce. |
| **Admins & Builders** | Avonni Experiences Admin | Required for users who need to create, edit, or build layouts using the Avonni Component Builder. |
How to Assign:
1. Navigate to **Setup** > **Permission Sets**.
2. Select the appropriate Permission Set from the table above.
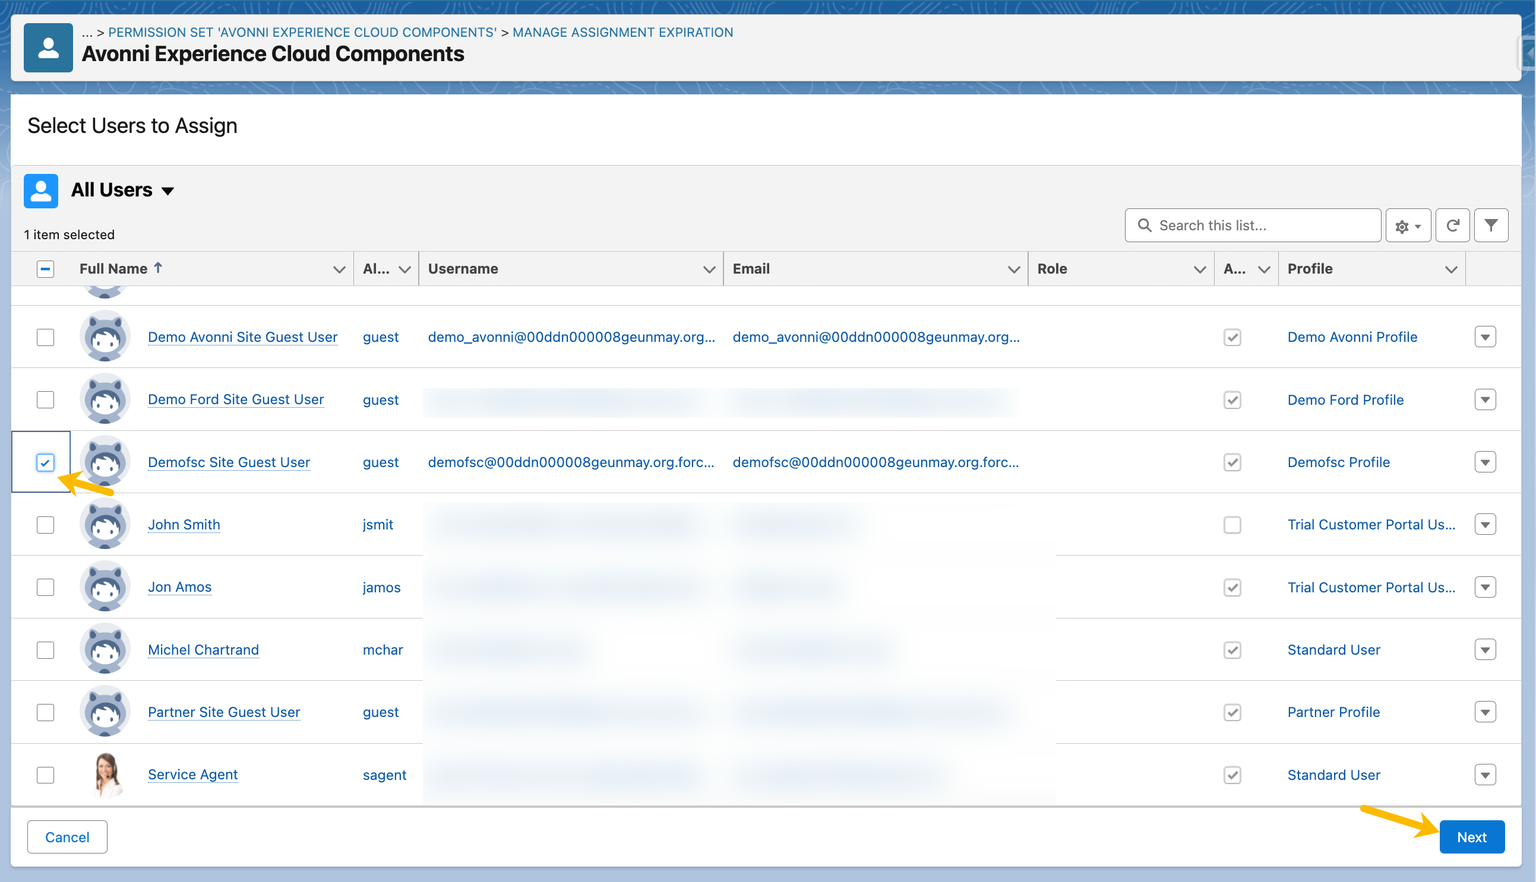
3. Click **Manage Assignments** > **Add Assignment**.
4. Select the users to whom you assigned licenses in Step 1.
5. Click **Assign**.
***
## Configuration for Guest Users
Guest users (unauthenticated visitors on public sites) do not require a standard Package License, but they do require permissions.
{% hint style="warning" %}
#### Note
Guest User access for Production environments is an add-on feature. Please [get in touch with support](mailto:support@avonni.app) for details.
{% endhint %}
To enable Guest Access:
1. Open your Experience Cloud site in Builder.
2. Go to Settings > General and click the link to the Guest User Profile.
3. In the Profile settings, scroll to Permission Set Assignments.
4. Add the Avonni Experience Cloud Components permission set to the profile.
#### Troubleshooting Access Issues
If a user reports the error *"You don't have access to this Avonni Component,"* check the following:
| Issue | Solution |
| ---------------------- | ---------------------------------------------------------------------------------------------------------------------------------------------------------- |
| **Missing License** | Ensure the user is listed in *Installed Packages > Manage Licenses*. |
| **Missing Permission** | Ensure the user has the *Avonni Experience Cloud Components* permission set assigned. |
| **LWS Disabled** | Ensure [*Lightning Web Security* is enabled](https://developer.salesforce.com/docs/platform/lightning-components-security/guide/lws-enable.html) in Setup. |
***
## Optional: Routing for Map Routes
The Map component can plan a multi-stop driving route. That feature is off until an administrator enables it, and it needs setup that is separate from licences and permission sets.
* Routing is **bring-your-own-key** — you supply an API key from OpenRouteService or Mapbox. Avonni hosts no routing backend.
* Enable it from the **Settings** tab of the **Avonni Experiences** app in the App Launcher.
* Enabling creates a permission set for the active provider, `Avonni Route ORS Access` or `Avonni Route Mapbox Access`. Because they are created at that point rather than shipped in the package, they do not appear in a fresh install's permission set list.
* Assign that permission set to everyone who needs to calculate routes on a map. On a public site, assign it to the guest user profile as well if site visitors calculate routes.
Full walkthrough: [Routing Setup](/experience-cloud/getting-started/routing-setup.md).
---
# Agent Instructions
This documentation is published with GitBook. GitBook is the documentation platform designed so that both humans and AI agents can read, navigate, and reason over technical content effectively. Learn more at gitbook.com.
## Querying This Documentation
If you need additional information that is not directly available in this page, you can query the documentation by asking a question.
Perform an HTTP GET request on the following URL with the `ask` and `goal` query parameters:
```
GET https://docs.avonnicomponents.com/experience-cloud/getting-started/license-management.md?ask=&goal=
```
`ask` is the immediate question: it should be specific, self-contained, and written in natural language.
`goal` is what the user is ultimately trying to achieve, the reason they need the answer. Sharing it helps GitBook give you a better, more relevant answer. A goal is most helpful when it describes the outcome the user wants rather than restating the question. For example, with `ask=how do I create an API token`, a goal like `automate deployments from our CI pipeline` lets GitBook tailor the answer to that use case.
The response will contain a direct answer to the question and relevant excerpts and sources from the documentation.
Use this mechanism when the answer is not explicitly present in the current page, you need clarification or additional context, or you want to retrieve related documentation sections.