> For the complete documentation index, see [llms.txt](https://docs.avonnicomponents.com/llms.txt). Markdown versions of documentation pages are available by appending `.md` to page URLs; this page is available as [Markdown](https://docs.avonnicomponents.com/projects/use-cases/track-my-installation.md).

# Track my installation

## Overview

A homeowner follows the solar installation step by step on the customer portal, from the signed proposal to the grid connection, without a Salesforce login. The whole page is one **AX - Timeline** on an Experience Site, seven steps grouped by month. This tutorial rebuilds the tracking page of SolarOps, a solar installer with a customer site, for the work order WO-2417 at 2417 Wooldridge Drive: first with the seven steps typed into the component, then from records.

## What you build

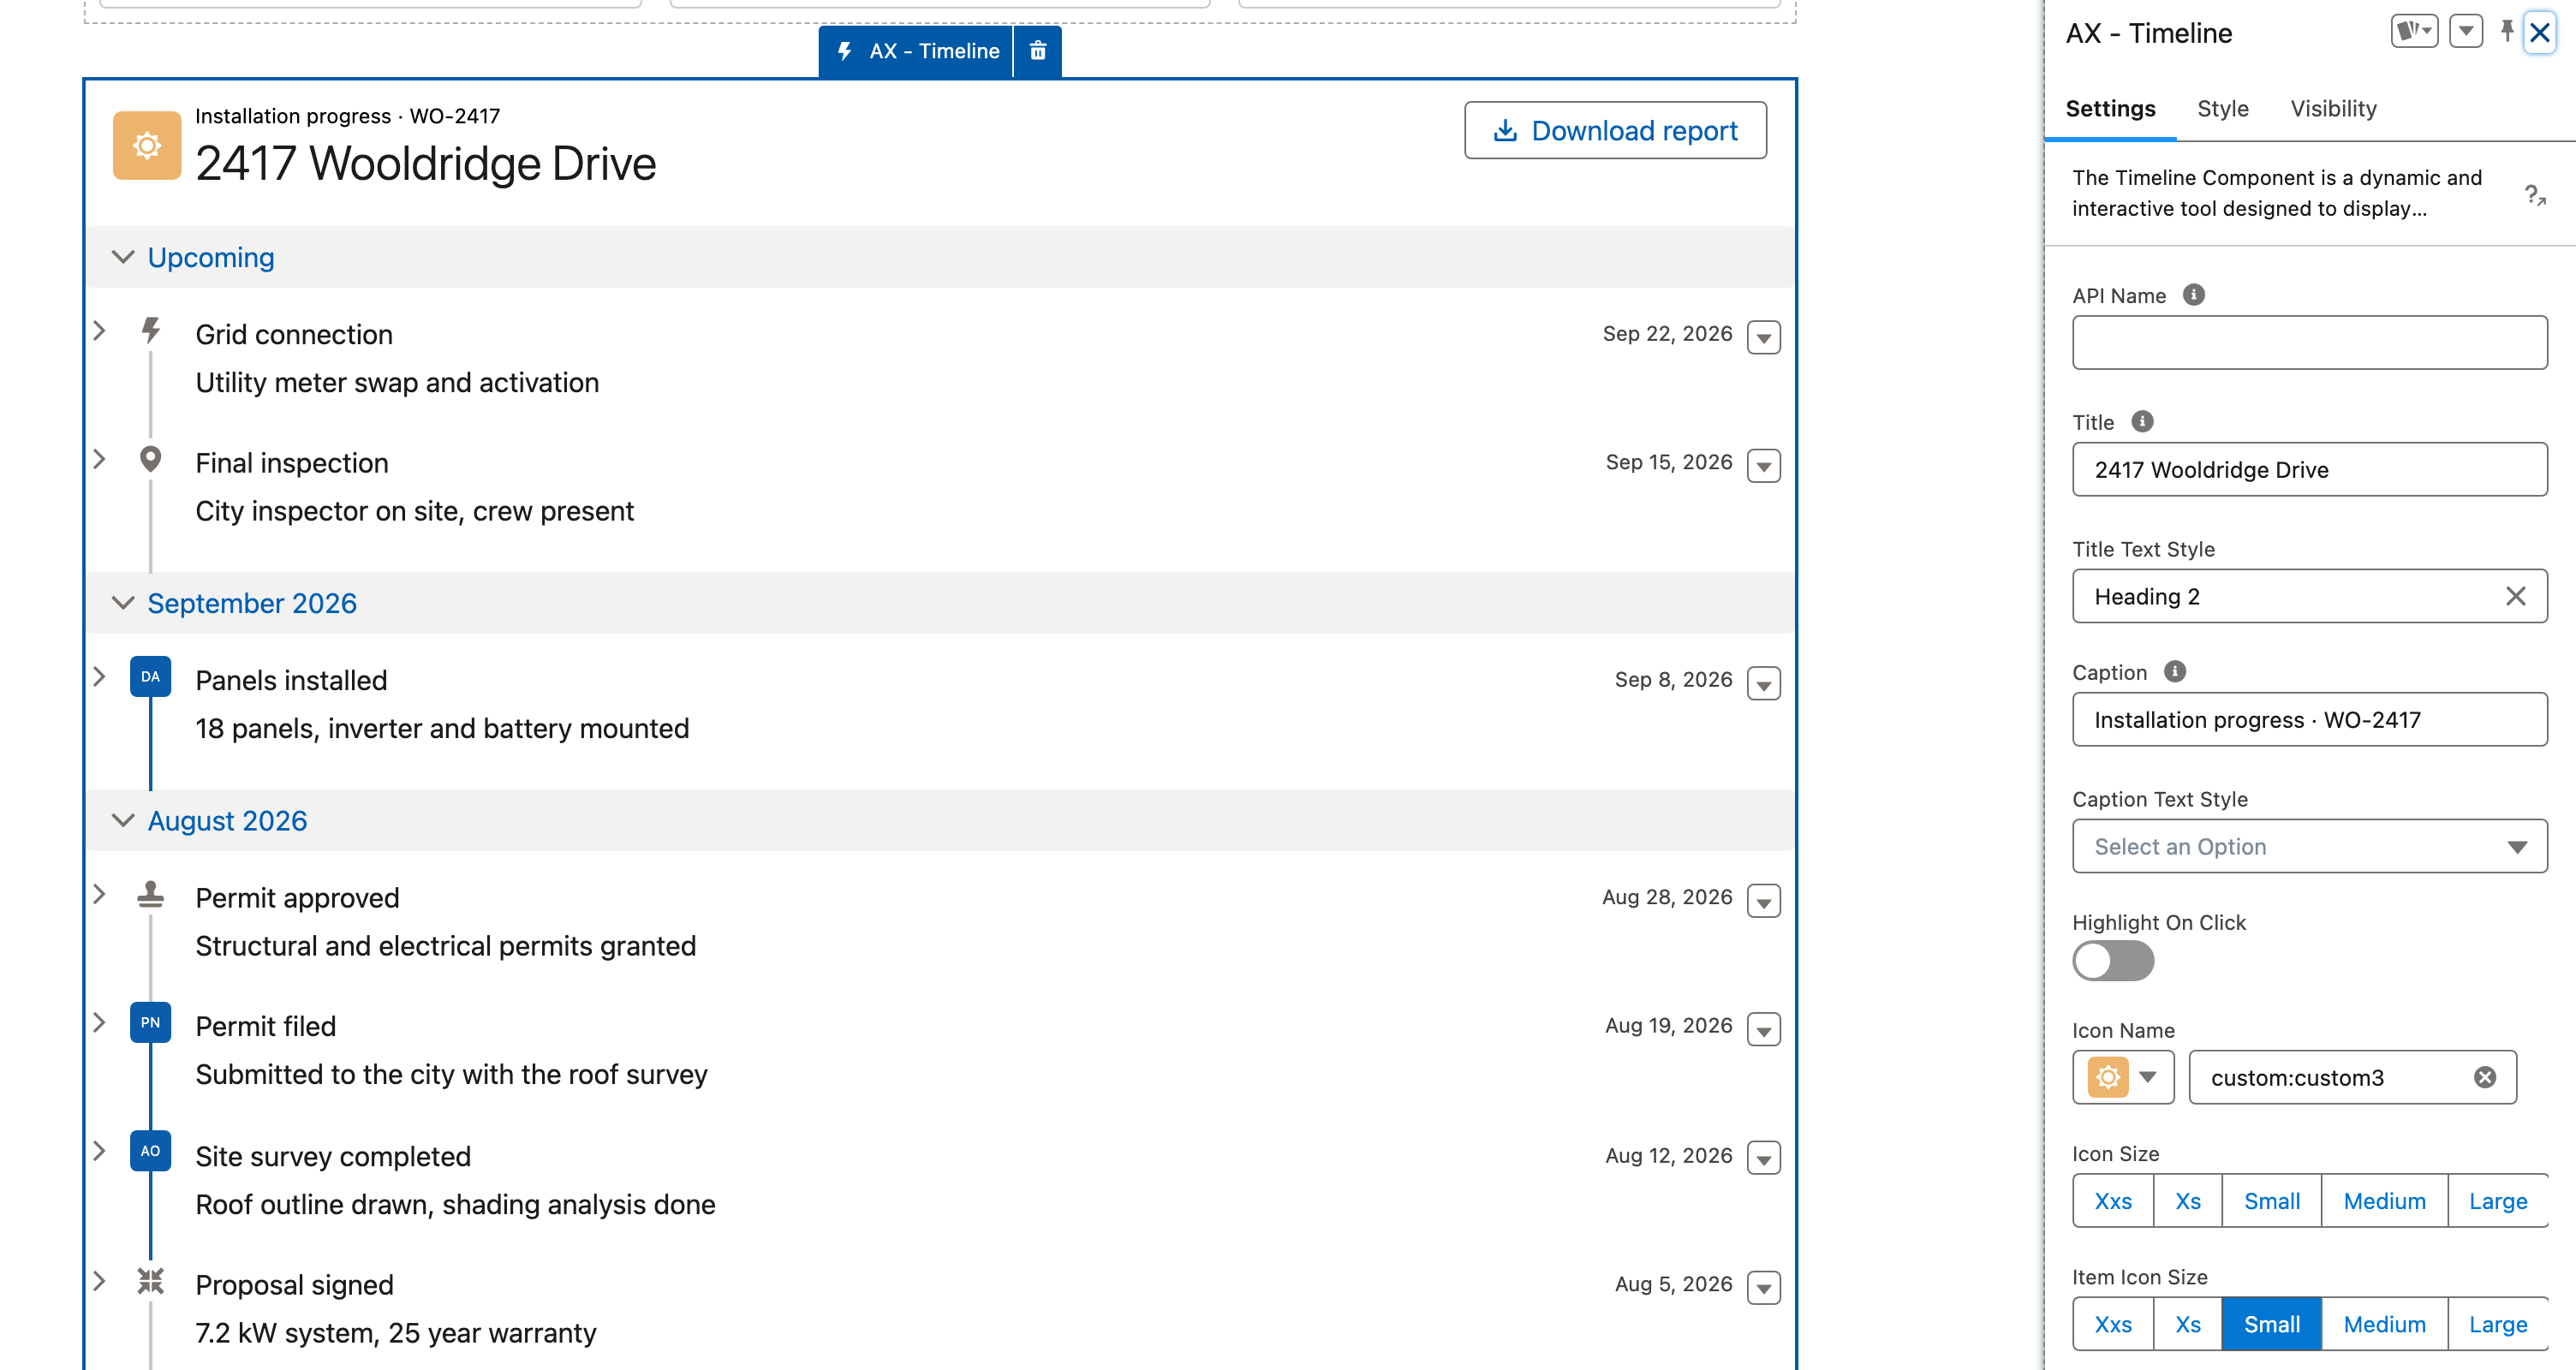
![Avonni Timeline on a customer portal page: seven installation steps grouped by month, each with two facts, initials or icons, and a Download report button](https://3857391697-files.gitbook.io/~/files/v0/b/gitbook-x-prod.appspot.com/o/spaces%2FdHOej9Pd5IxJNGEJMZKW%2Fuploads%2FRHJ8gV5acTmEVIKcPEIx%2Fuc-08-track-my-installation.png?alt=media)

* Nadia Ferreira logs into the SolarOps customer site and lands on her tracking page: **Installation progress · WO-2417** over **2417 Wooldridge Drive**, a sun icon, and a **Download report** button in the header.
* Seven steps on one timeline, grouped by month, the newest at the top. The three steps dated after today (Grid connection, Final inspection, Panels installed) sit under **Upcoming**, the four completed ones under **August 2026**.
* Each step opens on a one-line description and two facts side by side: who did it, how long it took, which permit, which utility.
* Steps done by a person show initials (DA, PN, AO), the others an icon. A menu on every step offers **Upload photos** and **Contact crew**.

## Before you start

{% hint style="info" %}
**Adapt this to your own org.** The figure is built with the seven steps typed into the component, so it needs no object at all, and every visitor of that page sees the same seven steps. Installation Step, the object behind the Query version in step 8, is one this tutorial creates. If your installations already leave a trail, milestones on an object of your own, tasks, work order line items, point the query there and map your own fields. A step needs a title and a date; the rest is decoration.
{% endhint %}

* The [Avonni Components for Experience Sites](https://appexchange.salesforce.com/appxListingDetail?listingId=2e584bb3-b5e0-415d-9347-d6567158d840) package is installed, and your customer users hold a package license and the **Avonni Experience Cloud Components User** permission set. Both are required, see [License Management](https://docs.avonnicomponents.com/experience-cloud/getting-started/license-management).
* An Experience Site (LWR or Aura) with a page for the tracker, and at least one customer user whose contact belongs to the account that owns the installation. The examples below use Nadia Ferreira, the homeowner at 2417 Wooldridge Drive. She logs in with an Experience Cloud customer license, not a Salesforce user license.
* Two ways to feed the timeline. **Manual**, which is what the figure shows, needs no object: the seven steps are typed into the component, and every visitor of that page sees the same seven steps. **Query** reads one record per step and shows each customer their own installation. Build the Manual version first, then switch to Query as step 8 describes. The Query path needs a custom object:

| Object                                     | Field                | Type                | Role                                                                      |
| ------------------------------------------ | -------------------- | ------------------- | ------------------------------------------------------------------------- |
| Installation Step (`Installation_Step__c`) | `Name`               | Text                | The step title, `Panels installed`                                        |
|                                            | `Account__c`         | Lookup (Account)    | The customer's account. It scopes the timeline to the logged-in customer. |
|                                            | `Work_Order__c`      | Lookup (Work Order) | The installation the step belongs to                                      |
|                                            | `Step_Date__c`       | Date/Time           | The date shown on the step, and the one that groups it by month           |
|                                            | `Description__c`     | Text (255)          | The line under the title                                                  |
|                                            | `Done_By__c`         | Text                | The first fact, `Diego Alvarez` or `Austin Energy`                        |
|                                            | `Detail__c`          | Text                | The second fact, `6 h` or `Scheduled`                                     |
|                                            | `Avatar_Initials__c` | Text (3)            | `DA` on the steps done by a person, empty on the others                   |
|                                            | `Avatar_Icon__c`     | Text                | An icon name such as `utility:approval` on the steps with no person       |

With records, every step shows the same two fields, and their labels are the field labels (**Done By**, **Detail**). The per-step labels in the figure (Crew, Permit, Utility) are a Manual effect: each Manual item carries its own labels.

**Sample data.** Seven steps, all on WO-2417. Enter any time of day: the date format set in step 4 shows the date only.

| Step                  | Date         | Description                                | First fact                | Second fact               | Avatar                        |
| --------------------- | ------------ | ------------------------------------------ | ------------------------- | ------------------------- | ----------------------------- |
| Grid connection       | Sep 22, 2026 | Utility meter swap and activation          | Status: Scheduled         | Utility: Austin Energy    | Icon `utility:connected_apps` |
| Final inspection      | Sep 15, 2026 | City inspector on site, crew present       | Status: Scheduled         | Inspector: City of Austin | Icon `utility:checkin`        |
| Panels installed      | Sep 8, 2026  | 18 panels, inverter and battery mounted    | Crew: Diego Alvarez       | Duration: 6 h             | Initials `DA`                 |
| Permit approved       | Aug 28, 2026 | Structural and electrical permits granted  | Permit: 2026-PV-41877     | Valid until: Feb 2027     | Icon `utility:approval`       |
| Permit filed          | Aug 19, 2026 | Submitted to the city with the roof survey | Filed by: Priya Nair      | Pages: 14                 | Initials `PN`                 |
| Site survey completed | Aug 12, 2026 | Roof outline drawn, shading analysis done  | Surveyor: Amara Osei      | Usable roof: 42 m²        | Initials `AO`                 |
| Proposal signed       | Aug 5, 2026  | 7.2 kW system, 25 year warranty            | Signed by: Nadia Ferreira | System: 7.2 kW            | Icon `utility:contract`       |

The figure was taken on September 5, 2026, which is why the three September steps sit under **Upcoming**. On your site, the group holds whichever steps are dated after today.

**Permissions.** A customer user needs the package license and the permission set named above, or the component does not load. For the Query path, the customer profile also needs Read on Installation Step and on its fields, and a sharing set (customer users) or a sharing rule that gives the account its own steps. The Avonni Query respects all of it: a customer only ever sees the steps Salesforce lets them see. Manual data needs no object access.

## Build it

{% stepper %}
{% step %}

### Add the Timeline to the tracking page

1. Open the site in **Experience Builder** and go to the tracking page.
2. In the **Components** panel, under **Custom Components**, drag **AX - Timeline** into a full-width section of the page.
3. Select the component to open its **Properties Panel**.
   {% endstep %}

{% step %}

### Write the header

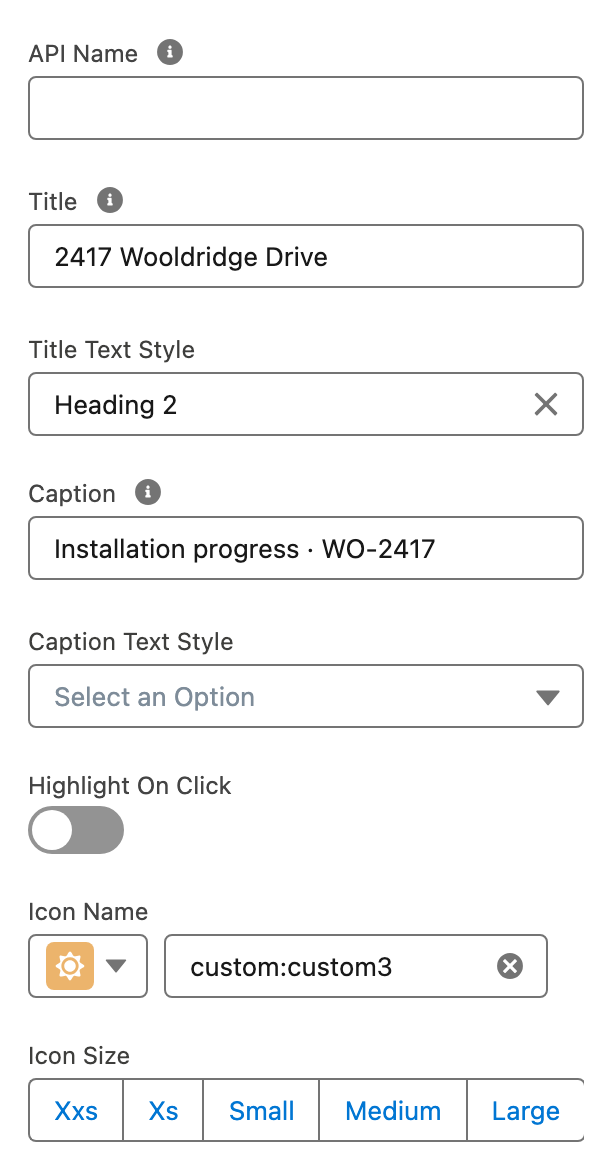
1. Set **Title** to `2417 Wooldridge Drive` and **Title Text Style** to **Heading 2**.
2. Set **Caption** to `Installation progress · WO-2417`.
3. Set **Icon Name** to `custom:custom3`. Leave **Icon Size** on its default.

*Why:* `custom:custom3` is the sun in the Lightning Design System icon set. The caption carries the work order number, so the title stays the address the customer recognizes.
{% endstep %}

{% step %}

### Group and sort the steps

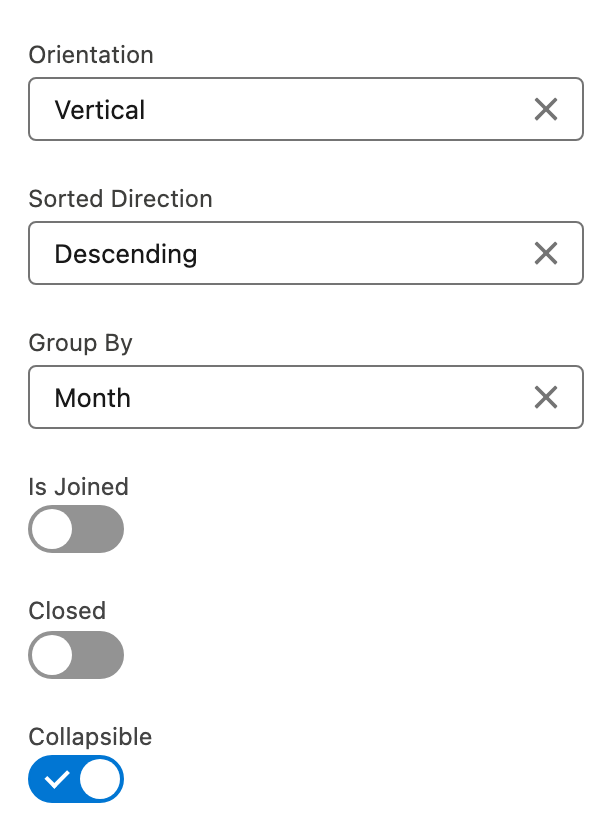
1. Leave **Orientation** on `vertical`.
2. Set **Sorted Direction** to `desc`.
3. Set **Group By** to `month`.
4. Turn on **Collapsible**.

*Why:* newest first puts what happens next at the top. With **Group By** set, the timeline collects every step dated after today under a group named **Upcoming**, whatever its month, and files the completed ones under their month. The Experience Builder has no setting to turn the Upcoming group off (as of September 2026). If you want dates with no groups at all, leave **Group By** empty.
{% endstep %}

{% step %}

### Format the date and the facts

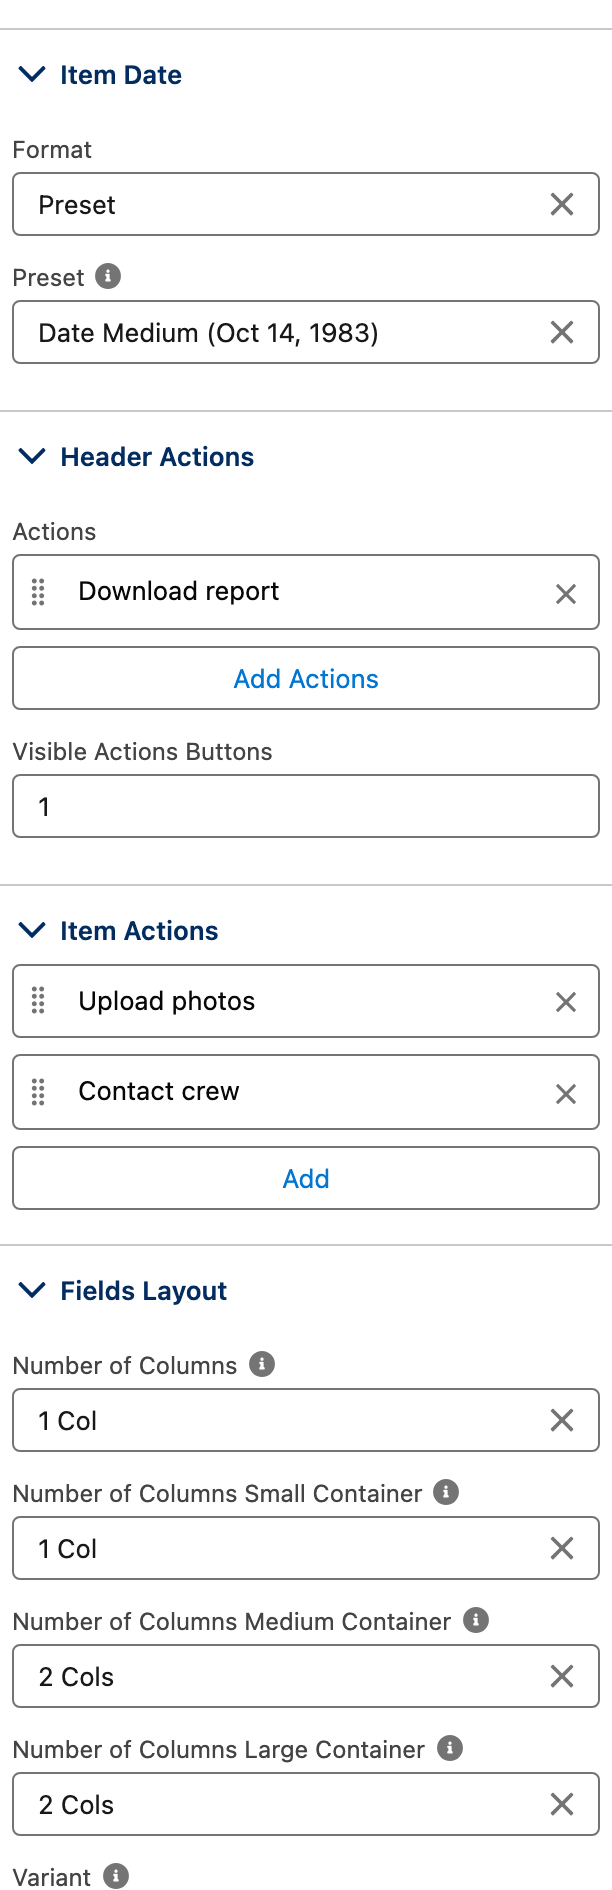
1. Open **Item Date Format**. Set **Format** to **Preset** and **Preset** to **Date Medium (Oct 14, 1983)**.
2. Open **Field Attributes**. Set **Variant** to **Label Inline** and **Number of Columns Large Container** to **2 Cols**.
3. Leave **Item Icon Size** on its default.

*Why:* a customer wants the day, not the hour. Label Inline keeps a label and its value on one line, and two columns put both facts side by side. **Number of Columns Large Container** applies to containers wider than 1024 px; the other **Number of Columns** settings cover the smaller ones.
{% endstep %}

{% step %}

### Enter the seven steps

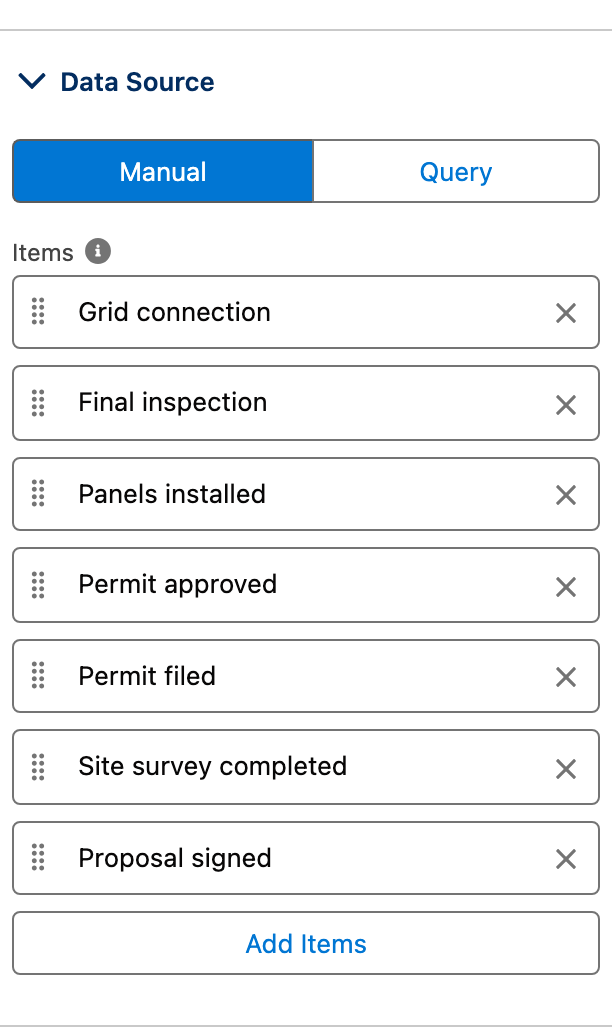
1. Open **Items**. Under **Data Source**, select **Manual**.
2. Add one item per row of the sample data. For each item, fill in **Title**, **Date** and **Description**, then add two rows under **Fields**, each with a **Label** and a **Value**.
3. Under **Avatar**, enter **Initials** (`DA`, `PN`, `AO`) on the three steps done by a person, and **Icon Name** on the other four.
4. Leave **Is Active** and **Has Checkbox** off. **Name** fills itself from the title.

*Why:* the fields of a step are visible only once the end user expands it, so the two facts stay out of the way until they are wanted. **Is Active** replaces the bullet with a blue circle only on an item that has no avatar: on these items it has no visible effect.
{% endstep %}

{% step %}

### Add the Download report button

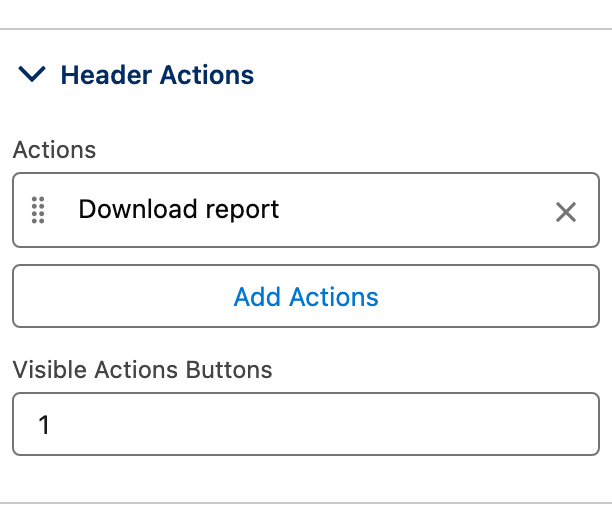
1. Open **Header Actions** and add an action: **Label** `Download report`, **Name** `report`, **Icon Name** `utility:download`.
2. Set **Visible Actions Buttons** to `1`.
3. On the action, set **On Click** to [Download](https://docs.avonnicomponents.com/experience-cloud/properties-panel/interactions/download) and point it at the report: a URL, or the Content Document ID of the file with **Auto Generate Public Link** turned on.

*Why:* with as many visible buttons as actions, the action shows as a button instead of collapsing into a menu. The public link is what lets a customer user open a file that lives in your org.
{% endstep %}

{% step %}

### Add the two item actions

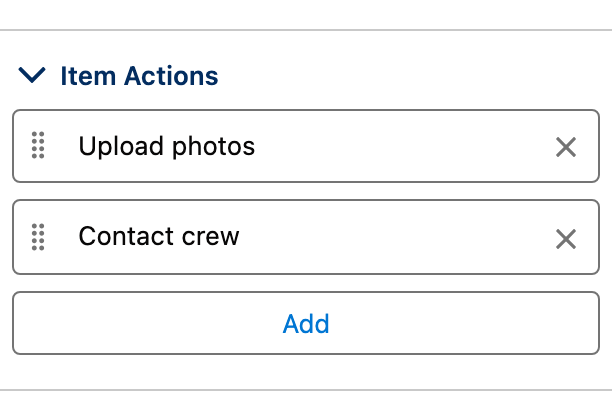
1. Open **Item Actions** and add two actions: **Label** `Upload photos`, **Name** `photos`, **Icon Name** `utility:image`, then **Label** `Contact crew`, **Name** `contact`, **Icon Name** `utility:chat`.
2. On each action, set **On Click** to [Open Flow Dialog](https://docs.avonnicomponents.com/experience-cloud/properties-panel/interactions/open-flow-dialog) and enter the **Flow API Name** of a screen flow: one that uploads photos to the work order, one that sends a message to the crew.

*Why:* item actions render as a menu at the right of every step. The customer acts from the step itself and never leaves the page.
{% endstep %}

{% step %}

### Switch to records

1. Open **Items** again and select **Query**. Choose the **Installation Step** object and add the fields you will map: `Name`, `Description__c`, `Step_Date__c`, `Done_By__c`, `Detail__c`, `Avatar_Initials__c`, `Avatar_Icon__c`.
2. Add a filter: **Account** equals the logged-in user's account. On an LWR site use `{!User.Record.AccountId}`; on an Aura site use `{!CurrentUser.accountId}`. See [Expressions for LWR Sites](https://docs.avonnicomponents.com/experience-cloud/tutorials/general/expressions-for-lwr-sites) and [Expressions for Aura Sites](https://docs.avonnicomponents.com/experience-cloud/tutorials/general/expressions-for-aura-sites).
3. In **Data Mappings**, map **Title** to Name, **Description** to Description, **Date** to Step Date, and select Done By and Detail under **Fields**. Under **Avatar**, map **Initials** to Avatar Initials and **Icon Name** to Avatar Icon. Leave **Key Field** on its default.

*Why:* the filter is what turns the page into a personal tracker: Nadia sees WO-2417 and nothing else. Sharing already hides other customers' records; the filter makes that scope explicit and keeps the page correct for internal users who can see everything.
{% endstep %}

{% step %}

### Preview, then publish

1. Click **Preview**, log in as the customer user and check the seven steps and the two groups.
2. **Publish** the site.
   {% endstep %}
   {% endstepper %}

## The settings that matter

| Setting                                                                | Value                                                                   | Why                                                                         |
| ---------------------------------------------------------------------- | ----------------------------------------------------------------------- | --------------------------------------------------------------------------- |
| **Group By** (`groupBy`) with **Sorted Direction** (`sortedDirection`) | `month`, `desc`                                                         | The steps ahead first, under **Upcoming**, then the history month by month. |
| **Field Attributes** (`fieldAttributes`)                               | **Variant** Label Inline, **Number of Columns Large Container** 2 Cols  | Two facts per step on one line.                                             |
| **Item Date Format** (`itemDateFormat`)                                | **Preset**, Date Medium                                                 | `Sep 22, 2026`, no time of day.                                             |
| **Item Actions** (`actions`)                                           | Upload photos, Contact crew                                             | The customer acts from the step, in a menu that every step carries.         |
| **Avatar** on each item                                                | **Initials** on the steps done by a person, **Icon Name** on the others | Who did it, at a glance.                                                    |

## Interactions

| Trigger                                         | Action                                                                                                                | What to set                                                                                                                                                |
| ----------------------------------------------- | --------------------------------------------------------------------------------------------------------------------- | ---------------------------------------------------------------------------------------------------------------------------------------------------------- |
| Header action **Download report**, **On Click** | [Download](https://docs.avonnicomponents.com/experience-cloud/properties-panel/interactions/download)                 | A URL, or the Content Document ID of the report with **Auto Generate Public Link** on.                                                                     |
| Item action **Upload photos**, **On Click**     | [Open Flow Dialog](https://docs.avonnicomponents.com/experience-cloud/properties-panel/interactions/open-flow-dialog) | The **Flow API Name** of a screen flow with a file upload on the work order. Add the flow to a page of the site and publish, or the dialog cannot find it. |
| Item action **Contact crew**, **On Click**      | [Open Flow Dialog](https://docs.avonnicomponents.com/experience-cloud/properties-panel/interactions/open-flow-dialog) | A screen flow that creates a case or sends an email to the crew.                                                                                           |

## Try it

1. Log in as the customer. Seven steps, **Upcoming** above **August 2026**, and nothing from another customer's installation.
2. Click the chevron on **Panels installed**: the description and the two facts, **Crew** and **Duration**, appear. Click the chevron next to **August 2026**: the whole group folds.
3. Open the menu at the right of any step: **Upload photos** and **Contact crew**. Click **Download report** in the header.
4. Move the date of **Grid connection** to yesterday. It leaves **Upcoming** and joins the group of the current month.

## Take it further

The same timeline exists on the other Avonni surfaces:

* [Timeline](https://docs.avonnicomponents.com/flow/flow-components/timeline) for Flow Screen Components, inside a screen flow.
* [Timeline](https://docs.avonnicomponents.com/dynamic-components/components/timeline) for Dynamic Components, on a Lightning page.
* [Timeline](https://docs.avonnicomponents.com/lwc-components/data-driven-components/timeline) for LWC Components, as the `avonni-dd-timeline` tag in your own component.

Two variations worth trying:

* Turn on **Searchable** once an installation runs to dozens of steps. **Search Engine Attributes** set the placeholder and the position of the search box.
* Turn on **Show Pagination** and set **Max Visible Items** for long histories, so the page stays short.

## Troubleshooting

| Problem                                                                      | Cause                                                                                                                                                                                                | Fix                                                                                                                                          |
| ---------------------------------------------------------------------------- | ---------------------------------------------------------------------------------------------------------------------------------------------------------------------------------------------------- | -------------------------------------------------------------------------------------------------------------------------------------------- |
| Steps dated after today show under **Upcoming** instead of their month       | With **Group By** set, the timeline collects every future item under Upcoming. The component has a setting that disables this group, but the Experience Builder does not expose it (September 2026). | Keep the group: it reads well on a tracker. For dates with no groups at all, clear **Group By**.                                             |
| The description and the two facts of a step are not visible                  | Items start collapsed, and the fields show only once the step is expanded. There is no setting to open them all.                                                                                     | Tell the customer to click the chevron on a step. The title and the date are always visible.                                                 |
| **Is Active** changes nothing on a step                                      | The blue active bullet replaces the default bullet only on an item that has no avatar. Initials or an icon take its place.                                                                           | Remove the avatar from that one step if you want the blue circle, or leave **Is Active** off.                                                |
| The timeline shows in **Preview** but the customer sees an error, or nothing | The customer user lacks the package license or the permission set (both are required), has no access to Installation Step, or no sharing set gives the account its steps.                            | Assign the license and **Avonni Experience Cloud Components User**, then check object permissions, field-level security and the sharing set. |
| **Download report** fails for the customer                                   | The file lives in your org and the customer cannot read it.                                                                                                                                          | On the Download interaction, turn on **Auto Generate Public Link**, or use a URL the customer can reach.                                     |
| **Upload photos** opens an empty dialog or an error                          | The flow is not part of the site.                                                                                                                                                                    | Add the flow to any page of the site, visible or not, then publish.                                                                          |


---

# Agent Instructions
This documentation is published with GitBook. GitBook is the documentation platform designed so that both humans and AI agents can read, navigate, and reason over technical content effectively. Learn more at gitbook.com.

## Querying This Documentation
If you need additional information that is not directly available in this page, you can query the documentation dynamically by asking a question.

Perform an HTTP GET request on the current page URL with the `ask` query parameter, and the optional `goal` query parameter:

```
GET https://docs.avonnicomponents.com/projects/use-cases/track-my-installation.md?ask=<question>&goal=<endgoal>
```

`ask` is the immediate question: it should be specific, self-contained, and written in natural language.
`goal` is optional and describes the broader end goal you are ultimately trying to accomplish on behalf of the user. GitBook uses it to tailor the answer towards what is most useful for that goal.

The response will contain a direct answer to the question and relevant excerpts and sources from the documentation.

Use this mechanism when the answer is not explicitly present in the current page, you need clarification or additional context, or you want to retrieve related documentation sections.