> For the complete documentation index, see [llms.txt](https://docs.avonnicomponents.com/llms.txt). Markdown versions of documentation pages are available by appending `.md` to page URLs; this page is available as [Markdown](https://docs.avonnicomponents.com/projects/use-cases/customer-sign-off-inside-a-flow.md).

# Customer sign-off inside a flow

## Overview

The customer signs the handover on the last screen of a flow, and the signature lands on the work order as a file. Nothing to print, nothing to scan. The whole step is one **Pen Input** component from Avonni Flow Screen Components, set up as a signature pad with a reduced toolbar and the drawing saved as a Salesforce File. This tutorial rebuilds the last screen of the **Handover** flow of SolarOps, a solar installer, in your own org.

## What you build

![Avonni Pen Input on the last screen of a Salesforce flow: a handwritten signature in blue ink on a signature pad, a reduced toolbar and a Save signature button](https://3857391697-files.gitbook.io/~/files/v0/b/gitbook-x-prod.appspot.com/o/spaces%2FdHOej9Pd5IxJNGEJMZKW%2Fuploads%2Fgd8O4HzzidYuLqW4uGwQ%2Fuc-07-customer-signoff-flow.png?alt=media)

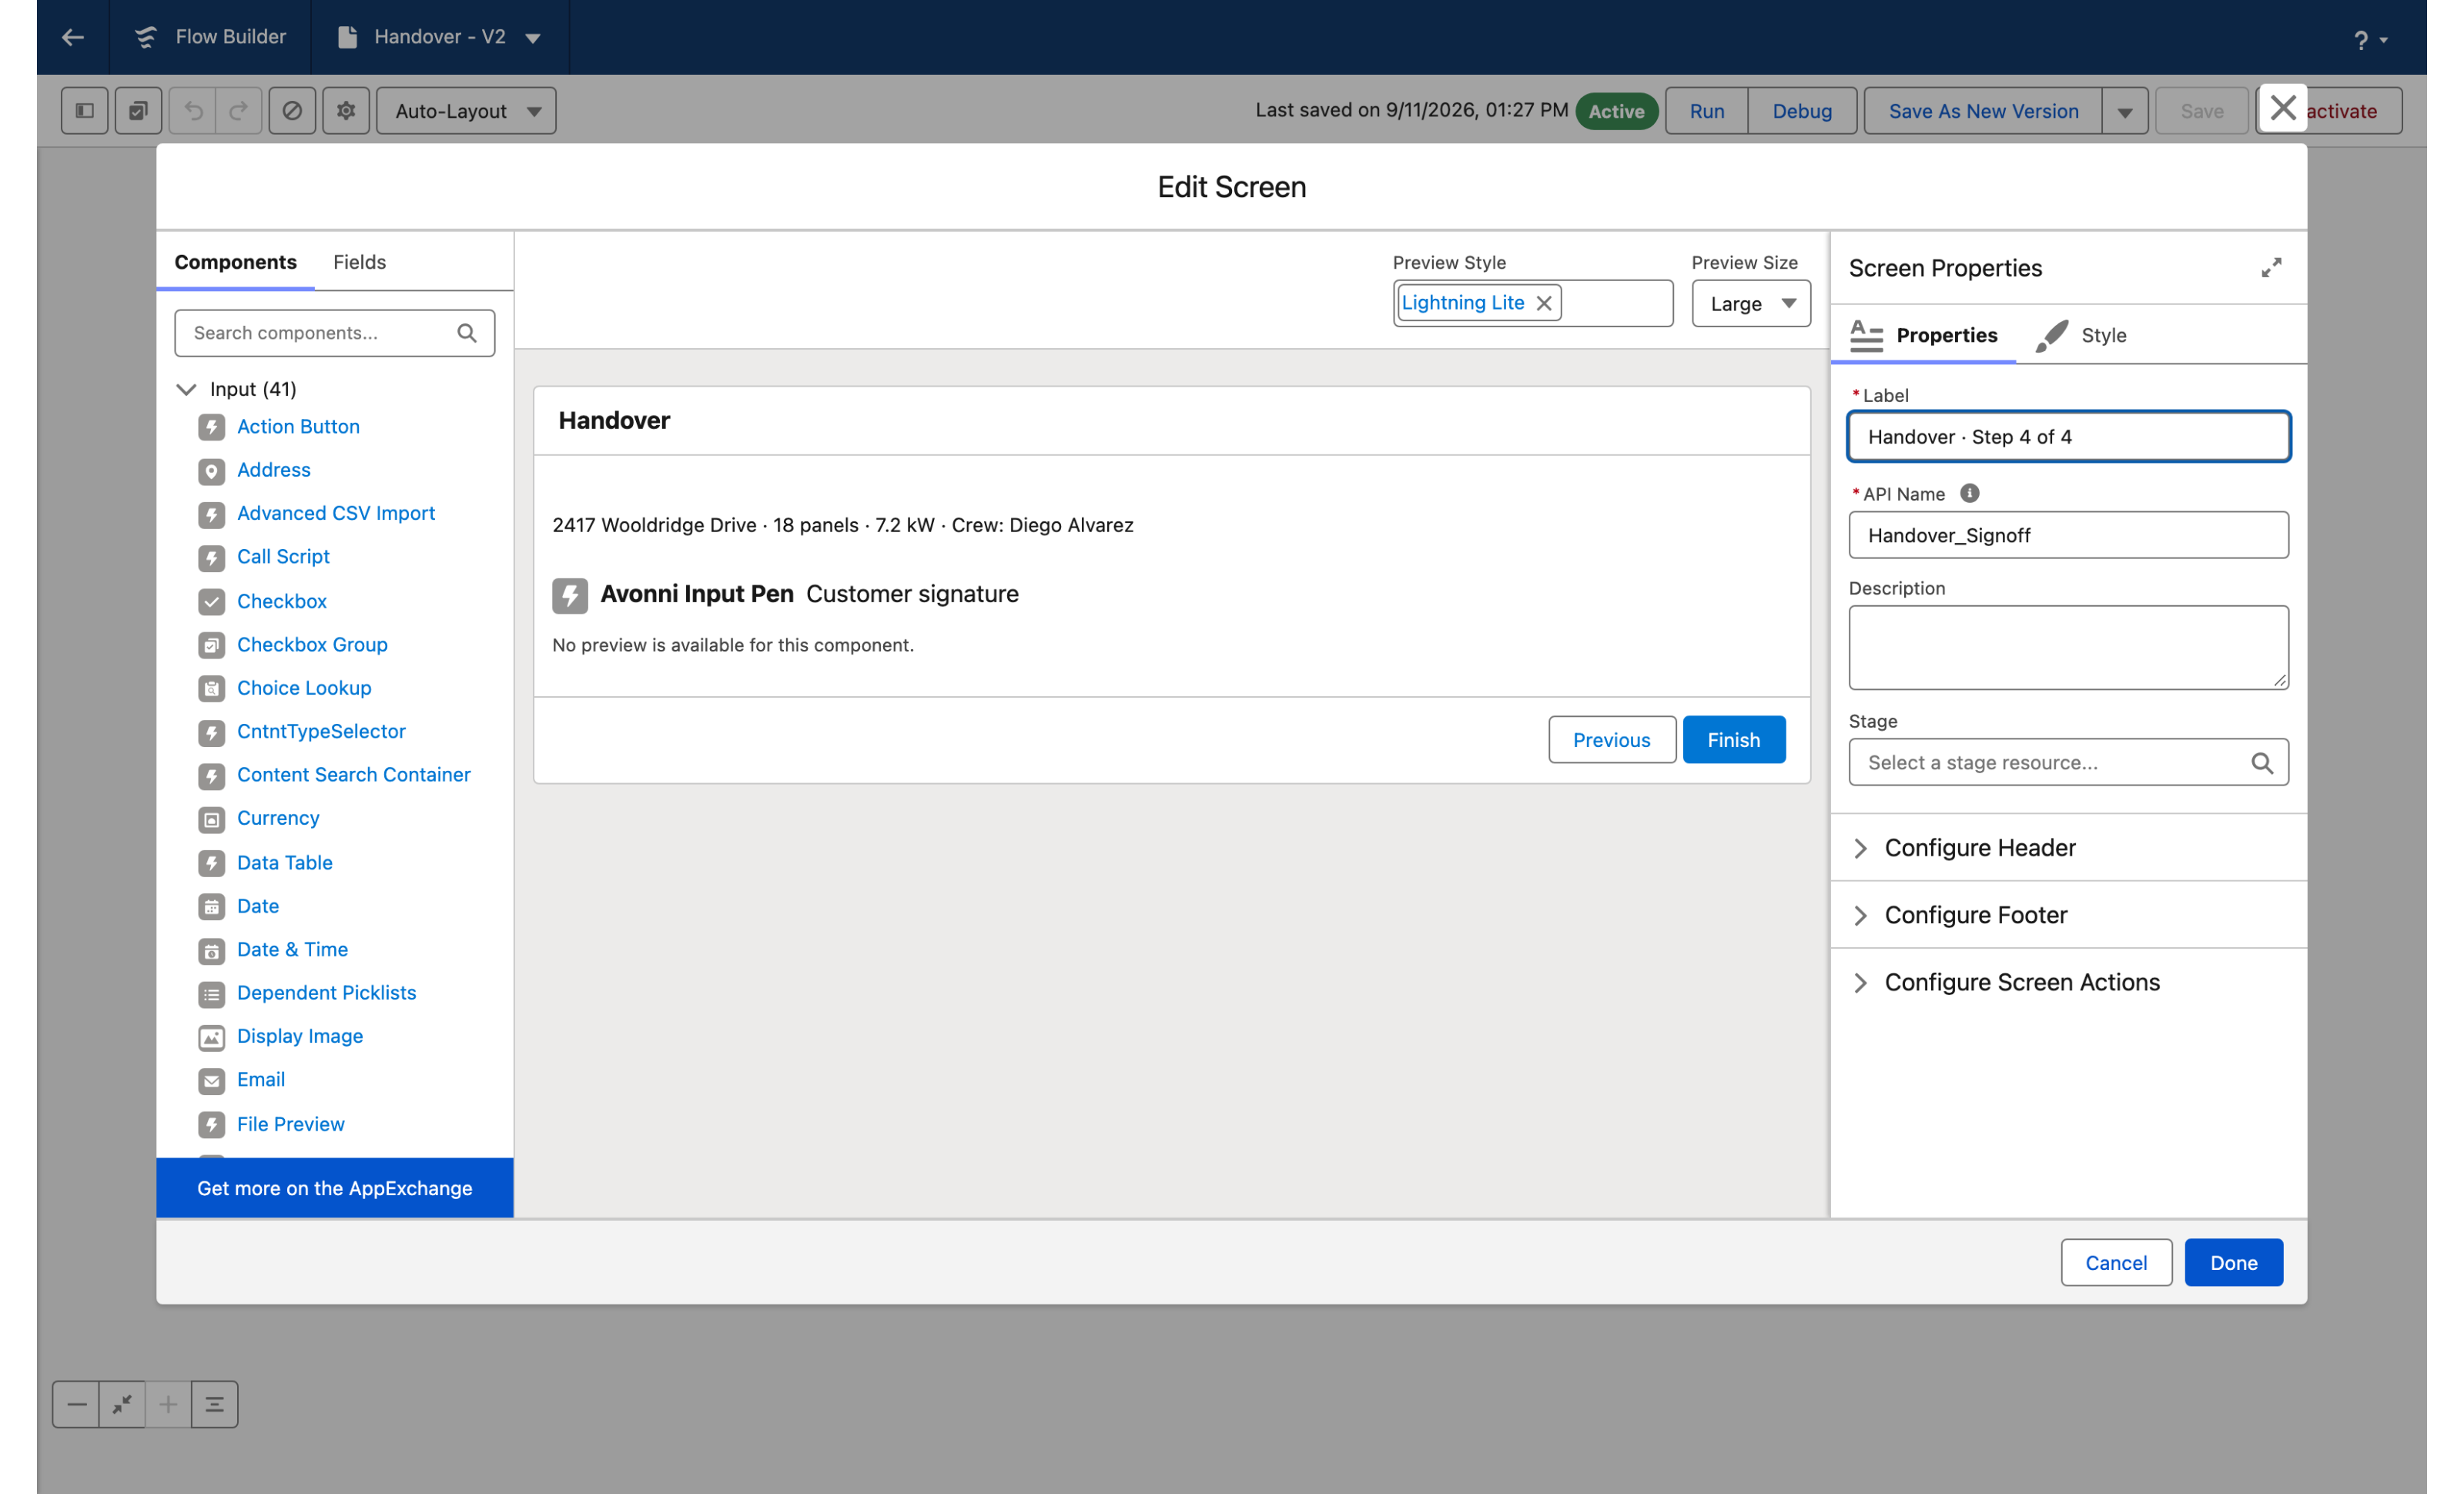
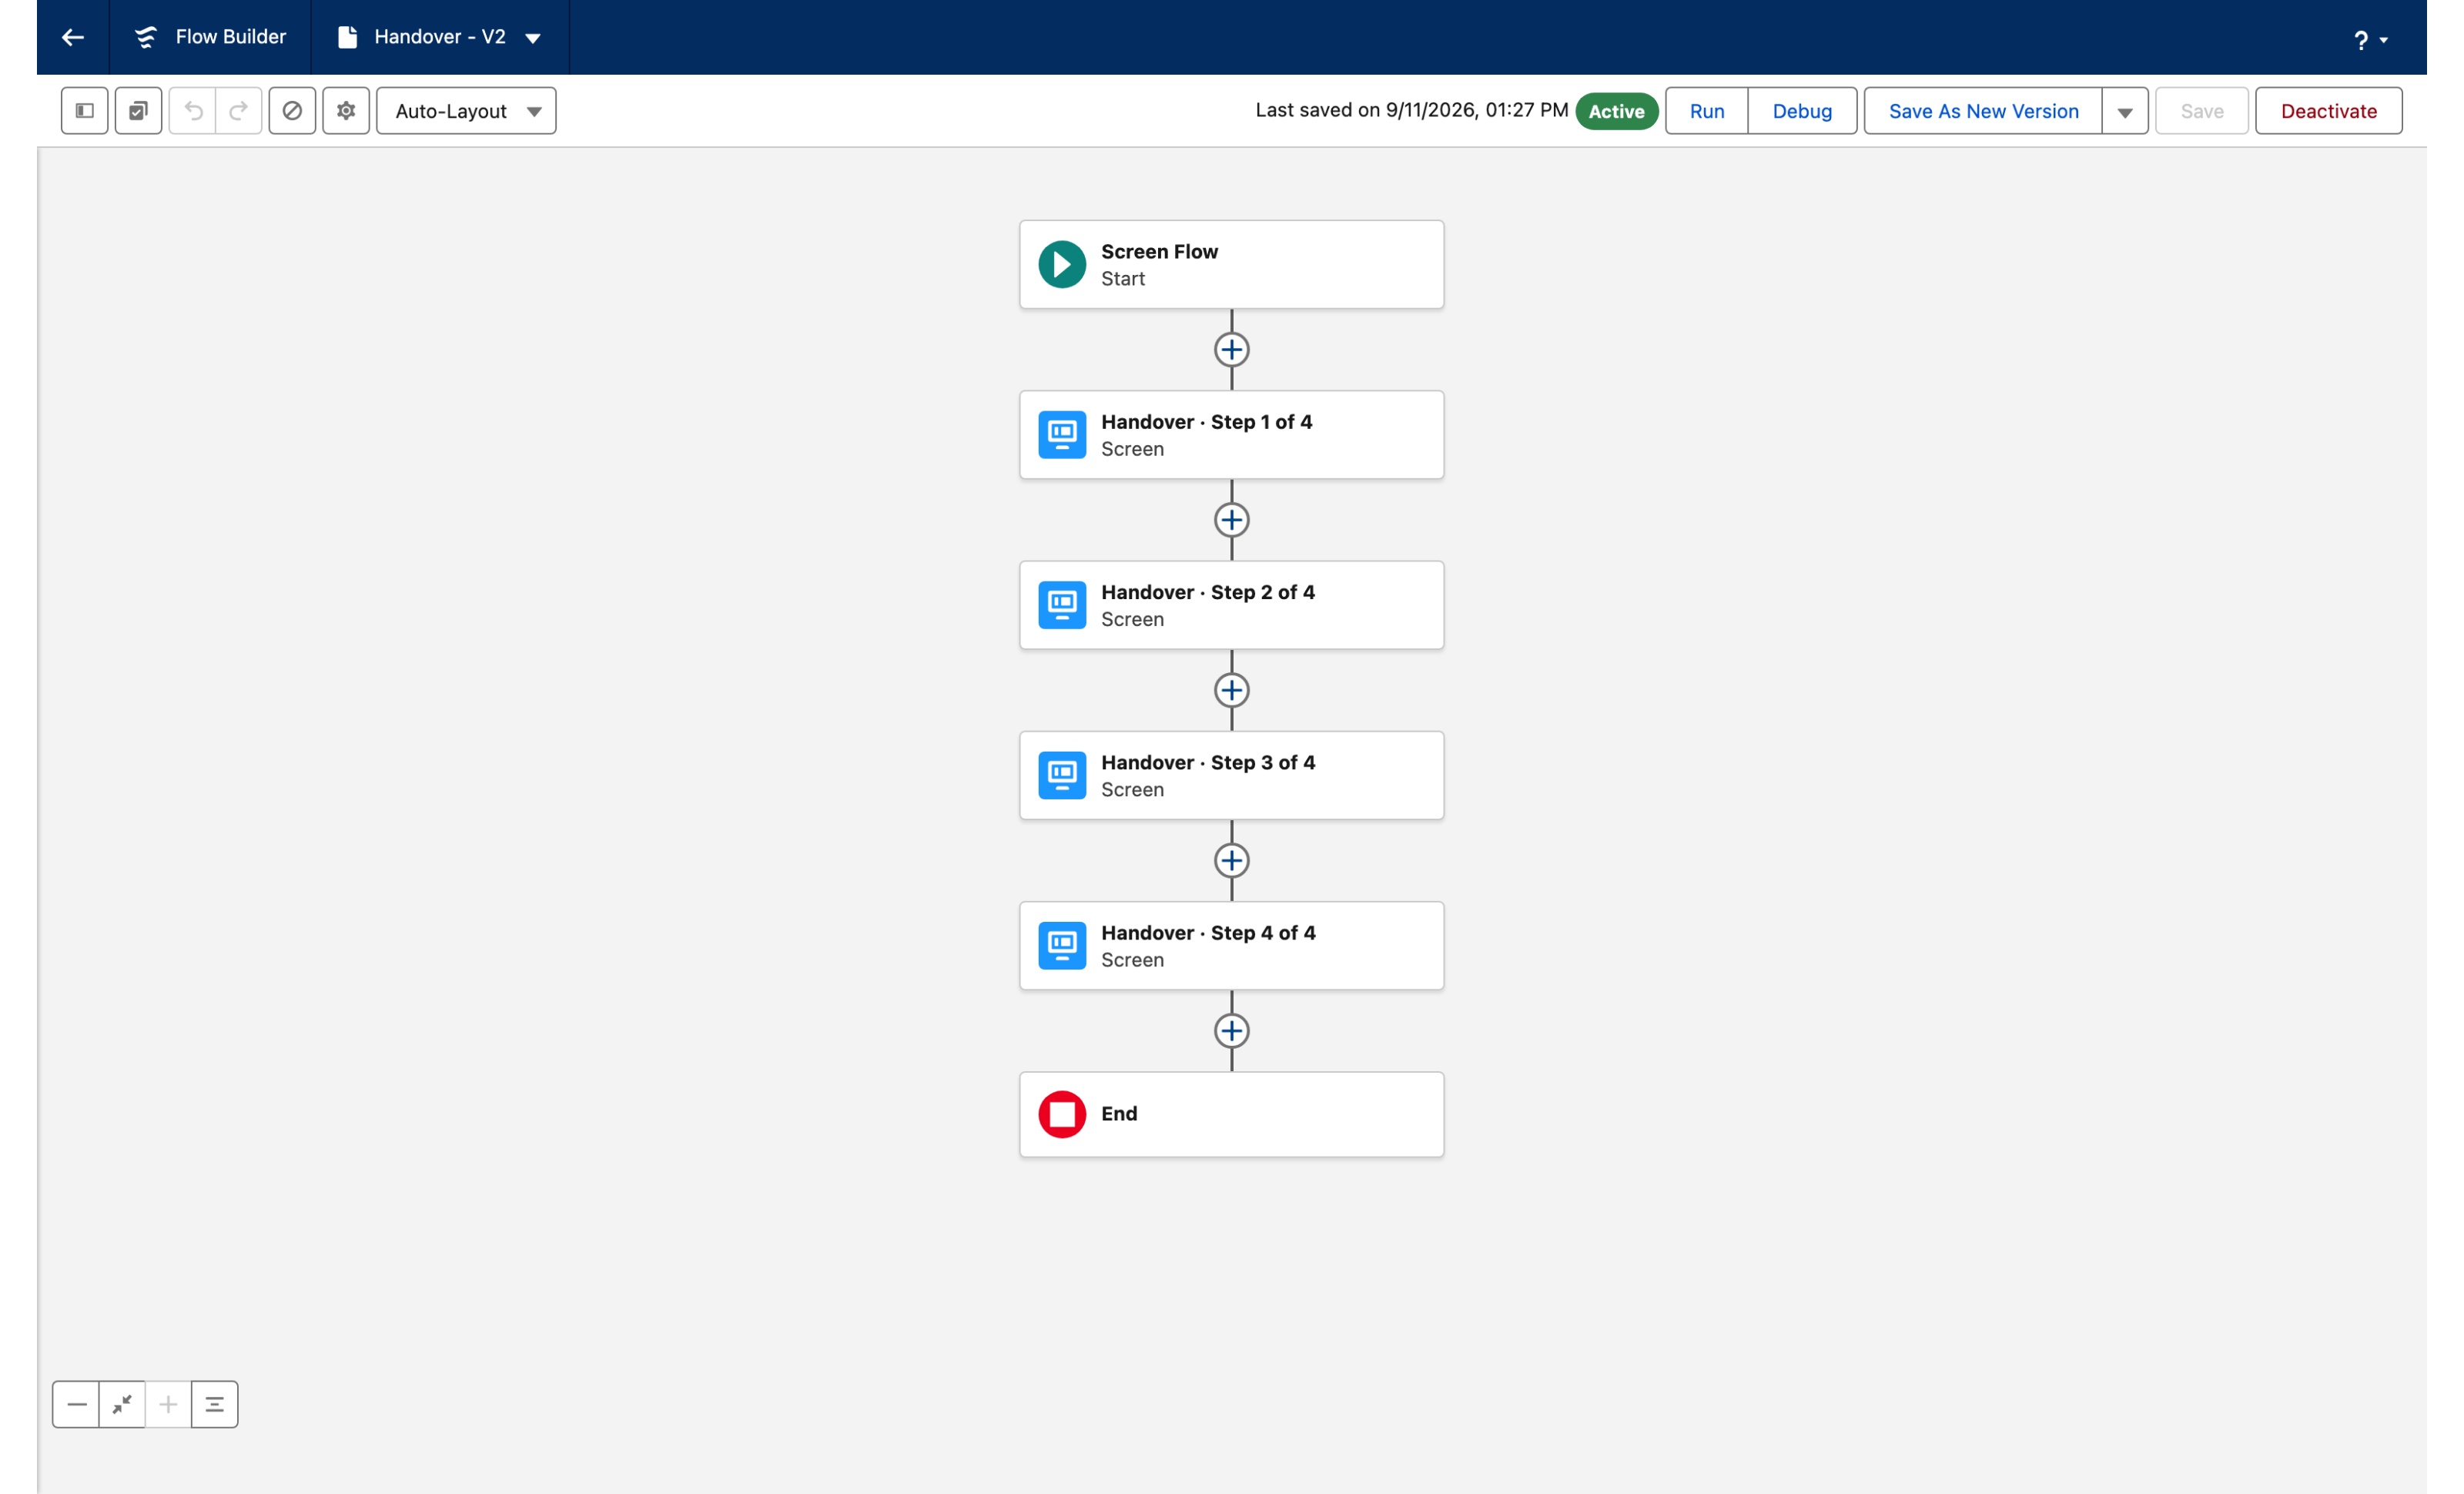
* SolarOps closes every installation with a four step screen flow. Step 4 is the signature, under a Display Text that sums up the job: **2417 Wooldridge Drive · 18 panels · 7.2 kW · Crew: Diego Alvarez**.
* The field is **Customer signature**, required, with the help text **Sign to confirm the installation is complete**.
* The pad shows a signature line and takes the signature in dark blue ink. The toolbar is reduced to the pen on the left and undo and redo on the right; the clear button is the circular arrow at the top right of the pad.
* **Save signature** files the drawing on the work order as **Handover signature WO-2417**. **Previous** and **Finish** are the standard flow footer.

## Before you start

{% hint style="info" %}
**Adapt this to your own org.** The signature is filed on the standard **Work Order** object here, which exists only in orgs where Work Orders are turned on. The pad does not care what it is attached to: any object the flow is launched from works, as long as `{!recordId}` carries its Id. The job summary above the pad is typed into a Display Text in the figure; build yours from your own fields.
{% endhint %}

* The [Avonni Flow Screen Components](https://appexchange.salesforce.com/appxListingDetail?listingId=a0N4V00000IDsfbUAD) package is installed, and your technicians hold a license and the permission set. See [Installation & Licenses management](https://docs.avonnicomponents.com/flow/getting-started/installation-and-licenses-management).
* A work order for the installation. The figure uses the standard **Work Order** object; any object the flow is launched from works the same way.

| Object                   | Field                     | Type        | Role                                                                                       |
| ------------------------ | ------------------------- | ----------- | ------------------------------------------------------------------------------------------ |
| Work Order (`WorkOrder`) | `Subject`                 | Text        | `Solar installation, 2417 Wooldridge Drive`                                                |
|                          | `Street`, `City`, `State` | Address     | `2417 Wooldridge Drive`, `Austin`, `TX`                                                    |
|                          | `Status`                  | Picklist    | `In Progress` while the crew is on site                                                    |
|                          | `WorkOrderNumber`         | Auto Number | Assigned by Salesforce. The SolarOps team calls this job WO-2417; your number will differ. |

**Sample data.** One work order, the one above. The job summary on the last screen (`18 panels`, `7.2 kW`, `Crew: Diego Alvarez`) is typed into the Display Text in the figure. Replace it with merge fields from your own work order fields when you have them. The signature itself needs no field: it is a Salesforce File linked to the work order when the technician clicks **Save signature**.

**Permissions.** The save runs as the running user, who must be able to create Files: Create on `ContentVersion` and on `ContentDocumentLink`. Authenticated Salesforce users typically have both. Guest users on an Experience site do not; the [Input Pen](https://docs.avonnicomponents.com/flow/flow-components/input-pen) page describes the alternative for them.

## Build it

{% stepper %}
{% step %}

### Create the flow and its record variable

1. In **Setup**, open **Flows** and create a **Screen Flow**.
2. In the **Toolbox**, click **New Resource**: Resource Type **Variable**, API Name `recordId`, Data Type **Text**, **Available for input** checked.
3. Save the flow with the label `Handover`.

*Why:* the header of a running screen flow shows the flow label, not the screen label. The flow in the figure is labeled `Handover · Step 4 of 4` so that its header reads that way on the captured screen; in a real flow that text would sit on every screen. Label yours `Handover` and show the step count in a Display Text or a [Progress Indicator](https://docs.avonnicomponents.com/flow/flow-components/progress-indicator). The `recordId` variable receives the work order Id when the flow is launched from the record. See [How to pass your current RecordID in your screen flow](https://docs.avonnicomponents.com/flow/tutorials/tips-and-tricks/how-to-pass-your-current-recordid-in-your-screen-flow).
{% endstep %}

{% step %}

### Add the four screens

1. Add three **Screen** elements for the steps before the signature, each with a Display Text: `Confirm the work order before the walkthrough.`, `Run the safety checklist.`, `Walk the customer through the system.`
2. Add a fourth **Screen** element labeled `Handover · Step 4 of 4`. Add a Display Text with the job summary: `2417 Wooldridge Drive · 18 panels · 7.2 kW · Crew: Diego Alvarez`.
3. Keep the standard header and footer on all four screens. The last screen shows **Previous** and **Finish**.

*Why:* the summary above the pad is what the customer is signing for. Keep it to one line.
{% endstep %}

{% step %}

### Add the Pen Input and make it a signature pad

1. On the fourth screen, drag the **Pen Input** component from the Avonni section of the **Components** panel under the Display Text.
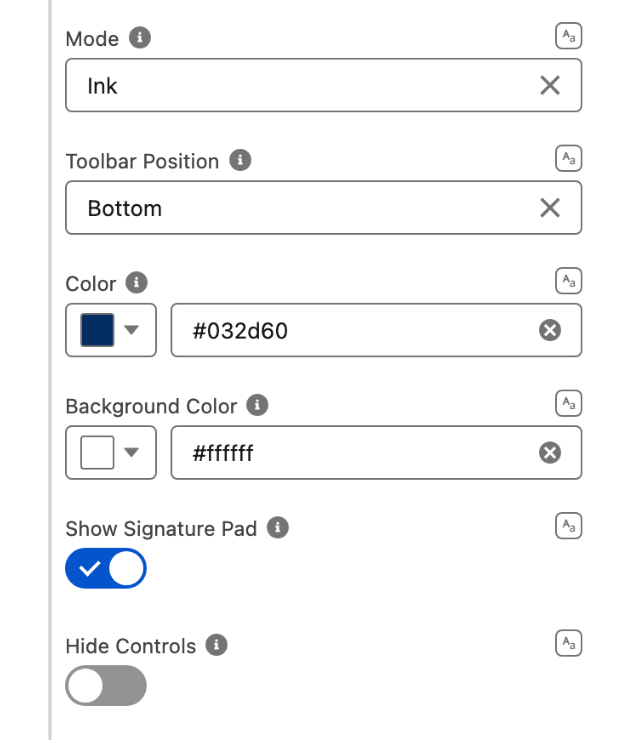
2. Click the component and open the **Edit Pen Input Component** panel. In the **Properties** tab, turn on **Show Signature Pad**.
3. Set **Mode** to **Ink** and **Toolbar Position** to **Bottom**.
4. Set **Color** to `#032d60` and leave **Background Color** at `#ffffff`.
5. Under **Advanced Options**, leave **Size** at **3px**.

*Why:* **Show Signature Pad** adds the signature line at the bottom of the canvas. **Ink** varies the stroke with the speed of the hand, which is what a pen does on paper; **Draw** gives a flat line. The Component Builder also offers a **Signature Pad** template that turns on the signature pad and Ink mode but hides the toolbar entirely; the figure keeps a reduced toolbar, so set the properties by hand or turn **Hide Controls** back off after applying the template.
{% endstep %}

{% step %}

### Label it and make it required

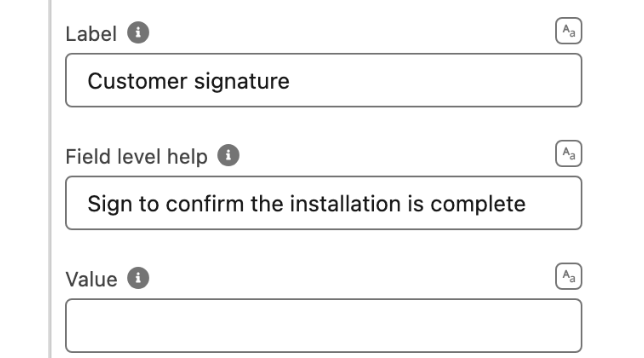
1. Set **Label** to `Customer signature`.
2. Set **Field level help** to `Sign to confirm the installation is complete`.
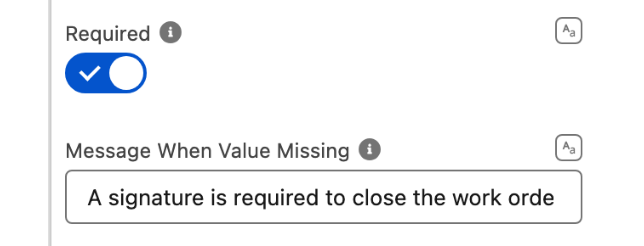
3. Turn on **Required** and set **Message When Value Missing** to `A signature is required to close the work order`.

*Why:* **Required** blocks **Finish** while the pad is empty, and the message says why in the customer's words.
{% endstep %}

{% step %}

### Reduce the toolbar

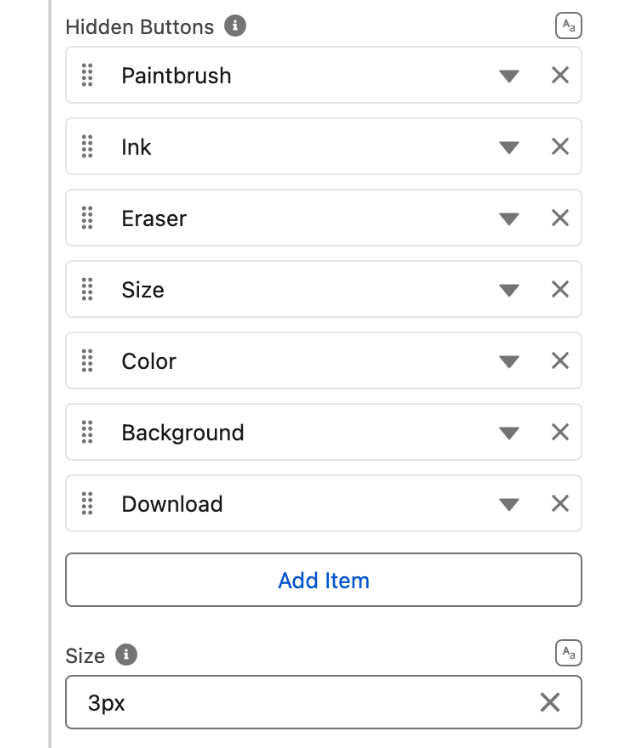
1. Under **Advanced Options**, open **Hidden Buttons**.
2. Add seven entries: **Paintbrush**, **Ink**, **Eraser**, **Size**, **Color**, **Background**, **Download**.

*Why:* a customer signs; they do not pick brushes or colors. What remains is **Pen**, **Undo**, **Redo** and **Clear**. Hiding the **Ink** button does not change the mode: Ink is already the default set in step 3, the button only lets the user switch to it.
{% endstep %}

{% step %}

### Save the signature on the work order

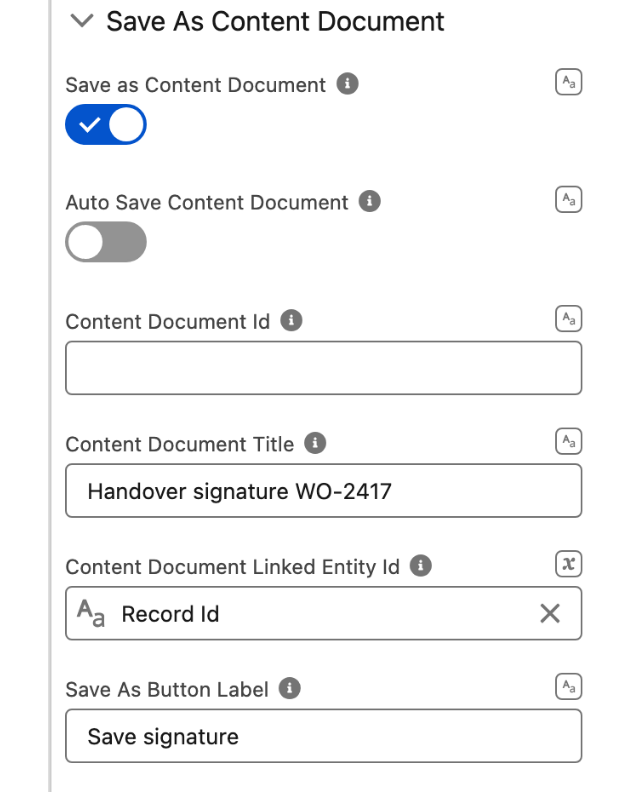
1. Open the **Save As Content Document** section and turn on **Save as Content Document**.
2. Set **Content Document Title** to `Handover signature WO-2417`. For a title that follows the record, switch it to **Mapped** or **Advanced** and build it from the work order number.
3. Switch **Content Document Linked Entity Id** to **Mapped** and select `{!recordId}`.
4. Set **Save As Button Label** to `Save signature`.
5. Leave **Auto Save Content Document** off.

*Why:* **Content Document Linked Entity Id** is what attaches the file to the record. Without it the signature is created in Files and belongs to no work order. With auto save off, the button appears and the technician files the signature once the customer is done.
{% endstep %}

{% step %}

### Activate and launch it from the work order

1. Click **Done**, save the flow and click **Activate**.
2. On the Work Order record page, add the standard **Flow** component in **Lightning App Builder**, select `Handover` and check **Pass record ID into this variable**. A quick action on Work Order works the same way.

*Why:* the figure shows the flow on the **Work orders** tab of the SolarOps app, which is where the crew opens it. Whatever the entry point, `{!recordId}` must be populated, or the signature has nothing to attach to.
{% endstep %}
{% endstepper %}

## The settings that matter

| Setting                                                                                                                                                                                                                                     | Value                                                                                  | Why                                                              |
| ------------------------------------------------------------------------------------------------------------------------------------------------------------------------------------------------------------------------------------------- | -------------------------------------------------------------------------------------- | ---------------------------------------------------------------- |
| **Show Signature Pad** (`showSignaturePad`) with **Mode** (`mode`)                                                                                                                                                                          | on, **Ink**                                                                            | A signature line and a pen stroke, not a marker.                 |
| **Required** (`required`) with **Message When Value Missing** (`messageWhenValueMissing`)                                                                                                                                                   | on, `A signature is required to close the work order`                                  | No **Finish** without a signature.                               |
| **Hidden Buttons** (`disabledButtonsSerialized`)                                                                                                                                                                                            | **Paintbrush**, **Ink**, **Eraser**, **Size**, **Color**, **Background**, **Download** | Pen, undo, redo and clear are all the customer needs.            |
| **Save as Content Document** (`saveAsContentDocument`) with **Content Document Linked Entity Id** (`contentDocumentLinkedEntityId`), **Content Document Title** (`contentDocumentTitle`) and **Save As Button Label** (`saveAsButtonLabel`) | on, `{!recordId}`, `Handover signature WO-2417`, `Save signature`                      | The signature becomes a named Salesforce File on the work order. |

## Interactions

| Trigger                  | Action                                                              | What to set                                                                                                                                                                                                                                                                                        |
| ------------------------ | ------------------------------------------------------------------- | -------------------------------------------------------------------------------------------------------------------------------------------------------------------------------------------------------------------------------------------------------------------------------------------------- |
| **Save As Button Click** | Built in: the component creates the file and links it to the record | Nothing. You can add a [Show Toast](https://docs.avonnicomponents.com/flow/component-builder/interactions-panel/show-toast) with a message such as `Signature filed on the work order`. The trigger exists only while **Auto Save Content Document** is off, because auto save removes the button. |

## Try it

1. Open a work order and start the flow. Click **Next** three times to reach the signature screen. Click **Finish** with an empty pad: the field shows `A signature is required to close the work order` and the flow stays on the screen.
2. Sign on the pad. Click **Undo**: the last stroke disappears. Click **Redo**: it is back. The circular arrow at the top right clears the pad.
3. Sign again and click **Save signature**, then open the work order in another tab: the **Files** related list holds `Handover signature WO-2417`. Click **Finish** to close the flow.

## Take it further

The same pad exists on two other Avonni surfaces:

* [Input Pen (Signature)](https://docs.avonnicomponents.com/dynamic-components/components/input-pen-signature) for Dynamic Components, on a Lightning page, with the same signature pad, hidden buttons and **Save as Content Document** settings.
* [Signature Pad](https://docs.avonnicomponents.com/lwc-components/core-components/signature-pad) for LWC Components, as the `avonni-signature-pad` tag in your own component. It exposes the same drawing options and returns the signature as a Base64 image in `value`; storing it is your code's job.

There is no Pen Input for Experience Sites. To collect a signature on a site, run this screen flow on the site, keeping in mind the guest user limitation described on the [Input Pen](https://docs.avonnicomponents.com/flow/flow-components/input-pen) page.

Two variations worth trying:

* Turn on **Auto Save Content Document** to file the signature without a button. **Finish** then does not depend on the technician remembering to click **Save signature**.
* Build **Content Document Title** from the record, for example an **Advanced** value combining `Handover signature` and `{!Get_Work_Order.WorkOrderNumber}` after a Get Records on the work order, so the file name matches the job in Files.

## Troubleshooting

| Problem                                                       | Cause                                                                                                                                                                         | Fix                                                                                                                                                                                                  |
| ------------------------------------------------------------- | ----------------------------------------------------------------------------------------------------------------------------------------------------------------------------- | ---------------------------------------------------------------------------------------------------------------------------------------------------------------------------------------------------- |
| The flow finishes, but no file appears on the work order      | The customer signed, but nobody clicked **Save signature**. **Required** checks that the pad has a drawing, not that it was saved.                                            | Click **Save signature** before **Finish**, or turn on **Auto Save Content Document** so the file is created without the button.                                                                     |
| The file exists in **Files**, but it is not on the work order | **Content Document Linked Entity Id** is empty. The component creates the file without linking it to any record.                                                              | Set **Content Document Linked Entity Id** to `{!recordId}` and make sure the flow receives the record Id when it starts.                                                                             |
| The toolbar still shows every tool                            | **Hidden Buttons** sits under **Advanced Options** and is empty, or the **Signature Pad** template was applied with **Hide Controls** on, which removes the toolbar entirely. | Expand **Advanced Options**, list the buttons to hide, and turn **Hide Controls** off if you want the reduced toolbar rather than none.                                                              |
| Saving fails for a guest user on an Experience site           | Guest users cannot create `ContentVersion` and `ContentDocumentLink` records.                                                                                                 | Turn off **Save as Content Document** for that flow and store the **Value** output yourself, as described on the [Input Pen](https://docs.avonnicomponents.com/flow/flow-components/input-pen) page. |
| The pad is too short for a comfortable signature              | The canvas has a default height.                                                                                                                                              | Set **Height** in the **Size** section of the **Style** tab.                                                                                                                                         |
| The header reads the same on every screen                     | The flow header shows the flow label, not the screen label.                                                                                                                   | Keep the flow label short (`Handover`) and put the step count in a Display Text or a Progress Indicator on each screen.                                                                              |


---

# Agent Instructions
This documentation is published with GitBook. GitBook is the documentation platform designed so that both humans and AI agents can read, navigate, and reason over technical content effectively. Learn more at gitbook.com.

## Querying This Documentation
If you need additional information that is not directly available in this page, you can query the documentation dynamically by asking a question.

Perform an HTTP GET request on the current page URL with the `ask` query parameter, and the optional `goal` query parameter:

```
GET https://docs.avonnicomponents.com/projects/use-cases/customer-sign-off-inside-a-flow.md?ask=<question>&goal=<endgoal>
```

`ask` is the immediate question: it should be specific, self-contained, and written in natural language.
`goal` is optional and describes the broader end goal you are ultimately trying to accomplish on behalf of the user. GitBook uses it to tailor the answer towards what is most useful for that goal.

The response will contain a direct answer to the question and relevant excerpts and sources from the documentation.

Use this mechanism when the answer is not explicitly present in the current page, you need clarification or additional context, or you want to retrieve related documentation sections.