> For the complete documentation index, see [llms.txt](https://docs.avonnicomponents.com/llms.txt). Markdown versions of documentation pages are available by appending `.md` to page URLs; this page is available as [Markdown](https://docs.avonnicomponents.com/projects/use-cases/book-the-next-appointment.md).

# Book the next appointment

## Overview

A dental clinic books the next visit from a screen flow: one week of slots, lunch and taken slots greyed out, one tap to pick. No calendar app, no back and forth. The whole step is one **Date/Time Picker** component from Avonni Flow Screen Components, in its **Weekly** variant, on step 2 of a three step flow. This tutorial rebuilds the slot screen of Brightsmile Dental in your own org, first with a fixed list of booked slots, then points to the version that reads them from existing appointments.

## What you build

![Avonni Date/Time Picker on step 2 of a Salesforce flow: a week of thirty minute dental slots with lunch, booked slots and the weekend greyed out, Tuesday 10:30 selected](https://3857391697-files.gitbook.io/~/files/v0/b/gitbook-x-prod.appspot.com/o/spaces%2FdHOej9Pd5IxJNGEJMZKW%2Fuploads%2FAIe0f480ZLRO9hHtia4C%2Fuc-11-book-appointment-flow.png?alt=media)

* Brightsmile Dental creates appointments with a three step flow. Step 2 is the slot, under a Display Text that names the visit: **Nadia Ferreira · Hygiene visit · 45 min · Dr. Hana Sato**.
* The field **Pick a slot** shows the week of September 14 to 20, 2026, Monday first, from 8:00 AM to 4:30 PM in thirty minute slots, with a date band above the days and **Today**, previous and next navigation.
* Lunch, 12:00 and 12:30, is greyed out on the five weekdays. Eleven booked slots are greyed out. Saturday and Sunday are fully greyed out. Seven columns, five of them open.
* Tuesday 15, 10:30 AM is selected. **Next** in the flow footer carries the choice into step 3, where the appointment is created.

## Before you start

{% hint style="info" %}
**Adapt this to your own org.** The eleven booked slots and the lunch hour are typed into the component here. That is the fastest way to reproduce the screen and the wrong way to run a clinic: a fixed list is stale the day after it is entered. **Take it further** gives the version that greys the slots from the appointments already in Salesforce, which is what a live booking screen needs. The appointment itself is written on the standard **Event**; any object with a start date and time takes its place.
{% endhint %}

* The [Avonni Flow Screen Components](https://appexchange.salesforce.com/appxListingDetail?listingId=a0N4V00000IDsfbUAD) package is installed, and the front desk holds a license and the permission set. See [Installation & Licenses management](https://docs.avonnicomponents.com/flow/getting-started/installation-and-licenses-management).
* The slot screen itself needs no record. Step 3 writes the appointment; the figure does not show it. Any object with a start date and time works. The standard Event is the shortest path:

| Object          | Field           | Type             | Role                                             |
| --------------- | --------------- | ---------------- | ------------------------------------------------ |
| Event (`Event`) | `StartDateTime` | Date/Time        | Receives the slot picked in step 2               |
|                 | `EndDateTime`   | Date/Time        | The start plus the visit length, 45 minutes here |
|                 | `Subject`       | Text             | `Hygiene visit`                                  |
|                 | `WhoId`         | Lookup (Contact) | The patient, Nadia Ferreira                      |

**Sample data.** None is needed to reproduce the screen. The booked slots in the figure are typed into the panel as a fixed list, which is what **Build it** does. The last section shows how to read them from existing appointments instead.

## Build it

{% stepper %}
{% step %}

### Create the flow and its screens

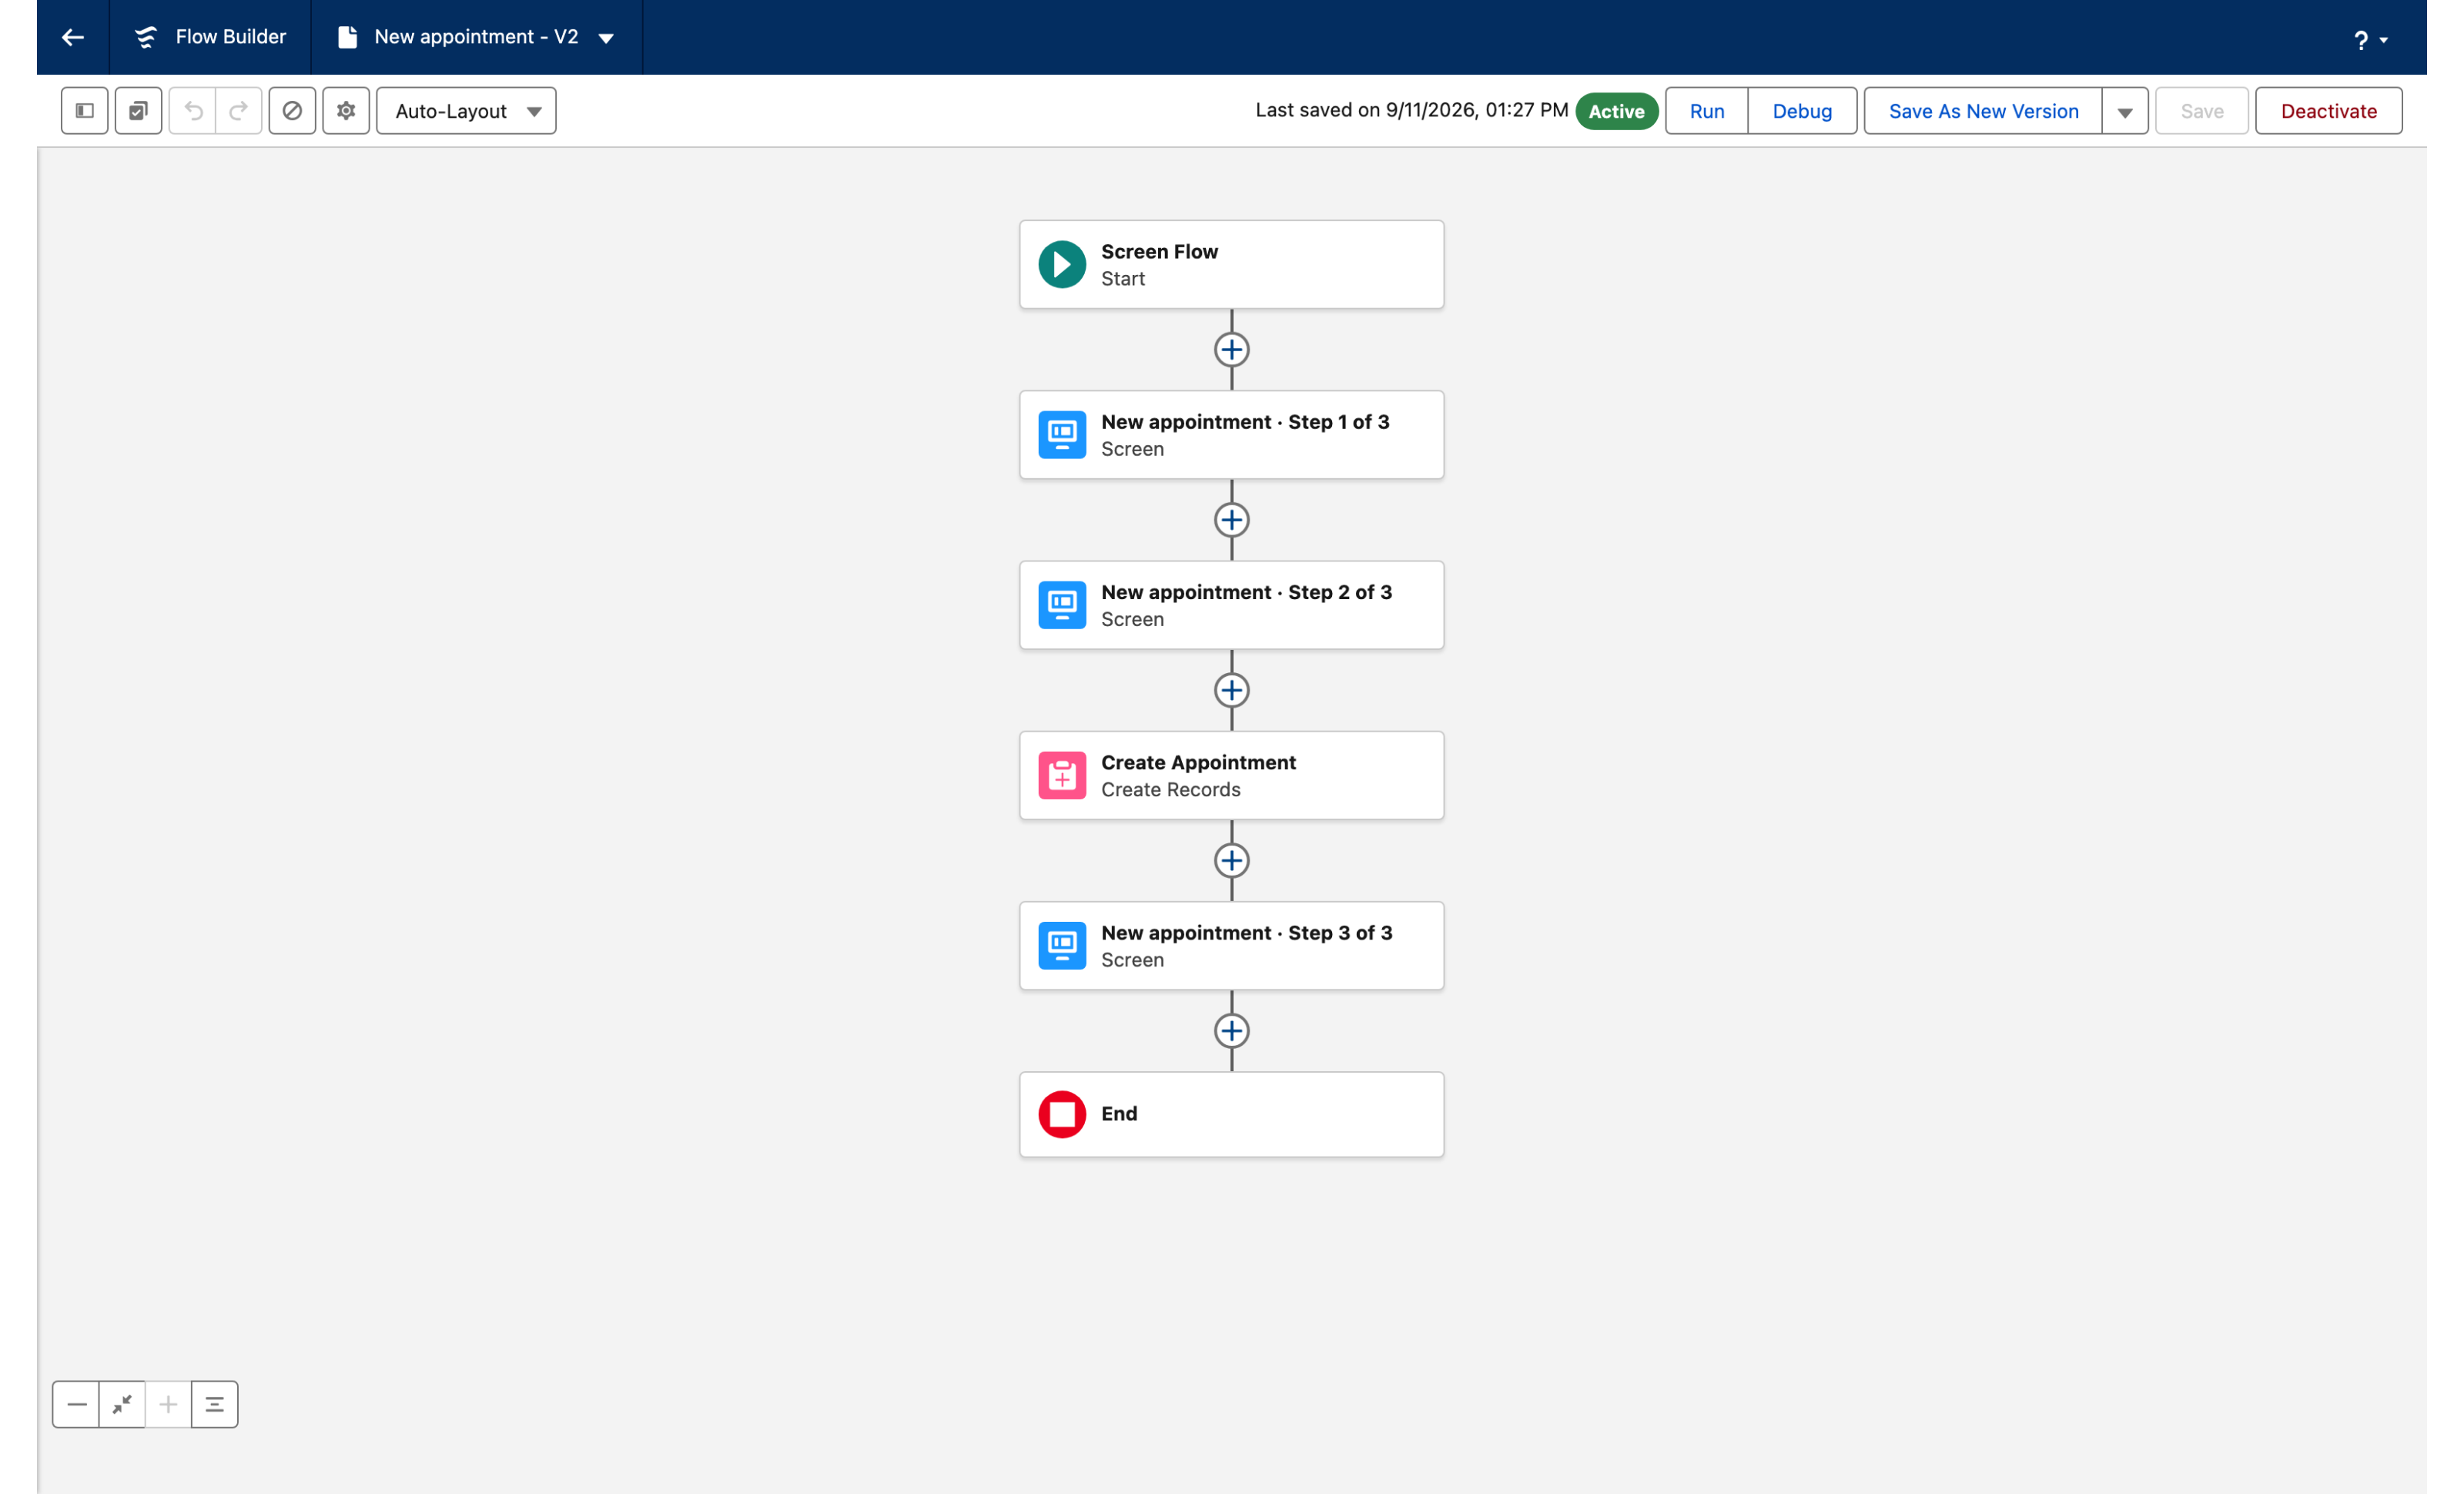
1. In **Setup**, open **Flows** and create a **Screen Flow**. Save it with the label `New appointment`.
2. Add a first **Screen** element with a Display Text: `Choose the patient and the visit type.`
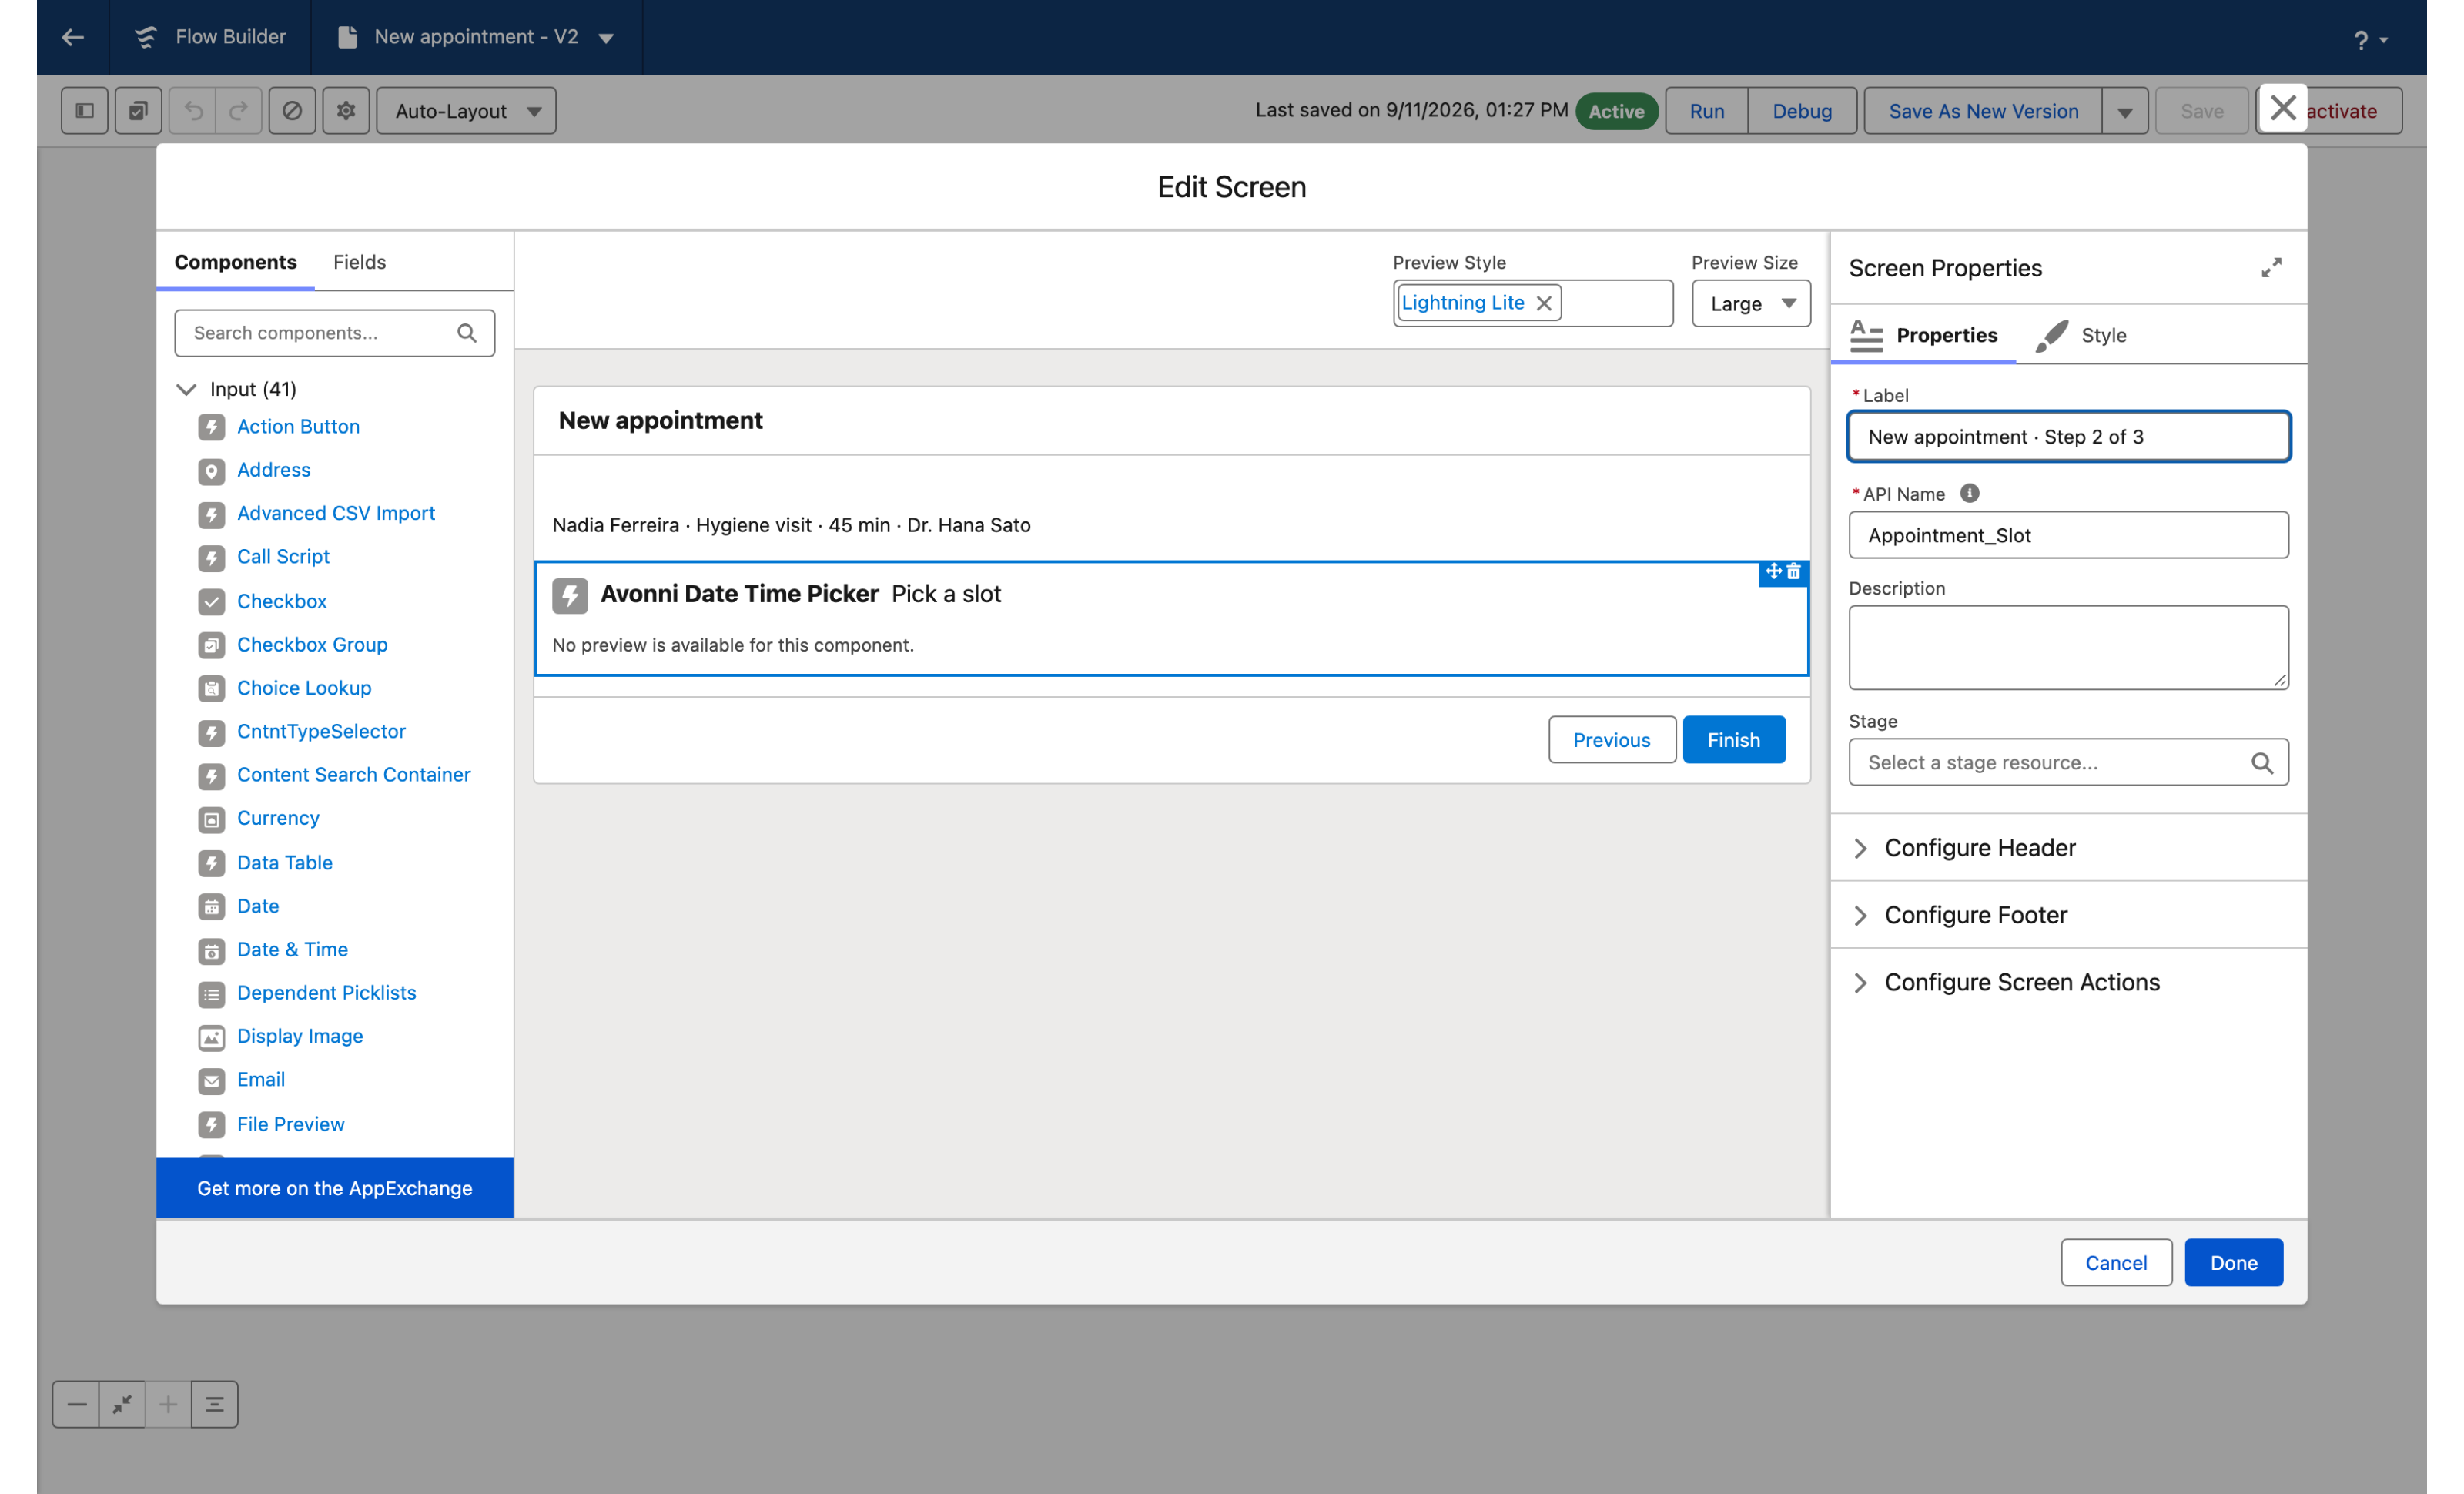
3. Add a second **Screen** element labeled `New appointment · Step 2 of 3`. Add a Display Text: `Nadia Ferreira · Hygiene visit · 45 min · Dr. Hana Sato`. This is the slot screen.
4. Add a third **Screen** element with a Display Text: `Review and confirm the appointment.`
5. Keep the standard header and footer on all three screens.

*Why:* the header of a running screen flow shows the flow label, not the screen label. The flow in the figure is labeled `New appointment · Step 2 of 3` so that its header reads that way on the captured screen; in a real flow that text would sit on every screen. Label yours `New appointment` and show the step count in a Display Text or a [Progress Indicator](https://docs.avonnicomponents.com/flow/flow-components/progress-indicator).
{% endstep %}

{% step %}

### Add the Date/Time Picker

1. On the second screen, drag the **Date/Time Picker** component from the Avonni section of the **Components** panel under the Display Text. Give it the API name `appointmentSlot`.
2. Click the component and open the **Edit Date/Time Picker Component** panel.
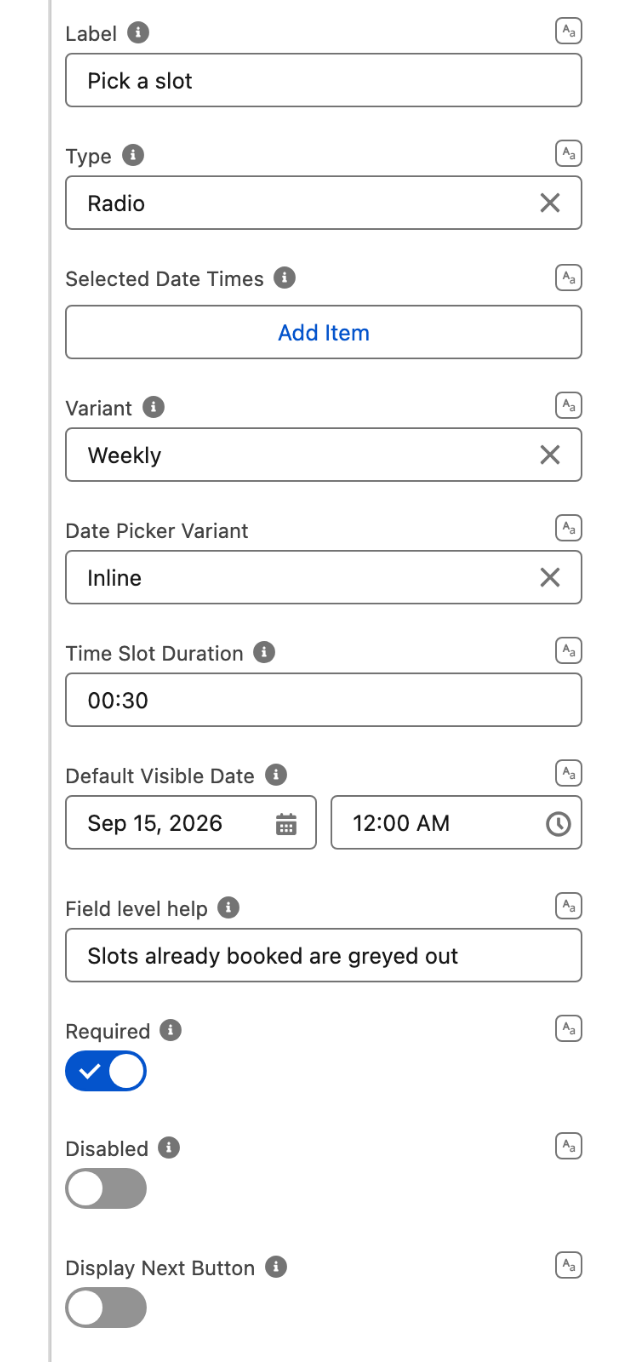
3. In the **Properties** tab, set **Label** to `Pick a slot` and **Field level help** to `Slots already booked are greyed out`.
4. Turn on **Required**. Set **Type** to **Radio**.

*Why:* **Radio** means one slot per booking. **Checkbox** would let the receptionist pick several, which a visit does not need.
{% endstep %}

{% step %}

### Show one week at a time

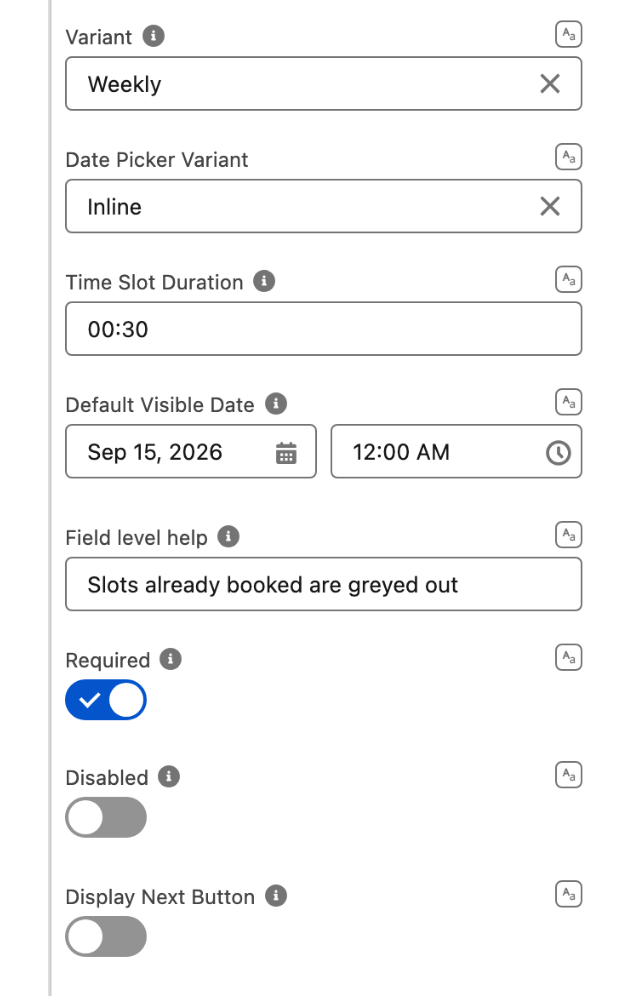
1. Set **Variant** to **Weekly** and **Date Picker Variant** to **Inline**.
2. Set **Week Start Day** to **Monday** and **Time Slot Duration** to `00:30`.
3. Set **Default Visible Date** to September 15, 2026.
4. Leave **Display Next Button** off.

*Why:* **Weekly** lays the seven days side by side, one column each. **Inline** shows the date band above the columns instead of a date field. The band highlights the visible date, not the selected slot: the figure highlights Tuesday 15 because that is the day of the chosen slot, so **Default Visible Date** is set to the 15th; the week shown is the same as with the 14th. The flow footer already has **Next**, so the component's own button stays off.
{% endstep %}

{% step %}

### Set the clinic's hours

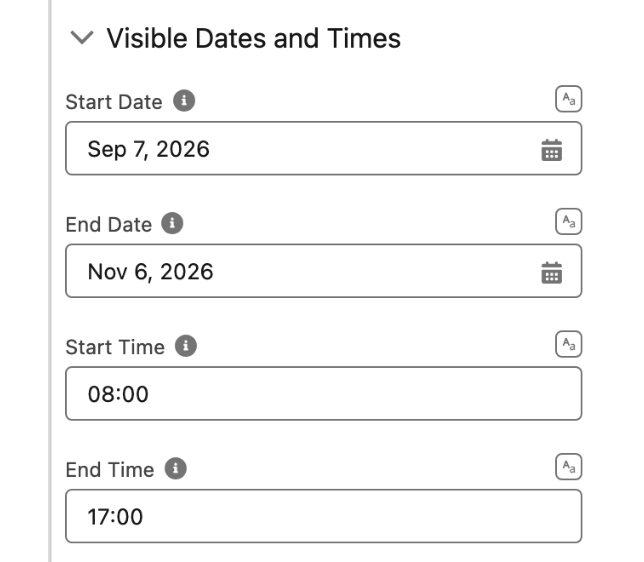
1. Open the **Visible Dates and Times** section.
2. Set **Start Date** to September 7, 2026 and **End Date** to November 6, 2026.
3. Set **Start Time** to `08:00` and **End Time** to `17:00`.
4. Turn on **Show Disabled Dates**.

*Why:* two months of navigation is enough to book the next visit. **End Time** is the end of the last slot, so `17:00` makes 4:30 PM the last button. **Show Disabled Dates** keeps unavailable slots visible in grey rather than removing them, which is how the receptionist sees that a time is taken rather than nonexistent.
{% endstep %}

{% step %}

### Grey out lunch and the weekend

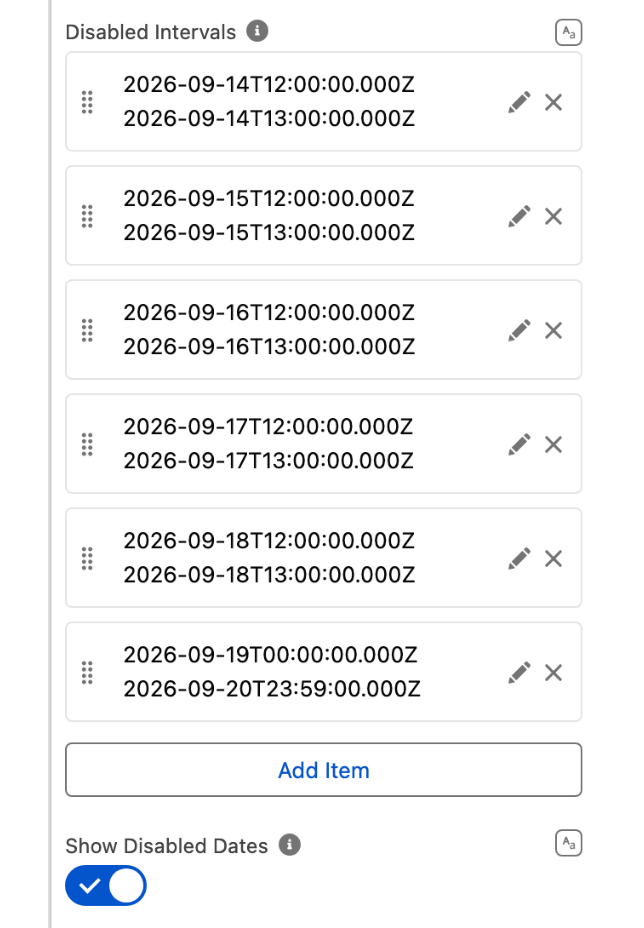
Still in **Visible Dates and Times**, open **Disabled Intervals** and add six rows, each with a **Start** and an **End**:

| Start                       | End                         | What it greys |
| --------------------------- | --------------------------- | ------------- |
| Mon, Sep 14, 2026, 12:00 PM | Mon, Sep 14, 2026, 1:00 PM  | Lunch         |
| Tue, Sep 15, 2026, 12:00 PM | Tue, Sep 15, 2026, 1:00 PM  | Lunch         |
| Wed, Sep 16, 2026, 12:00 PM | Wed, Sep 16, 2026, 1:00 PM  | Lunch         |
| Thu, Sep 17, 2026, 12:00 PM | Thu, Sep 17, 2026, 1:00 PM  | Lunch         |
| Fri, Sep 18, 2026, 12:00 PM | Fri, Sep 18, 2026, 1:00 PM  | Lunch         |
| Sat, Sep 19, 2026, 12:00 AM | Sun, Sep 20, 2026, 11:59 PM | The weekend   |

*Why:* an interval greys every slot it covers, so one row handles both lunch slots, and one row handles the whole weekend. Day names such as `Sat` are not accepted in **Disabled Date Times**; a dated interval is the way to close the weekend.
{% endstep %}

{% step %}

### Grey out the booked slots

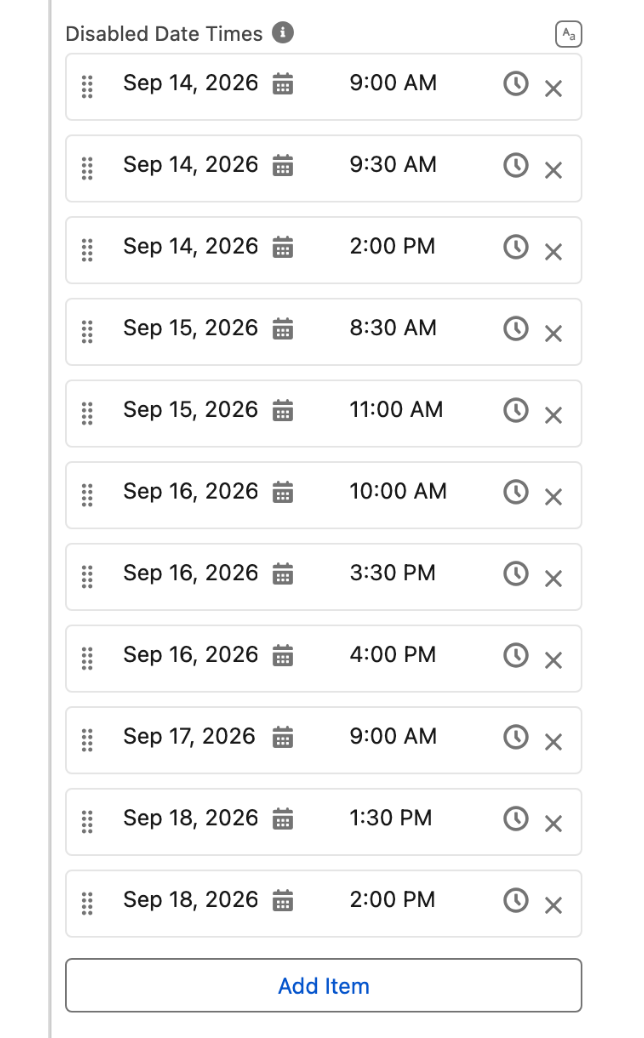
Open **Disabled Date Times** and add eleven entries, one per booked slot:

| Day               | Booked slots               |
| ----------------- | -------------------------- |
| Mon, Sep 14, 2026 | 9:00 AM, 9:30 AM, 2:00 PM  |
| Tue, Sep 15, 2026 | 8:30 AM, 11:00 AM          |
| Wed, Sep 16, 2026 | 10:00 AM, 3:30 PM, 4:00 PM |
| Thu, Sep 17, 2026 | 9:00 AM                    |
| Fri, Sep 18, 2026 | 1:30 PM, 2:00 PM           |

*Why:* a disabled date time greys the slot that starts at that exact time. This fixed list reproduces the figure. In production, the list comes from the appointments already in Salesforce, see **Take it further**.
{% endstep %}

{% step %}

### Format the days and the hours

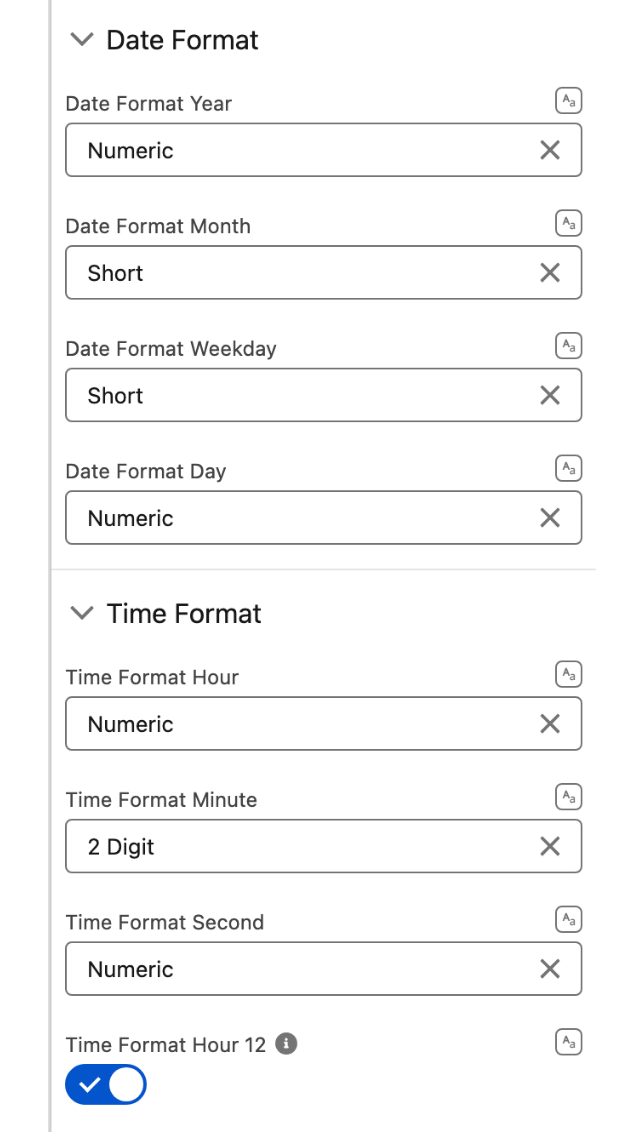
1. Open the **Date Format** section: **Date Format Weekday** **Short**, **Date Format Month** **Short**, **Date Format Day** **Numeric**.
2. Open the **Time Format** section: **Time Format Hour** **Numeric**, **Time Format Minute** **2 Digit**, **Time Format Hour 12** on.

*Why:* the columns read `Mon 14` and the band reads `Sep 14`. The figure shows the slots as `8:00 AM`. Built from the panel they read `8:00:00 AM`: **Time Format Second** offers **Numeric** or **2 Digit** and no empty value, so the seconds stay (see Troubleshooting).
{% endstep %}

{% step %}

### Use the slot in step 3, activate

1. Click **Done**. After the second screen, add a **Create Records** element on **Event** with `StartDateTime` set to `{!appointmentSlot.value}`, `Subject` to `Hygiene visit`, and the other fields your appointment needs.
2. Save the flow and click **Activate**. Add it to the Appointments page of your app with the standard **Flow** component in **Lightning App Builder**, or launch it from the patient record.

*Why:* **Value** is the picked slot as a date and time. In **Radio** mode it holds the single selection.
{% endstep %}
{% endstepper %}

## The settings that matter

| Setting                                                                                                                                                        | Value                                                                 | Why                                                                |
| -------------------------------------------------------------------------------------------------------------------------------------------------------------- | --------------------------------------------------------------------- | ------------------------------------------------------------------ |
| **Variant** (`variant`) with **Date Picker Variant** (`datePickerVariant`)                                                                                     | **Weekly**, **Inline**                                                | One week of columns with the date band above them.                 |
| **Type** (`type`) with **Display Next Button** (`displayNextButton`)                                                                                           | **Radio**, off                                                        | One slot per visit, and the flow footer does the **Next**.         |
| **Disabled Intervals** (`disabledIntervalsSerialized`), **Disabled Date Times** (`disabledDateTimesSerialized`), **Show Disabled Dates** (`showDisabledDates`) | lunch and weekend as intervals, eleven booked slots as date times, on | Taken time stays visible in grey instead of vanishing.             |
| **Start Time**, **End Time**, **Time Slot Duration** (`startTime`, `endTime`, `timeSlotDuration`)                                                              | `08:00`, `17:00`, `00:30`                                             | The clinic's day, in thirty minute slots, the last one at 4:30 PM. |

## Interactions

| Trigger                                                | Action                                                                                                                                                                          | What to set                                                                                                                              |
| ------------------------------------------------------ | ------------------------------------------------------------------------------------------------------------------------------------------------------------------------------- | ---------------------------------------------------------------------------------------------------------------------------------------- |
| **Change**, fires when the receptionist selects a slot | Optional: [Flow Navigation](https://docs.avonnicomponents.com/flow/component-builder/interactions-panel/flow-navigation) to move to the next screen as soon as a slot is picked | The **Next** direction. The figure keeps the standard footer instead, so the receptionist can change her mind before leaving the screen. |

## Try it

1. Start the flow and click **Next**. The week of September 14 opens with Tuesday 15 highlighted in the band, lunch and the weekend in grey, and the eleven booked slots in grey.
2. Click **Next** without picking: the field reports that a value is required and the flow stays on the screen. Click the Tuesday 15 slot at 10:30: the button turns solid blue. Click **Next**: step 3 opens and the Event is created with that start.
3. Use the next-week arrow: the week of September 21 has no grey slots on weekdays, because the fixed lists cover the 14th to the 20th only. That is the limit of the fixed version, and why the production version below reads the calendar.

## Take it further

**Read the booked slots from Salesforce.** **Disabled Date Times** accepts a mapped Date/Time collection variable, so the grey slots can come from the appointments already in the org:

1. Before the slot screen, add a **Get Records** on **Event** (or your appointment object) for the practitioner and the date range you show, storing `StartDateTime`.
2. Add a **Loop** over the result and an **Assignment** that adds `{!Loop.StartDateTime}` to a Date/Time collection variable. The tutorial [How to create Collection Variables for StartDateTime and EndDateTime](https://docs.avonnicomponents.com/flow/tutorials/components/date-time-picker/how-to-create-collection-variables-for-startdatetime-and-enddatetime) walks through those two elements.
3. In the picker, switch **Disabled Date Times** to **Mapped** and select that collection.

A disabled date time greys the slot that starts at that time. A 45 minute visit covers two thirty minute slots, so add the start of each slot the visit overlaps. The [How to Block Out Times](https://docs.avonnicomponents.com/flow/tutorials/components/date-time-picker/how-to-block-out-times) tutorial shows the same idea in a video.

The same picker exists on two other Avonni surfaces:

* [Date Time Picker](https://docs.avonnicomponents.com/dynamic-components/components/date-time-picker) for Dynamic Components, on a Lightning page, with the same **Weekly** variant, disabled intervals and disabled date times.
* [Date Time Picker](https://docs.avonnicomponents.com/lwc-components/core-components/date-time-picker) for LWC Components, as the `avonni-date-time-picker` tag in your own component. It takes `disabledDateTimes` but has no disabled intervals, so lunch and the weekend are listed slot by slot.

There is no Date/Time Picker for Experience Sites; this screen flow can run on a site instead.

Two variations worth trying:

* Turn on **Show End Time** so each button reads `10:30 AM - 11:00 AM`.
* Turn on **Hide Navigation** when the receptionist must book within the visible week only.

## Troubleshooting

| Problem                                                         | Cause                                                                                                                                                                                         | Fix                                                                                                                                                                                                     |
| --------------------------------------------------------------- | --------------------------------------------------------------------------------------------------------------------------------------------------------------------------------------------- | ------------------------------------------------------------------------------------------------------------------------------------------------------------------------------------------------------- |
| Saturday and Sunday still appear, as grey columns               | The **Weekly** variant always shows seven days. With **Show Disabled Dates** on, the disabled weekend is shown in grey.                                                                       | This is the figure's state. Turning **Show Disabled Dates** off hides the weekend columns, but also hides lunch and the booked slots instead of greying them. Choose one behavior for the whole picker. |
| Entering `Sat` or `Sun` in **Disabled Date Times** does nothing | Only values that parse as dates are kept. Day names are dropped.                                                                                                                              | Close the weekend with a row in **Disabled Intervals**, from Saturday 12:00 AM to Sunday 11:59 PM.                                                                                                      |
| The date band highlights Monday, not the day of the chosen slot | The band marks the **Default Visible Date**, not the selection.                                                                                                                               | Set **Default Visible Date** to the day you want highlighted. The week shown does not change as long as the date stays in the same week.                                                                |
| The slots read `8:00:00 AM`, with seconds                       | **Time Format Second** defaults to **Numeric** on the Flow component, and the panel offers **Numeric** or **2 Digit** only.                                                                   | There is no setting in the panel to remove the seconds as of September 2026. Contact Avonni support if the seconds are a problem for your users.                                                        |
| The last slot is 4:30 PM, not 5:00 PM                           | **End Time** is the end of the last slot.                                                                                                                                                     | Set **End Time** to `17:30` to offer a slot starting at 5:00 PM.                                                                                                                                        |
| Grey slots are shifted by a few hours for some users            | Disabled date times are stored as absolute instants and displayed in each user's time zone. A lunch entered as 12:00 PM in one time zone shows at another hour for a user in a different one. | Enter the values in the time zone of the clinic and make sure the users who book share it, or turn on **Show Time Zone** so the picker shows which zone it displays.                                    |


---

# Agent Instructions
This documentation is published with GitBook. GitBook is the documentation platform designed so that both humans and AI agents can read, navigate, and reason over technical content effectively. Learn more at gitbook.com.

## Querying This Documentation
If you need additional information that is not directly available in this page, you can query the documentation dynamically by asking a question.

Perform an HTTP GET request on the current page URL with the `ask` query parameter, and the optional `goal` query parameter:

```
GET https://docs.avonnicomponents.com/projects/use-cases/book-the-next-appointment.md?ask=<question>&goal=<endgoal>
```

`ask` is the immediate question: it should be specific, self-contained, and written in natural language.
`goal` is optional and describes the broader end goal you are ultimately trying to accomplish on behalf of the user. GitBook uses it to tailor the answer towards what is most useful for that goal.

The response will contain a direct answer to the question and relevant excerpts and sources from the documentation.

Use this mechanism when the answer is not explicitly present in the current page, you need clarification or additional context, or you want to retrieve related documentation sections.