# Open Flow Dialog

## Overview

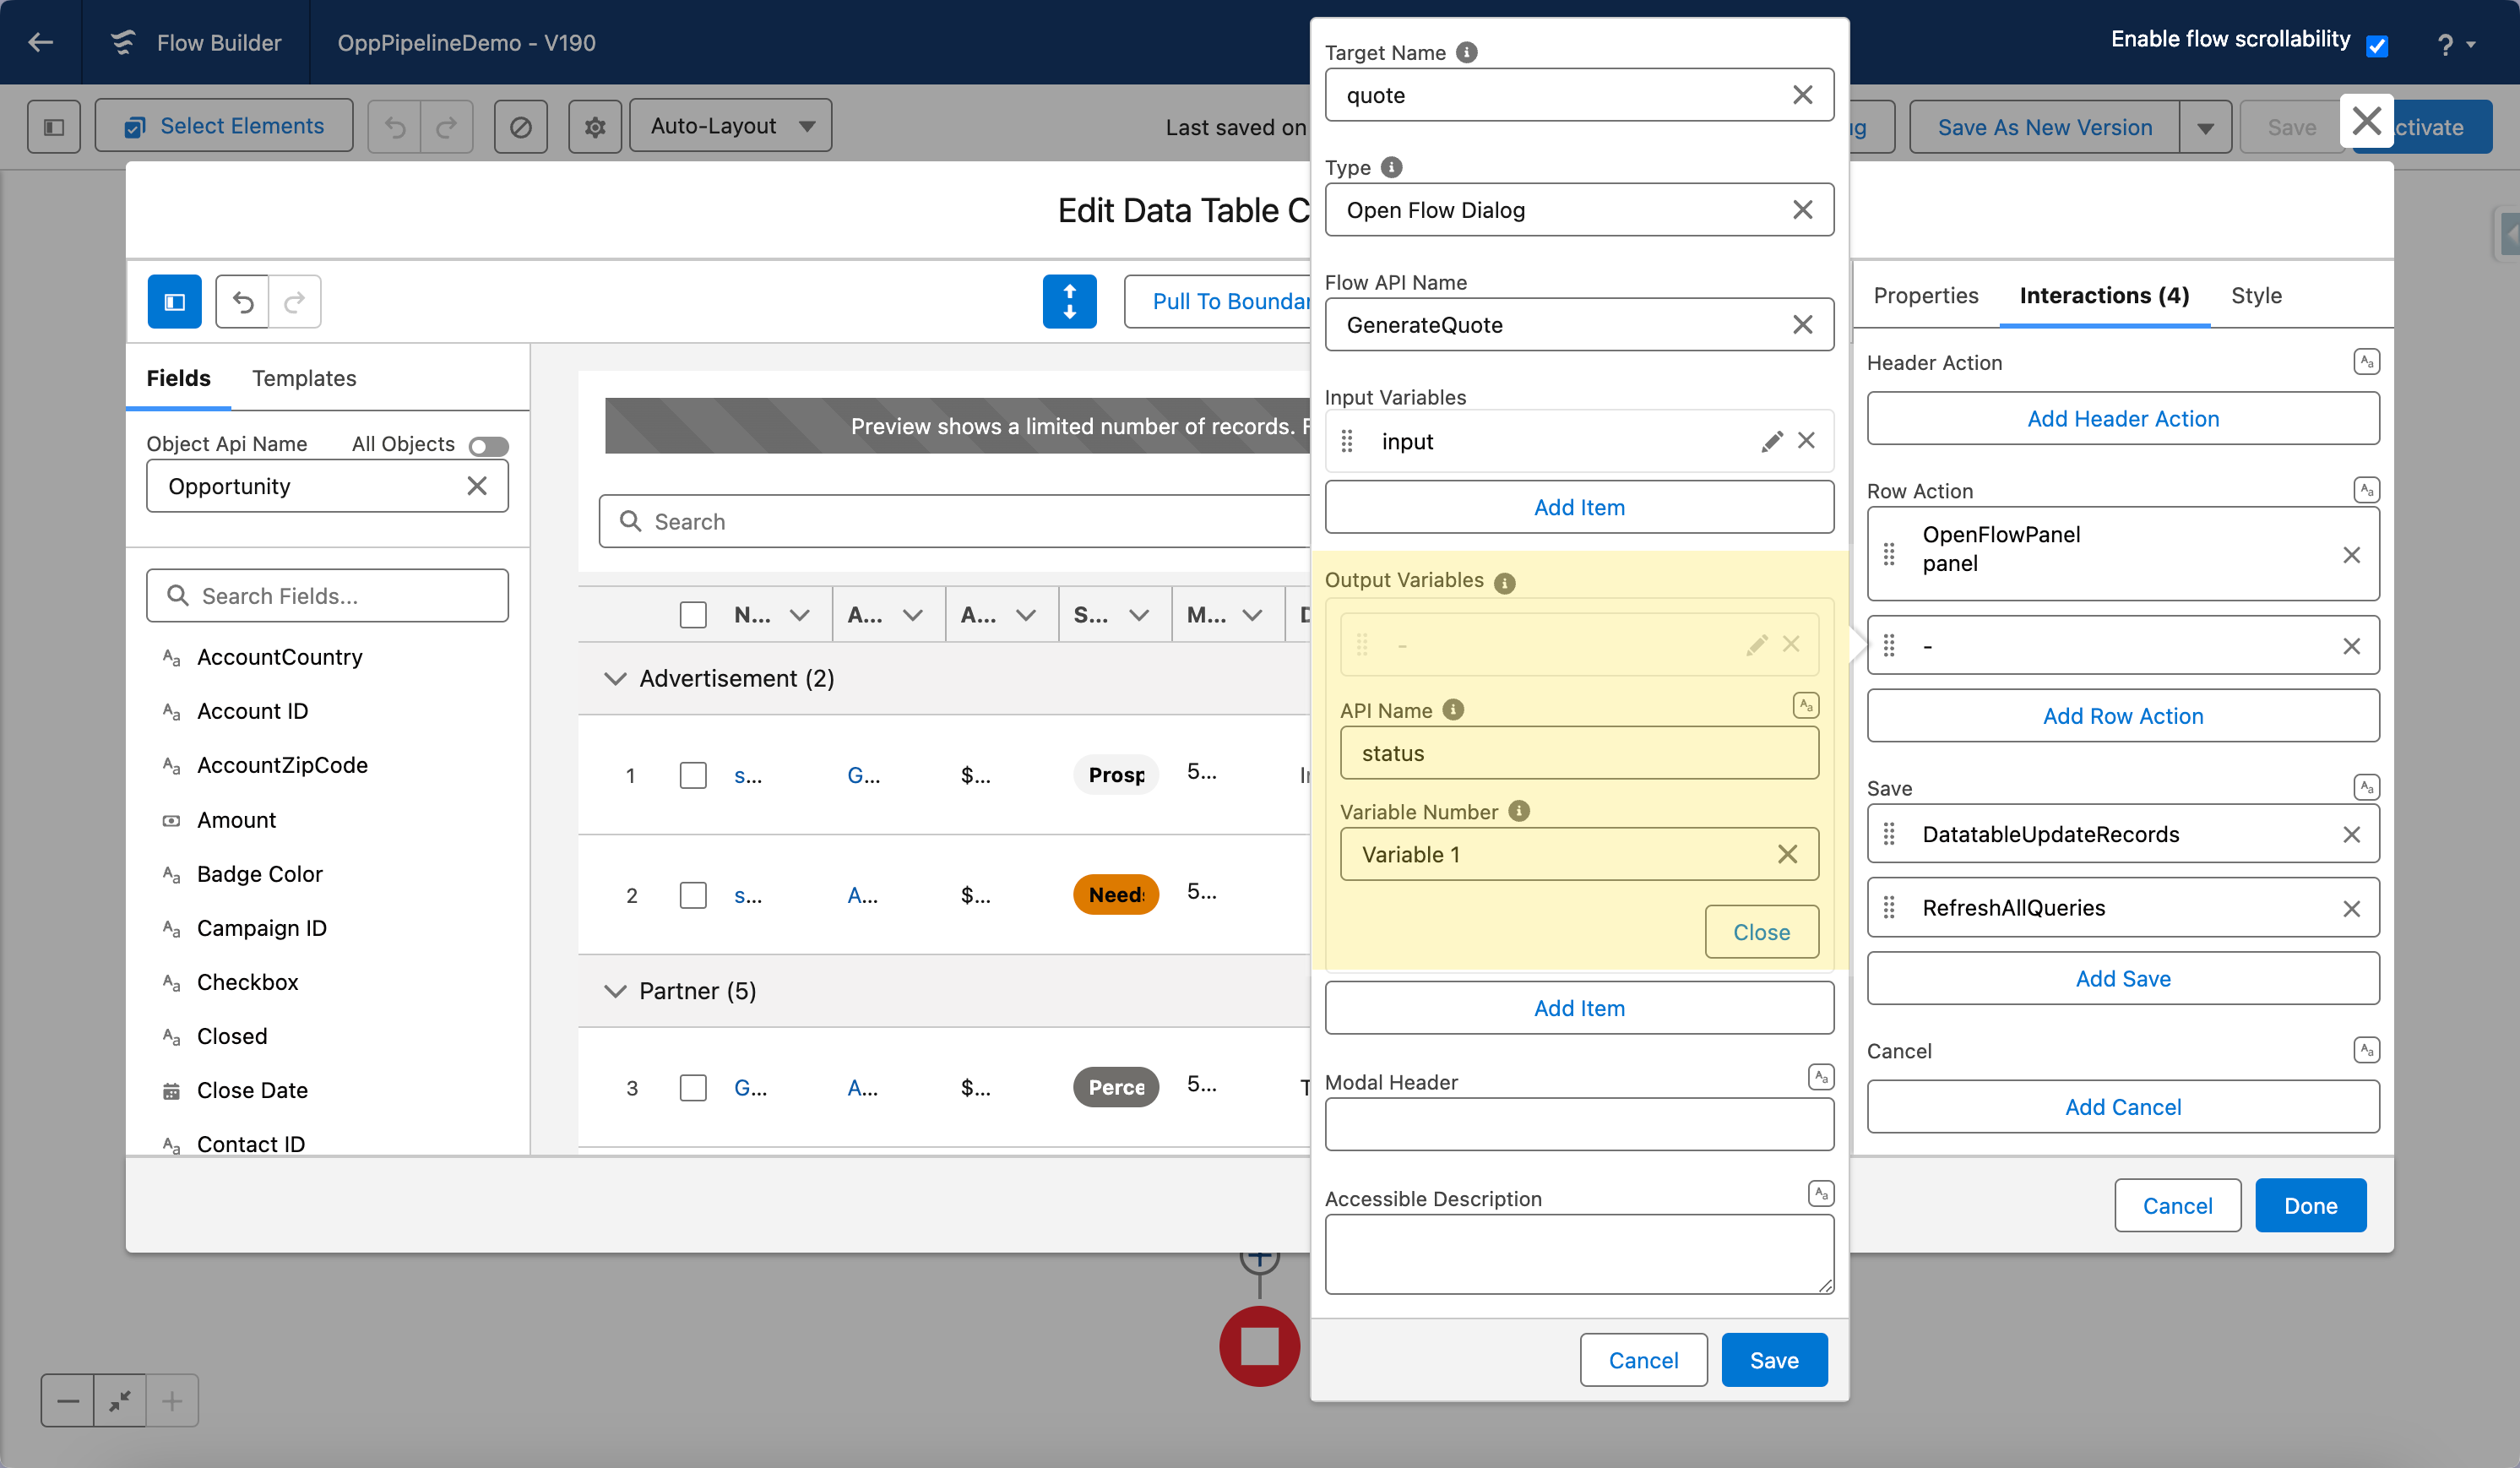
The "Open Flow Dialog" interaction lets users launch Salesforce flows directly from within a screen flow. An administrator can configure this interaction to streamline processes, guide users through complex tasks, or provide quick access to specific functionality.

***

## Tutorials

<table data-card-size="large" data-view="cards"><thead><tr><th></th><th></th><th></th><th data-hidden data-card-target data-type="content-ref"></th></tr></thead><tbody><tr><td><strong>Passing an input variable from one flow to another one</strong></td><td>Learn how to connect your Salesforce flows and pass data between them. </td><td></td><td><a href="/pages/O9NATNSrxzKgRebM4GFS">/pages/O9NATNSrxzKgRebM4GFS</a></td></tr><tr><td><strong>Enable auto-refresh for queries after the Flow Dialog ends</strong></td><td>Automatically update data after completing a flow dialog – save time and ensure users see the latest information.</td><td></td><td><a href="/pages/CXxZsCmnkuGQnLfG7mJM">/pages/CXxZsCmnkuGQnLfG7mJM</a></td></tr></tbody></table>

{% embed url="<https://www.youtube.com/watch?t=1s&v=Wa7k5I4dkbQ>" %}

***

## Specification

The "Open Flow Dialog" lets you launch a Salesforce flow from within your screen flow. Here's a breakdown of the attributes you can configure:

### **Launching the Flow**

* **Flow API Name:** Select the flow you want to launch when a user triggers this interaction.

### **Passing Data to the Launched Flow (Input Variables)**

* **Input Variable / Name:** The API name of the variable in the launched flow that you want to set.
* **Input Variable / Value:** The value you want to pass to the input variable.
* **Input Variable / Type**: The data type of the value you're passing. See the type reference below.
* **Allow Multiple Values (collection)**: Toggle this on when you need to pass a list of values rather than a single value (e.g., a list of record IDs or a record collection variable).

#### Input variable types

| Type                  | Value format        | When to use                                    |
| --------------------- | ------------------- | ---------------------------------------------- |
| **Text**              | `String`            | Text values, record IDs, comma-separated lists |
| **Number**            | `Number`            | Numeric values (integers or decimals)          |
| **Boolean**           | `Boolean`           | True/false flags                               |
| **Date**              | `Date`              | Date values without a time component           |
| **Date/Time**         | `DateTime`          | Date values with a time component              |
| **Salesforce Object** | `SObject`           | A full Salesforce record with all its fields   |
| **Custom**            | Any Apex class name | Apex-defined variables (custom Apex classes)   |

#### Passing a Salesforce record (SObject type)

Select Salesforce Object as the type to pass an entire record variable (not just an ID) to the launched flow.

When you select this type, an extra field appears: Object API Name. Enter the API name of the Salesforce object you're passing (e.g., Account, ServiceAppointment, My\_Custom\_Object\_\_c).

In the Value field, reference the record variable from your flow. If the value picker drills down into individual fields instead of letting you select the record variable itself, switch to expression mode (click the {x} icon next to the Value field) and type the variable reference directly, e.g. {!myRecordVariable}.

The target flow must have a record variable of the same object type, with Available for Input checked.

{% hint style="info" %}

#### Tip

If you only need one or two fields from a record in the target flow, it's simpler to pass the Record ID as Text and use a Get Records element in the target flow. Pass the whole record when the target flow needs many fields and you want to avoid an extra query
{% endhint %}

#### Passing Apex-defined variables (Custom type)

Select Custom as the type to pass Apex-defined variables between flows. When you select it, a text field appears below the dropdown where you enter the Apex class name.

Enter the fully qualified class name:

* **For unmanaged classes**: MyApexClass
* **For classes in a managed package**: MyNamespace.MyApexClass

The target flow must have a variable of the same Apex-defined type, with Available for Input checked.

{% hint style="warning" %}

#### Note

The Custom type passes the Apex class name directly to Salesforce's standard lightning-flow component. While the feature is designed to support Apex-defined types, behavior may vary depending on the specific structure of the Apex class. If you run into issues, contact Avonni support
{% endhint %}

### **Configuring the Dialog Box**

* **Modal Header:** Enter a title for the dialog box that will display the launched flow, or map it to a variable to make it dynamic.
* **Accessible Description:** Describe how to improve accessibility for users with screen readers.
* **Size:** Choose the dialog box size (Small, Medium, Large).

### **Handling Flow Outcomes (Output Variables)**

* **Output Variable / Name:** The API name of the variable in the launched flow that you want to capture. This **must match precisely** the API name in the launched flow.
* **Output Variable / Variable Number:** Select a number to identify this output variable. You'll use this number to access the variable in your original flow.

### **Actions After the Launched Flow**

* **On Finish:** Choose actions to happen after the launched flow finishes, such as refreshing data in the original flow or triggering a fun animation.
* **On Close:** Define an interaction that occurs when the user closes the dialog box.
* **On Error:** Specify an interaction to run if an error occurs in the launched flow.

### **Accessing Output Variables**

* You can access captured output variables in your original flow using the `flowInteractionOutputVariables` attribute of the "Open Flow Dialog" component. Refer to the variable by its assigned number.

***

## Capture Output Variables

The "Open Flow Dialog" interaction now allows you to capture output variables from the flow you launch. This means you can pass information from the launched flow back to your original screen flow, making your flows more dynamic and efficient.

<figure><img src="/files/msAUWwZWJUuRN8V099c7" alt=""><figcaption></figcaption></figure>

### **Step-by-step guide**

1. **Launch a Flow Within a Flow:** Use the "Open Flow Dialog" to embed another flow within your current screen flow. This is the flow from which you'll get data.
2. **Prepare the Launched Flow**
   * In the launched flow, create a variable to hold the information you want to pass back.
   * **Important:** Make sure this variable is marked as "Available for Output" by checking the corresponding checkbox.
3. **Configure the "Open Flow Dialog"**
   * Find your original screen flow's "Open Flow Dialog" interaction element.
   * In the interaction's properties, locate the "Output Variables" attribute.
   * Add a new output variable and enter its API Name. This **must match exactly** the API name of the variable you created in the launched flow.
   * Select a variable number from the list. This number helps you identify the variable later.
4. **Use the Captured Variable**
   * In your original flow, you can now access the captured variable. Look for it under the `flowInteractionOutputVariables` attribute of the "Open Flow Panel" component and select the chosen variable number above.
   * Use this variable in subsequent elements and logic within your flow, just like any other variable.

<figure><img src="https://www.tella.tv/api/stories/cm2mlucia000903l69zts66z5/thumb.gif?version=2024-10-24T01:09:42.706Z&#x26;resolution=1280x720&#x26;inpoint=1500" alt=""><figcaption></figcaption></figure>

### **Example**

Imagine you have a flow to collect customer information. You can use "Open Flow Dialog" to launch a flow that validates the customer's address. The address validation flow can then return a "Validation Status" output variable (e.g., "Valid" or "Invalid"). You can use this variable in your main flow to decide whether to proceed with the order or display an error message.

By capturing output variables, you can create more interconnected flows, automate more of your business processes, and improve the user experience.


---

# Agent Instructions: Querying This Documentation

If you need additional information that is not directly available in this page, you can query the documentation dynamically by asking a question.

Perform an HTTP GET request on the current page URL with the `ask` query parameter:

```
GET https://docs.avonnicomponents.com/flow/component-builder/interactions-panel/open-flow-dialog.md?ask=<question>
```

The question should be specific, self-contained, and written in natural language.
The response will contain a direct answer to the question and relevant excerpts and sources from the documentation.

Use this mechanism when the answer is not explicitly present in the current page, you need clarification or additional context, or you want to retrieve related documentation sections.
