> For the complete documentation index, see [llms.txt](https://docs.avonnicomponents.com/llms.txt). Markdown versions of documentation pages are available by appending `.md` to page URLs; this page is available as [Markdown](https://docs.avonnicomponents.com/build-with-ai.md).

# Build with AI

Build Avonni components by describing what you want in plain language: one MCP server, one skill set, four Salesforce surfaces.

{% hint style="warning" %}
🚧 **Early access.** Build with AI is rolling out gradually and improving with every release. Something unclear, missing, or broken? Tell us: your feedback directly shapes what we improve next.
{% endhint %}

You can now build with Avonni by describing what you want in plain language. An AI assistant such as Claude, Cursor, or GitHub Copilot creates real, working Avonni components: on Lightning pages, in screen flows, on Experience Sites, and in your own LWC code.

## How it works

Avonni ships two things that turn a general-purpose AI assistant into an Avonni specialist:

<table><thead><tr><th width="215"></th><th></th></tr></thead><tbody><tr><td>🧠 <strong>Avonni MCP server</strong></td><td>A hosted documentation service at <code>https://mcp.avonnicomponents.com</code>. It gives the assistant accurate, always up-to-date knowledge of every component: properties, interactions, and styling hooks, refreshed with each release. Nothing to install or run.</td></tr><tr><td>🛠️ <strong>Avonni Skills</strong></td><td>Step-by-step workflows from the public <a href="https://github.com/avonni/skills">avonni/skills</a> repository. They teach the assistant how to create and update each kind of Avonni artifact, and how to verify every detail against the MCP server before writing it.</td></tr></tbody></table>

{% hint style="success" %}
**The skills tell the assistant what to do; the MCP server tells it what's true.** Using one without the other gives worse results. Install both.
{% endhint %}

<figure><img src="https://4064884509-files.gitbook.io/~/files/v0/b/gitbook-x-prod.appspot.com/o/spaces%2FtAjHpTxL9rEknLdE4DOb%2Fuploads%2FmJLZ59eMvHlNFFiNREqL%2Fbuild-with-ai-how-it-works.png?alt=media" alt="A prompt on the left feeds an AI assistant in the centre, which produces a real Avonni component on a Lightning page, a Flow screen, an Experience Site or in LWC code. Below, the Avonni Skills and the Avonni MCP server both feed into the assistant."><figcaption><p>Your sentence goes in, a real Avonni component comes out. The Skills supply the method and the MCP server supplies the facts, which is why both are installed.</p></figcaption></figure>

## What building looks like

You describe the outcome; the assistant looks up the real components and builds. A few examples, one per surface:

> *"Create an Avonni Dynamic Component for the Account record page: a Data Table of the account's open Cases with inline editing."* — **Lightning pages**

> *"Create a screen flow where the user picks an appointment date on an Avonni Date Picker, then confirms on a summary screen."* — **Screen flows**

> *"Add an Avonni Kanban of Cases grouped by status to my customer portal page."* — **Experience Sites**

> *"Add an Avonni Data Table of Cases to my component, with sorting and inline editing."* — **Your own LWC code**

<figure><img src="https://4064884509-files.gitbook.io/~/files/v0/b/gitbook-x-prod.appspot.com/o/spaces%2FtAjHpTxL9rEknLdE4DOb%2Fuploads%2FAEO9Fvq9EoUjDu3vbMng%2Fbuild-with-ai-prompt-result.png?alt=media" alt="A Data Table titled Related Opportunities on an Account record page, with sortable Name, Stage, Amount and Close Date columns, stage badges and formatted currency."><figcaption><p>What a prompt of this kind produces: a Data Table of an account's related records, running on the Account record page, with sortable columns, stage badges and formatted currency.</p></figcaption></figure>

For complete use cases that span several artifacts (a page component plus the flow it launches, for example), the `avonni-architect` skill plans the pieces and builds them in the right order.

## Get set up in about 10 minutes

Five steps, one time. After that, you just describe what you want.

First, pick your assistant. All of them build the same thing with the same Avonni components. What changes is how much plumbing you touch:

<table><thead><tr><th width="230"></th><th width="180"></th><th></th></tr></thead><tbody><tr><td>💬 <strong>Claude desktop app</strong><br>(included with Claude Pro)</td><td>Best for non-developers</td><td>A normal desktop app. Paste any setup command into the chat and Claude runs it for you: you never open a terminal yourself.</td></tr><tr><td>⌨️ <strong>Cursor, VS Code, GitHub Copilot</strong></td><td>Best if you already use them</td><td>Skills install with one command, and the MCP server goes in as a small JSON entry in your editor config.</td></tr><tr><td>⚡ <strong>Gemini CLI</strong></td><td>Works, least tested</td><td>A chat that runs in a terminal window. Daily use is plain language like the others, but setup and troubleshooting are manual. Follow the Gemini CLI tab in each step below.</td></tr></tbody></table>

**Not a developer?** Step 1 is for everyone: without Node.js and a connected Salesforce CLI, no assistant can build, save, or deploy anything. The good news is that both install like any desktop app (download, run the installer, done). After that you never need a terminal: paste any command on this page, including `sf org login web`, into the Claude desktop app's chat, and Claude runs it for you. You just approve.

{% stepper %}
{% step %}

### Get the foundation ready

Two installs power everything. Without them, the assistant can read documentation but cannot build or save anything.

1. Install [**Node.js**](https://nodejs.org/en/download) (version 18 or later). Download, run the installer, accept the defaults.
2. Install the [**Salesforce CLI**](https://developer.salesforce.com/docs/atlas.en-us.sfdx_setup.meta/sfdx_setup/sfdx_setup_install_cli.htm), then connect it to your Salesforce org:

```bash
sf org login web
```

This opens a browser window where you log in to Salesforce as usual. That's it: the CLI now acts on your behalf.
{% endstep %}

{% step %}

### Open a project folder

The assistant works inside a folder on your computer, where it saves the files it creates. Any folder works: create an empty one ("Avonni AI" on your Desktop is fine) and open it in your tool.

* **Claude desktop app or Claude Code**: open the folder as your project.
* **Cursor, VS Code**: File, then Open Folder.
* **Gemini CLI**: install it with `npm install -g @google/gemini-cli`, then run `gemini` from inside the folder.
  {% endstep %}

{% step %}

### Install the Avonni Skills

One command installs all five skills into the open project:

```bash
npx skills add avonni/skills
```

The installer detects your assistant (Claude Code, Cursor, Gemini CLI, and more) and puts the skills in the right place.

{% tabs %}
{% tab title="Claude" %}
Run it in the terminal, or paste it into the Claude chat and ask Claude to run it for you.
{% endtab %}

{% tab title="Cursor, VS Code, Copilot" %}
Run it in your editor's integrated terminal, from the project folder you opened in step 2.
{% endtab %}

{% tab title="Gemini CLI" %}
Run it from your project folder. Inside a Gemini session, check the result with `/skills list`, and run `/skills reload` if you just added them.

If the skills do not appear, trust the folder first with `/trust` and restart the session: Gemini only loads workspace skills from trusted folders.
{% endtab %}
{% endtabs %}
{% endstep %}

{% step %}

### Connect the Avonni MCP server

The server is hosted by Avonni: nothing to install, you just point your assistant at it.

{% tabs %}
{% tab title="Claude" %}
Run this command, or paste it into the chat the same way as step 3:

```bash
claude mcp add --transport http avonni https://mcp.avonnicomponents.com
```

{% endtab %}

{% tab title="Cursor, VS Code, Copilot" %}
Add `https://mcp.avonnicomponents.com` as an MCP server in your editor's JSON config, for example `.cursor/mcp.json`.
{% endtab %}

{% tab title="Gemini CLI" %}
Add the server to your project's `.gemini/settings.json`, creating the file if needed:

```json
{
    "mcpServers": {
        "avonni": {
            "httpUrl": "https://mcp.avonnicomponents.com"
        }
    }
}
```

Restart Gemini, then run `/mcp` in the session to confirm the server is connected and its tools are listed.

Gemini's VS Code extension runs the same engine as the CLI, so these steps apply there too. It unlocks nothing extra for Avonni, so if you want Gemini, the CLI is the shorter path. This is also the path we have tested least: if anything misbehaves, we want to hear about it.
{% endtab %}
{% endtabs %}
{% endstep %}

{% step %}

### Test it, then build

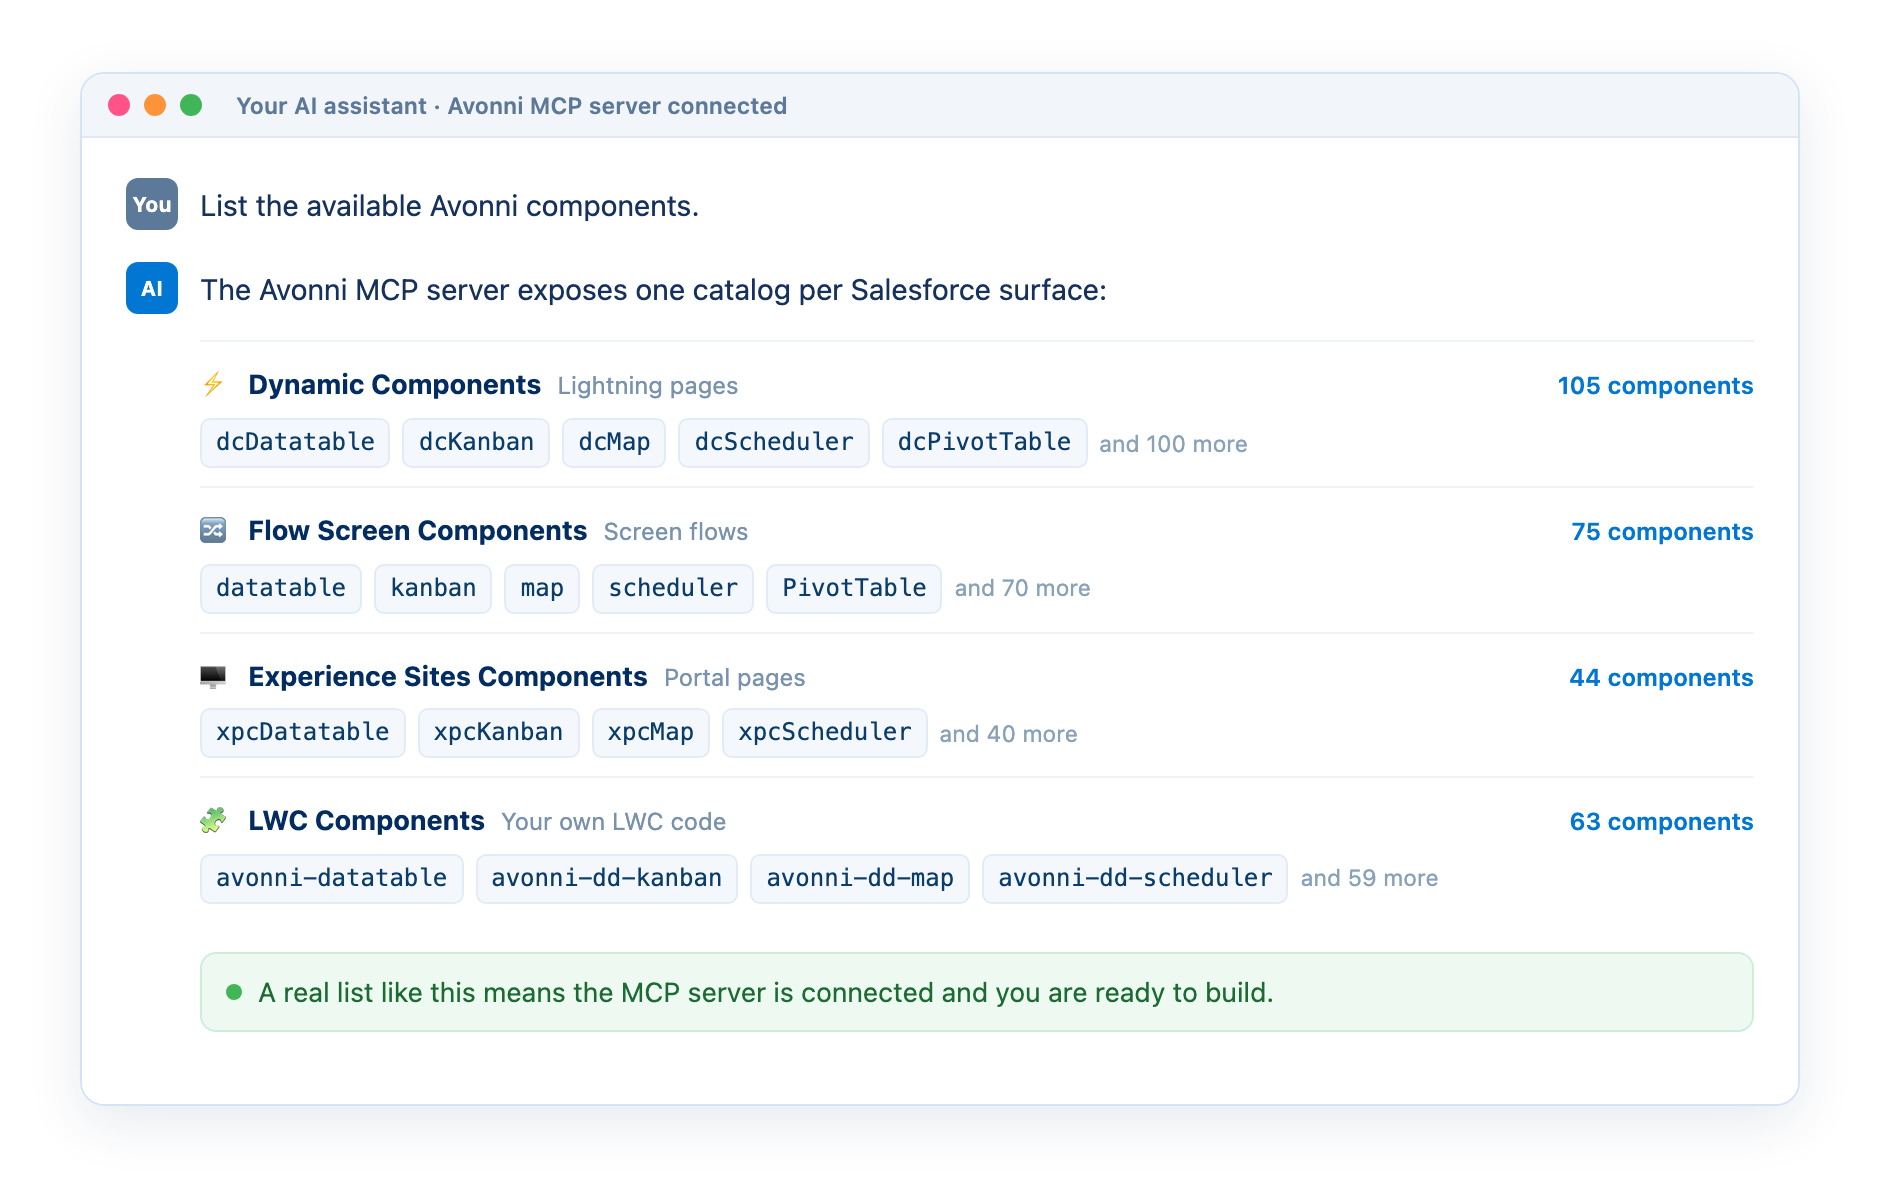
Ask your assistant: *"List the available Avonni components."*

<figure><img src="https://4064884509-files.gitbook.io/~/files/v0/b/gitbook-x-prod.appspot.com/o/spaces%2FtAjHpTxL9rEknLdE4DOb%2Fuploads%2FRr2UDf5dwe6FutV65FXM%2Fbuild-with-ai-connected.png?alt=media" alt="An assistant window showing the question List the available Avonni components, answered with four catalogs: Dynamic Components, Flow Screen Components, Experience Sites Components and LWC Components, each with example component names and a count."><figcaption><p>What a connected assistant answers: one catalog per Salesforce surface.</p></figcaption></figure>

A real component list means everything is connected. Now describe your first component, like the examples above, and watch it build.
{% endstep %}
{% endstepper %}

{% hint style="info" %}
**Nothing is deployed automatically.** The assistant writes files locally; you review them and deploy with your usual process. Your org is never touched without you.
{% endhint %}

## Why this beats AI code from scratch

An AI assistant can build almost anything. The question nobody asks in the demo is: **who maintains it afterwards?** Code generated from scratch means hundreds or thousands of lines that are now yours: yours to debug, yours to evolve, yours to re-test at every Salesforce release. Building with Avonni components flips that equation:

<table><thead><tr><th width="260"></th><th></th></tr></thead><tbody><tr><td>✍️ <strong>The assistant writes a thin layer</strong></td><td>A prompt produces configuration around finished components. A full data table is about 30 lines of configuration, not a codebase.</td></tr><tr><td>🛡️ <strong>Avonni maintains the deep layer</strong></td><td>The components carrying the complexity are packaged, tested, and updated with every release. When Salesforce changes, you update the package; your AI-written layer keeps working.</td></tr><tr><td>🧩 <strong>Everything stays consistent</strong></td><td>Pages, flows, portals, and code share one component family, so what you build with AI matches what your team built before, and what they'll build next.</td></tr></tbody></table>

**Speed on day one is what makes AI exciting. A thin, maintainable layer is what makes it sustainable. This setup gives you both.**

## Go deeper by product

Each documentation hub has a complete Build with AI section: setup details, prompt libraries, and limitations, written for that surface.

<table data-view="cards"><thead><tr><th></th><th></th><th data-hidden data-card-target data-type="content-ref"></th></tr></thead><tbody><tr><td>⚡ <strong>Dynamic Components</strong></td><td>Build components for Lightning pages from prompts.</td><td><a href="https://docs.avonnicomponents.com/dynamic-components/build-with-ai/overview">https://docs.avonnicomponents.com/dynamic-components/build-with-ai/overview</a></td></tr><tr><td>🔀 <strong>Flow Screen Components</strong></td><td>Build screen flows around Avonni components from prompts.</td><td><a href="https://docs.avonnicomponents.com/flow/build-with-ai/overview">https://docs.avonnicomponents.com/flow/build-with-ai/overview</a></td></tr><tr><td>🖥️ <strong>Experience Sites Components</strong></td><td>Add and configure Avonni components on portal pages from prompts.</td><td><a href="https://docs.avonnicomponents.com/experience-cloud/build-with-ai/overview">https://docs.avonnicomponents.com/experience-cloud/build-with-ai/overview</a></td></tr><tr><td>🧩 <strong>LWC Components</strong></td><td>Write avonni-* markup and code in your own LWCs from prompts.</td><td><a href="https://docs.avonnicomponents.com/lwc-components/build-with-ai/overview">https://docs.avonnicomponents.com/lwc-components/build-with-ai/overview</a></td></tr></tbody></table>

## For AI agents

This documentation is itself machine-readable: append `.md` to any page URL for clean Markdown, read the full index at [`llms.txt`](https://docs.avonnicomponents.com/llms.txt) (or the whole corpus at [`llms-full.txt`](https://docs.avonnicomponents.com/llms-full.txt)), and ask any page a question with `GET <page>.md?ask=<question>`. The structured component catalog lives on the MCP server at `https://mcp.avonnicomponents.com`.


---

# Agent Instructions
This documentation is published with GitBook. GitBook is the documentation platform designed so that both humans and AI agents can read, navigate, and reason over technical content effectively. Learn more at gitbook.com.

## Querying This Documentation
If you need additional information that is not directly available in this page, you can query the documentation dynamically by asking a question.

Perform an HTTP GET request on the current page URL with the `ask` query parameter, and the optional `goal` query parameter:

```
GET https://docs.avonnicomponents.com/build-with-ai.md?ask=<question>&goal=<endgoal>
```

`ask` is the immediate question: it should be specific, self-contained, and written in natural language.
`goal` is optional and describes the broader end goal you are ultimately trying to accomplish on behalf of the user. GitBook uses it to tailor the answer towards what is most useful for that goal.

The response will contain a direct answer to the question and relevant excerpts and sources from the documentation.

Use this mechanism when the answer is not explicitly present in the current page, you need clarification or additional context, or you want to retrieve related documentation sections.